
Jim’s Tech Talk
By Jim Langley
Thanks everyone for the interesting, helpful and even funny feedback on last week’s story about finding and shutting up a hard-to-find ticking noise. “Jack’s” comment was the one that made me smile. He wrote, “Once I noticed a click every pedal revolution over multiple rides but could not replicate it in the stand. It was my knee! What a relief my bike didn’t need maintenance.”
Ha! Just like a roadie to only care about the bike and not give a second thought to fixing the knee!
The blue ribbon for most helpful comment goes to regular contributor Kerry Irons who shared his mechanical expertise listing over 25 common noises and also how to fix them. Thank you, Kerry. Noises are among the most frustrating things and your tips are sure to help readers.
If you missed the article or the helpful comments, it’s all here: Finding and Fixing a Ticking Noise.
Seatpost and Saddle Noise-Proofing
This week, I’m going to add some details on one of Kerry’s tips, because it’s a good one for fixing noises and also for maintaining your road bike(s).
His tip is:
“Clicks related to pedaling can come from the seatpost and saddle. For this, grease the post, seatpost clamp, seatpost bolts, saddle rails, and add some oil to where the rails go into the saddle body.”
Removing & Lubing the Seatpost & Binder Bolt/Clamp
At least yearly seatposts should be removed and fresh lube applied. This prevents noises and more importantly it ensures the post doesn’t get stuck in the frame. This can be caused by corrosion and/or a chemical reaction created by dissimilar materials. And, when a seatpost gets frozen in a frame, it can be a nightmare getting them out.
Mark the Seat Height First
Before, loosening or removing a post, put a wrap of electrical tape around it right at the frame so that you can reinsert it at exactly the same height. This way you won’t have to find your proper seat height again.
Alternatively, you can mark the post with an indelible marker, but it may come off if lube gets on it, so tape is more reliable. Do NOT scratch a line in the post to mark it! That can cause a stress riser and cause the post to break eventually.
Loosen and Remove the Seat and Post as a Unit
With the seatpost marked for height, loosen the bolt in the frame that’s keeping the seatpost tight. Don’t remove the bolt. Just make sure it’s loose.
Now, with your dominant foot, push down on the pedal until it reaches 6 o’clock and as you apply force on the pedal, hold the saddle with both hands and gently rock it and see if the seat and post come out of the frame. Be careful. If it comes out all the way quickly, the bike might fall over before you can catch it. Don’t let that happen.
Try to avoid twisting the seatpost because some frames scratch seatposts and scratching can lead to breaks in aluminum and carbon. (This isn’t an issue with steel seatposts in steel frames.)
Wedge-type Designs
If the seatpost doesn’t come out or still feels tight, it might be that the bolt that holds the post tight has a wedge design. With these, there’s another piece (sometimes hidden) that needs to be jarred loose before the post will budge. Sometimes, there are a few pieces that only go together one way – another reason not to fully remove the bolt.
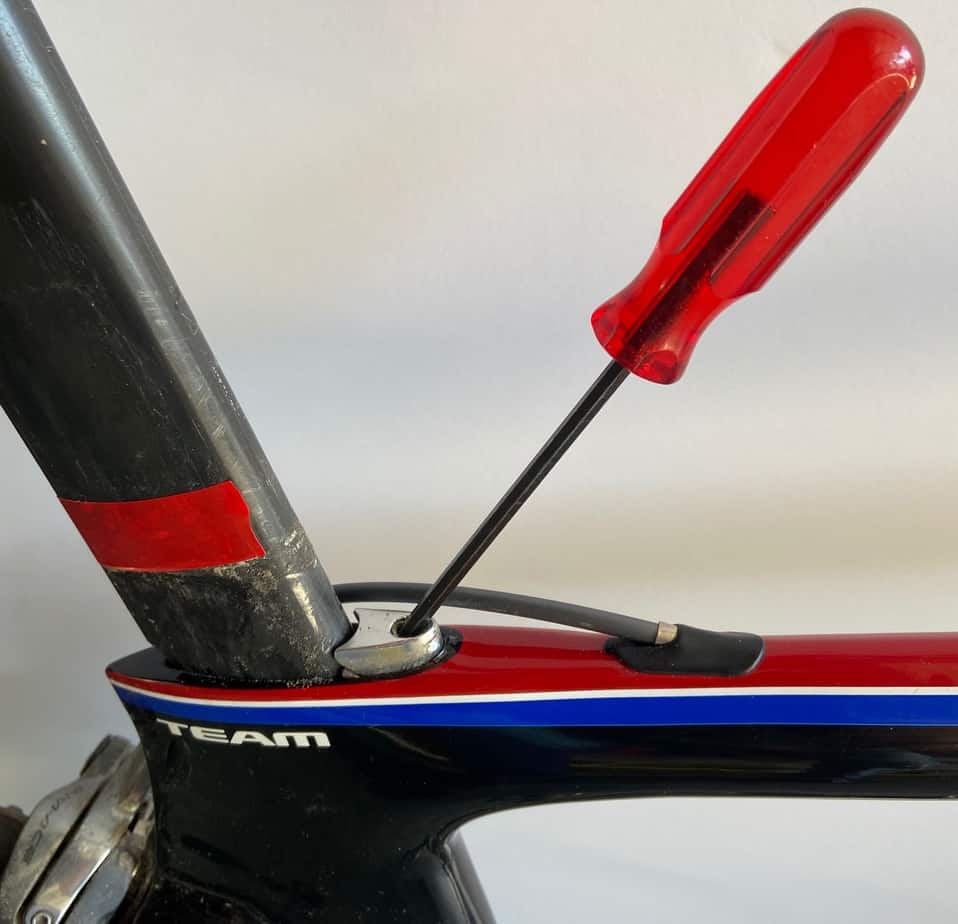
My Cervelo S5 has this type of arrangement (photo). I first have to loosen the bolt and then wiggle the bolt to get the wedge to move. It also helps to pull a little. Then the post will come out. The wedge piece is made up of other pieces and complicated.
Do Your Research
If you’re dealing with a seatpost bolt/clamping design you don’t understand, visit the bicycle maker’s website and look for the instructions. Some are not very intuitive and 15 minutes of research will save you frustration and possibly damaging the bolt, clamp, seatpost or even the frame.
Don’t Lose the Bolt/Wedge Inside the Frame
Another issue with some of these bolts and wedge clamps is having them fall down inside the frame as soon as you pull out the seatpost. Doh! That’s why it’s best to only loosen the bolt and not remove it entirely. With luck if it falls inside you can invert the bike and shake it out.
Lubing the Bolt and Clamp
Once the seatpost is removed, the hard work is done. Put the seat/seatpost assembly to the side for a minute and work on the bolt, clamp and wedge (if there is one) first.
Clean these hard-working parts and inspect them for any signs of wear and tear. The bolt threads should be in perfect condition. The part the bolt threads into should be, too. And the clamp or wedge should also be like-new. All the parts should then be lubed with grease or anti-seize.
Lubing the Seatpost
Now attend to the seatpost. Start by wiping off any existing lube and inspect the post. Hopefully, it’ll be clean, smooth and corrosion-free.
If the seatpost is made of aluminum and it’s been in the frame for some time, it might show some light corrosion or tarnishing. Clean this off with fine emery cloth or steel wool or a wire brush. But, keep in mind that you’re only removing the corrosion, NOT sanding into the seatpost itself. If you take much material off the post, it’s possible to ruin the fit. So work carefully.
The best way to lube the seatpost is to put the lube inside the frame. If you put it on the seatpost, most of the lube will be wiped off as you push the post into the frame.
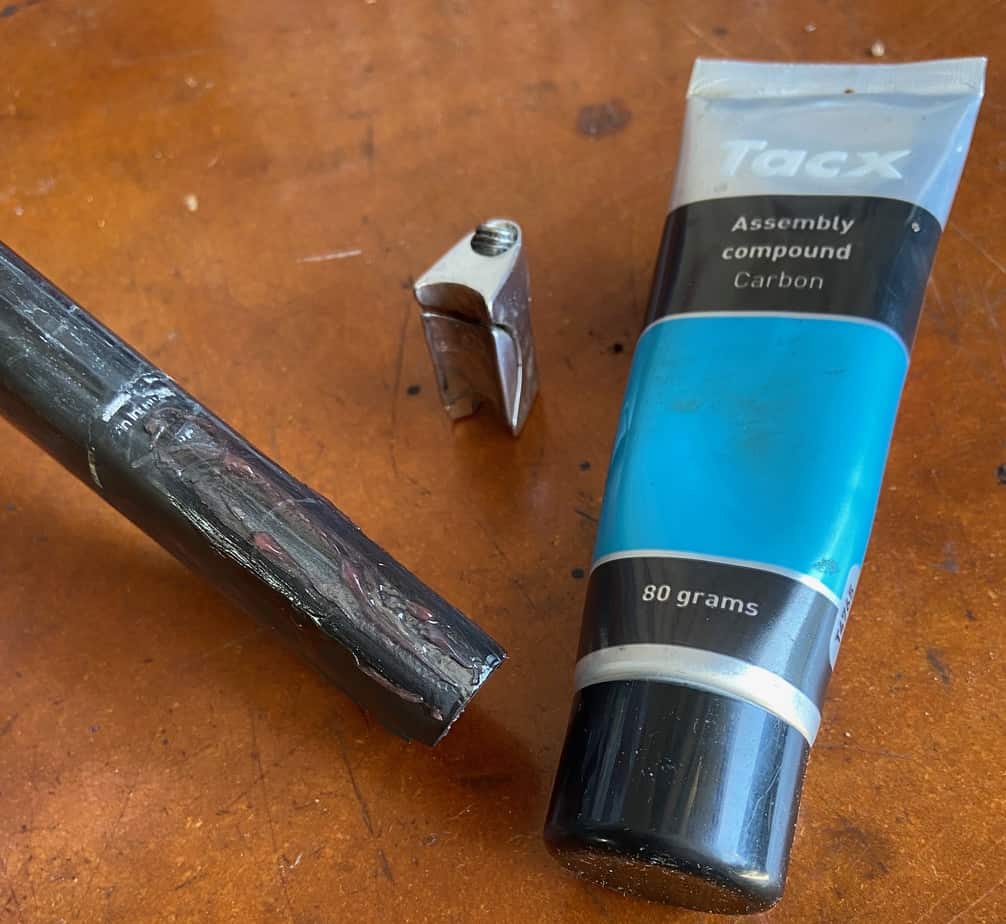
Lubes
For carbon seatposts, use what’s called carbon assembly paste. This relatively new lube, has grit in it so it both lubes between the frame and post and improves grip between the parts, too. I put it on the post for the photo in the hopes some of the grit might show.
For metal seatposts use grease or anti-seize. Grease is the usual choice. But, if you’ve ever had a seatpost get stuck inside, anti-seize is a better choice. It’s thicker than grease and lasts longer. In fact, it’s a pain to work with because it’s so sticky it tends to get on everything.
Lubricating the Saddle Clamp and Rails
As Kerry pointed out, noises can come from the interfaces between the saddle rails and the clamps that hold them on the seatpost. And from the parts that make up the clamp, too.
Now that you have the seatpost out of the frame, it’s easier to address these issues than when it’s in place on the bike. To do it, simply rest the seat on its top and apply a light oil to the saddle rails and clamping parts.
Because the saddle’s upside down, any drips will land on the bottom of the seat and be easy to clean up. If you have a nice leather saddle you don’t want lube on, put a rag down first to catch any drips.
Once the lube is in there, lift the seat and post assembly and hold it at different angles so that the lube has a chance to find its way in between the parts. Give it some time to get in there. Then wipe off any excess lube.
For Stubborn Seat Clamp Noises
If you know a noise was coming from the saddle clamp and oiling it doesn’t stop the noise, you can wait and see if the lube will make its way in between the parts. Sometimes that happens if you give it a chance.
If not, you’ll need to loosen the bolts that hold the seat tight in the clamp. That allows the lube to make its way deep inside and usually that’ll cure noises once and for all.
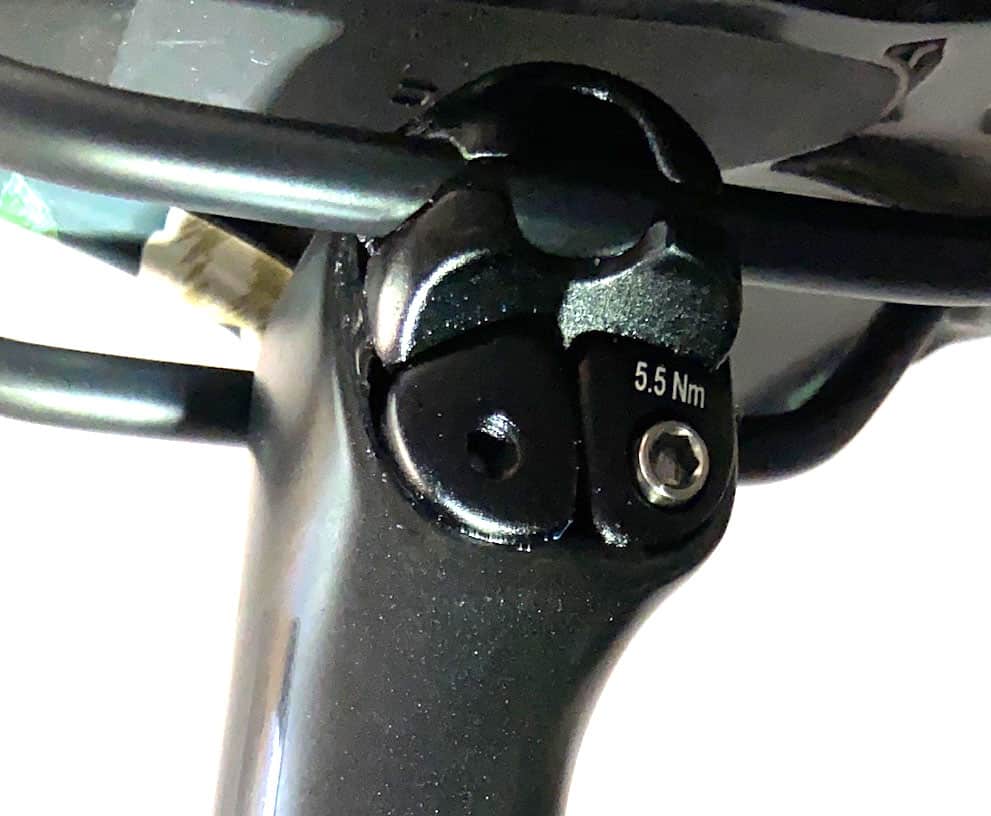
However, if even that doesn’t work, you’ll need to take the whole assembly apart and lube each individual piece. If it comes to that, be sure you know how your seatpost is assembled BEFORE taking it apart. Some are complicated, only go together correctly one way and are challenging to mount the seat to (see photo).
Also, keep in mind that you will need to put your seat back where you had it. Like you marked the seatpost position, a helpful trick is to mark the saddle rails so that it’s easy to put it where it was fore/aft in the clamp. Then you only need to find the same saddle angle you had before, which for most roadies is level to only a few degrees off.
Then be sure to properly tighten the saddle in the clamp. Keep reading for torquing tips.
Reassembly and Tightening
To finish the job, the lubed bolt and clamp or wedge is installed and then the seatpost and seat assembly is put into the lubed frame at the right height.
Before tightening the bolt, double check that the clamping mechanism is assembled correctly. If not, it won’t work correctly and hold the seatpost tight. Also, look closely for a torque specification, which is often printed somewhere on the clamp or bolt. Usually it’s in the 5 – 7Nm range, but you don’t want to overtighten so try to find it on the part or online.
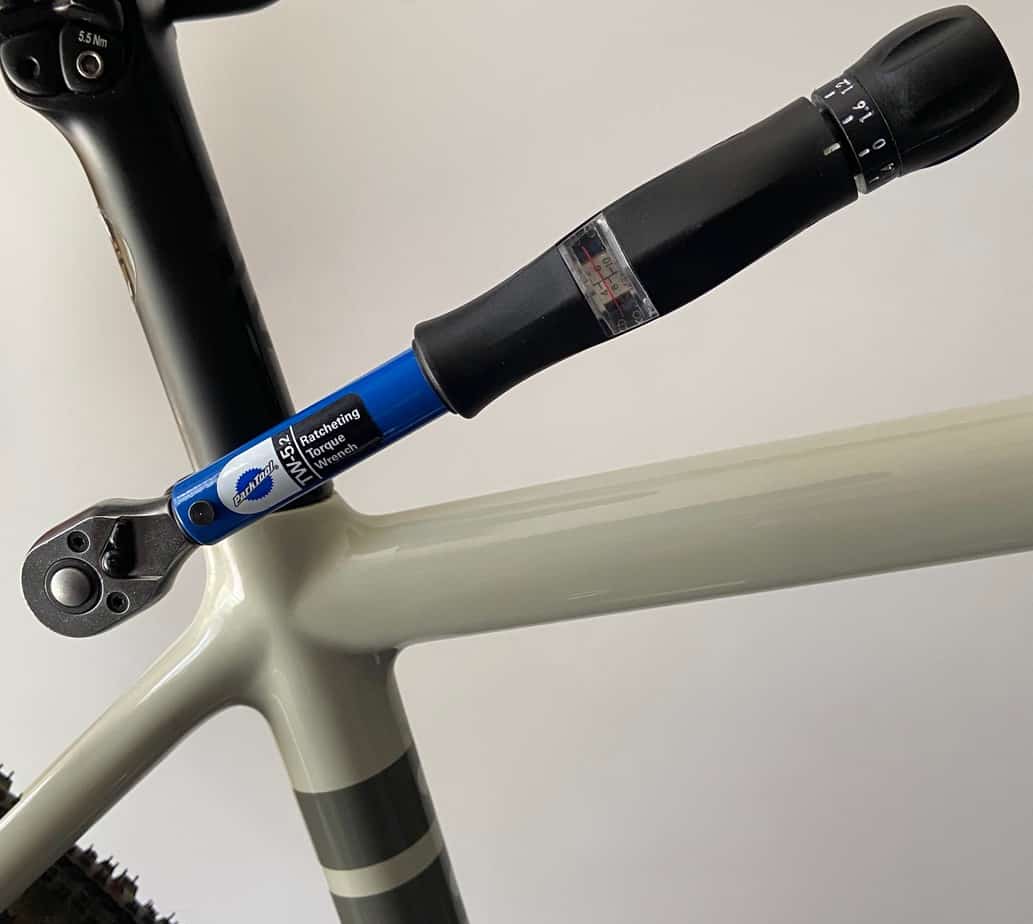
It’s easy to overtighten and break carbon and certain aluminum parts, so check final torque with a torque wrench like those by Park Tool, which I use and reviewed here: Park Tool Torque Wrenches, Sockets & Drivers.
After tightening and torquing things and before riding them, it’s important to test them for tightness by hand. Because it’s always possible that something’s a bit off and you don’t want to find out the hard way and crash on your maiden voyage.
For saddles and seatposts, the test I use is to hold the saddle with two hands and try to move it, left and right and up and down. It has to support most of your body weight so it shouldn’t budge under hand pressure. If it moves, figure out why and fix the issue and retighten everything.
The last steps are cleaning off any excess lube and going for a test ride and enjoying the knowledge that your seatpost and all its related bits and pieces are lubed, happy and noise-free. Good job!
Again, kudos to Kerry for all the tips!
Ride total: 9,611
Excellent article. I had a noise in my seatpost last year and it took me a long while to figure out where it was coming from and the carbon paste resolved the issue.
Eugene
All this talk about carbon, aluminum and steel. What about those of us with titanium seatposts in titanium frames? 😉
I have read that titanium has a tendency to “cold-weld” to other titanium parts, and that the best prevention is a copper-based anti-sieze compound. Over the last 18 years or so, I have not had any problems with seizures (or noises) related to the seatpost-frame interface.
Hi Steve, the reason I didn’t mention titanium seatposts is because they’re not very common and they are very corrosion resistant. But, you’re right, the correct choice for lubing them is anti-seize. In my shop I use Finish-Line Ti Prep and it does have a copper tint to it. Here’s a link: https://amzn.to/2RJbtFV
Thanks, Steve!
Jim
I hope you are staying safe in our new reality!
Thanks fo the link! I got one of those little pouches of the lube with my bike (18 years ago!), and I still have enough for another coating or two.
🙂
Agree with Steve W. Even with my aluminum seatpost in my titanium frame, I always use anti-seize!
Wish I’d had this a couple of years ago. Tried everything I could possibly think of to get rid of that persistent “click” including re-applying assembly compound and tightening seat post clamp to spec with a torque wrench. Eventually I replaced the press fit bottom bracket because that “had” to be it. It wasn’t. My solution in the end was replacing the original seat post clamp.
I once had a regular rhythmic click when out of the saddle. Since it went away when seated I figured it had to be the saddle, clamp or seatpost moving with some frame flex. I did a version of the great things recommended here but on my next ride I still had clicking when out of the saddle. Annoyed and starting to get warm I tugged at the zipper pull on my new club kit wind vest….the noise stopped instantly. With some experimenting I found that if I had the vest zipped almost all the way up the metal pull bounced against the zipper teeth when my upper body was moving more because I was standing. .The moral of the story for me is that if you convince yourself a noise is coming from a specific place on your bike you might miss something else.
That’s a good story and tip, Jeff. Thanks for sharing.
Jim
I have had a persistent problem with the seat post of my Cannondale Slate creaking. The resolution seems to be assembly paste (even though alu/alu frame/post), tightening clamp very tight, and when the creak returns, loosening clamp, moving post up and down a bit then retightening. Tried grease, boot over clamp to keep out dirt, etc. previously. Not a perfect solution but seems as good as I can figure out. Magic incantations next?
2022 c64. Creaking when seated and peddling. When I got bike I loosen wedge screw too much and it fell in. But was able to retrieve however was not 100 % sure on orientation with wedge. Pretty sure creaking is with post since it’s totally silent when our of the seat. Thinking wedge may be wrongly installed. Thoughts ? Wish there was a video about this