
Jim’s Tech Talk
By Jim Langley
Thanks for your great comments on last week’s Tech Talk about bicycle repair stands that lift bikes for you with a counterweight or electric motor-driven system. These are a relatively new type of repair stand. While most of them are significantly more expensive than repair stands without a lift-assist feature, they may be worth the investment if you work on heavier bikes, such as ebikes. Or if for some reason, it’s difficult for you to lift bikes.
I think we’ll see more of these repair stands and perhaps some with simpler lifting systems. Seems to me one could be made with a hand cranked gear for raising and lowering bikes, or maybe a hydraulic system?
As I was writing this a new lift-assist stand came to my attention, Topeak’s PREPSTAND eUP Pro, which is actually a portable stand and it also has a pressurized cartridge that does the lifting! Learn more: https://www.topeak.com/us/en/product/1513-PREPSTAND-eUP-PRO
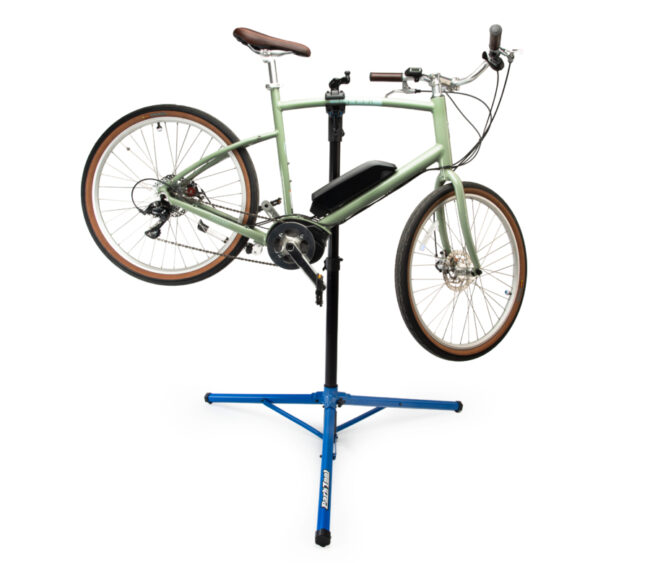
Most Stands Use Clamps to Hold Bikes
All the current assist repair stands and the most popular standard bike stands too, hold bicycles off the ground with a clamp. That’s because having the bike held in the air by a clamp is the most convenient way to work on it. If you hold the bike by its fork as “race-style” stands do, the front wheel isn’t on the bike to true or adjust the front brake. If you hang a bike, it swings around when you work on it.
Clamp designs vary by make and model but they’re all designed to hold the full weight of the bike (be sure you are using a repair stand that can handle your heaviest bikes). Below are two photos, one is of my favorite clamp and the second is of it in use on a repair stand. The repair stand is Park Tool’s PRS-26 Team Issue Repair Stand (this is a standard repair stand, not a lift-assist; Park’s lifting stand uses the same clamp). In this Park Tool video, you can see how the clamps are used: https://youtu.be/1a3Bqk1fko0?si=9ud27mA7nOM45Nsv.

How to Safely Clamp Your Bikes
If you’re new to using a repair stand it’s important to follow some safety rules when clamping bikes in the repair stand. That’s what we’re going to cover today. If you make a mistake clamping your bike you could damage it and/or yourself.
Basics
- To be sure to use it safely, learn how your stand and clamp function by reading the instructions with your repair stand. If instructions didn’t come with the stand they may be on the company website. If you can’t find instructions, leave a comment here or email me and if I can explain I will.
- It’s important to understand that all bicycle frames and components, whether they’re made of metal or carbon fiber, can be damaged by misuse of repair stand clamps. Don’t think that any material is safe if the stand is used incorrectly or if you make a mistake.
- Having said that, it’s also true that if a quality clamp is used correctly, it’s perfectly safe to hold metal and carbon bikes in repair stands by the clamp. Someone may tell you that carbon bikes can’t be clamped in repair stands but that’s not true, it’s a myth.
Checks to Make
- Be sure the repair stand is set up properly otherwise some types might tip over. For portable stands, be sure the legs are fully extended or open and the surface you’re putting the stand on will prevent it from falling over – level hard ground is best.
- Repair stands usually have protruding arms with the clamp on the end of the arm that holds the bike. That’s where all the weight will be focused. So make sure the arm is positioned so that the stand’s legs and feet can hold the weight and prevent the stand falling over.
- Some of these arms on repair stands are held in the stand in such a way that the arm may fall out of the stand and the bike along with it. That’s why it’s important to understand how your repair stand works so that you can check that the arm is fully inserted in the repair stand and can’t fall out.
Putting Bikes in the Clamp the Most Common Way: By Holding the Seatpost
- For most bikes, the best way to clamp them in the repair stand is by clamping the bike’s seatpost. This is a good balance point for the bike in the stand. Also, the seatpost is designed to support a rider’s weight so it can certainly hold the weight of the bike. If it’s a “dropper” seatpost, hold the base of the post.
- The full clamp needs to fit on the seatpost. If it won’t fit, raise the seatpost to get more to hold onto. Mark it first so it’s easy to put the seatpost back to the correct height again after working on the bike.
- Be sure that the seatpost is fully tightened in the bicycle! If it’s loose the bike can drop out of the stand leaving only the seatpost behind in the repair stand.
- The best repair stand clamps are adjustable to hold different diameter and shape seatposts; even wide aero models (see Park Tool’s video https://youtu.be/1a3Bqk1fko0?si=9ud27mA7nOM45Nsv).
Putting Bikes in the Clamp When You Can’t Use the Seatpost
- If you can’t clamp the bike by its seatpost, you can usually clamp it by the frame, but you have to be especially careful if you choose to do that. Because:
a: frame tubes are hollow
b: frame tubes of steel, aluminum, titanium and carbon can be dented or crushed/cracked if not clamped carefully
c: the clamp may scratch the paint and/or bike’s finish
- Clean soft-jaw clamps are least likely to mar decals or scratch paint jobs. If grit or grime got embedded in the clamp jaws, all bets are off. You can get replacement jaws for most repair stands.
- You can wrap plastic or cloth around frame tubes to protect the frame from scratches but beware wrinkles. Wrinkles in a rag can create a bump in the jaw and when you close the clamp, it could push into and dent or damage the frame tube.
Things to Know When Clamping by the Frame
- Don’t ever close the clamp on a frame tube without checking if the clamp is adjusted to fit safely (keep reading).
- Also, never close a clamp on a frame tube without making 100% certain that there’s nothing in the way of the clamp! For example, cable guides, hydraulic lines, wires, bottle bosses and so on. The only thing that should be under the clamp is the frame. If you close it on anything else you could crush something important and damage the frame tube.
- Pay attention to the shape of the tube you’re planning to clamp. Round tubes are best but lots of carbon frames aren’t round. You can still clamp them if your clamp has soft rubber jaws that flex to fit and your clamp has sufficient opening adjustment. But, always set the jaw adjustment too loose at first and fine tune the adjustment so that it’s just tight enough to hold the bike in place.
- Holding bikes by a frame tube is fine for most basic maintenance and repairs. However, if you need to apply lots of force or pound on your bike, such as to remove a frozen part or knock out a bottom bracket, you should remove the bike from the stand and work on it on the ground. That way the force won’t impact the point where the frame is held in the clamp.
That’s a lot of tips. If you decide to get a clamp-style lift-assist repair stand or standard stand I hope they help prevent any problems when clamping your bikes.
Jim Langley is RBR’s Technical Editor. A pro mechanic & cycling writer for more than 40 years, he’s the author of Your Home Bicycle Workshop in the RBR eBookstore. Tune in to Jim’s popular YouTube channel for wheel building & bike repair how-to’s. Jim’s also known for his cycling streak that ended in February 2022 with a total of 10,269 consecutive daily rides (28 years, 1 month and 11 days of never missing a ride). Click to read Jim’s full bio.
Good article, but I clamp my 2022 Trek Madone using a SILCA Hirobel in conjunction with my Park PCS-10.3 work stand. This spreads the load and uses polyurethane type mounts under the frame junction points to secure the bike with rubber straps. With this method there is absolutely no chance of a collapsed top tube or seat tube, period. It is pricey but one of the best tools I have bought for my bike in a while.
I agree with Don. The SILICA Hirobel is a game-changer!
Thanks for mentioning SILCA’s Hirobel Don, glad you like it. Your Park repair stand came with a clamp specifically designed to protect and safeguard all bicycles and that includes carbon bikes – so another device to do it is not needed.
But then some people like to wear a belt and suspenders at the same time 😉 so I can understand. For anyone interested here’s the Hirobel https://silca.cc/products/hirobel-clamp
Thanks!
Jim
Jim,
Although the Park stand is a great tool, the Park clamp pads leave a lot on the table. They are harder than they could be, and the width of the channel is a bit narrow for the wider seat posts of Aero bikes today. So, yes, in my case I’ll choose to wear the belt and suspenders to keep my carbon seat post from micro cracks or scratches.
Thanks for the reply – Love your newsletter and look forward to seeing it come into my inbox on Thursdays. Keep up the great information.
Thanks for explaining Don. It sounds like you might have an older Park stand before they went to their micro adjust clamps. These clamps (like the one shown in the story above) have been on the stands for years now and they fit aero posts and have soft jaws. The Hirobel makes sense if you have a clamp that doesn’t fit your bike.
Thanks!
Jim
The Hirobel device distributed by Silca can be clamped in any bike repair stand and then used to support the bike by its top tube resting on top of two soft blocks and secured in place by two silicon straps. No clamping of the bike frame with the use of this device and the support blocks are movable for different length top tubes.
I find that if you open the micro adjust before closing the clamp and then turn it down until just snug there is no more pressure on the top tube than if it were being held in your hands.
Thanks for the great tip John, appreciate it!
Jim
If there’s not enough room to use the seat post, what about using the seat tube on the theory that there is a lot of the seat post inside the seat tube to reinforce it?