
Jim’s Tech Talk
By Jim Langley
Let’s start with why last week’s Tech Talk was for beginners traveling with bikes with disc brakes (here’s that article) and then we’ll share an additional tip.
It seems important to explain the “why,” because there were multiple anti disc-brake comments to last week’s article. It’s completely understandable why disc brakes – especially hydraulic discs aren’t popular with roadies – and several of you elegantly made the case in your remarks – thank you. But there’s an excellent reason for us (“us” as in we editors of RBR and you readers who ride disc brake road bikes) to provide help with disc brakes anyway.
That reason is because many (maybe most) new road riders may not have a choice of purchasing a rim brake road bike when they visit their local shops. Since most of the major bike brands are only offering bikes with discs. If these buyers are brand new to cycling, they might never even realize that there’s anything out there except disc brakes. So the chances are high that a new road rider’s new bike will be one with hydraulic disc brakes.
Part of our mission at RoadBikeRider is to help new cyclists get the most out of road riding. And as components on road bikes have changed, we’ve always helped with the new gear too like hydraulic disc brakes. If we didn’t we’d be ignoring issues a lot of roadies are and will be experiencing.
One more hydraulic disc brake issue when traveling with your bike
This wasn’t included in last week’s tips because with a little luck, you might not experience it. But luck goes both ways and this tip will help if yours goes badly.
The problem you can run into removing and reinstalling wheels when traveling with bikes that have hydraulic disc brakes is rubbing. What happens usually is that something changes slightly and the rotor starts rubbing against a brake pad when the wheel spins. If you lift and hold up the front or rear wheel and spin it and it stops spinning abruptly, the rotor is probably rubbing.
You might hear the rotor make a little brushing sound as it rubs against the rotor when it’s spinning. Or it can make a little squeaking noise if you move the bike slightly like when leaning it against a wall, etc.
This rubbing can be frustrating if you notice it. If it’s barely noticeable, you probably won’t feel it when you’re riding, but you probably want to fix it just to ensure you aren’t wasting energy riding. And if it’s making noise, that can drive you crazy.
Two ways to fix rubbing disc brakes
There are 2 ways to fix it. With both, the idea is to center the disc brake caliper over the rotor. The calipers are the parts attached to the fork in front and frame on the rear. The rotors are the parts attached to the center of the wheel. Applying the brake levers causes the brake pads inside the calipers to close on the rotors, which slows and stops the bike.
The following instructions assume that the rotors are straight, not bent. To tell, spin the wheel with the rubbing rotor and focus on its edge. It should spin true without any lateral wobbles. If it’s bent, the following adjustments won’t fix your rubbing issue. Instead you need to fix the bent rotor or replace it with a new one.
1. Recentering the caliper over the rotor.
On newer bikes this procedure usually stops rubbing disc brakes. And it’s worth trying even on older or well-used bikes. There are only 2 steps. First, find and loosen the 2 bolts that attach the calipers to the frame or fork. Just loosen them, do not remove them. When they’re the right looseness you will be able to hold and wiggle the caliper a bit, it won’t be held tightly in place by the bolts to the frame.

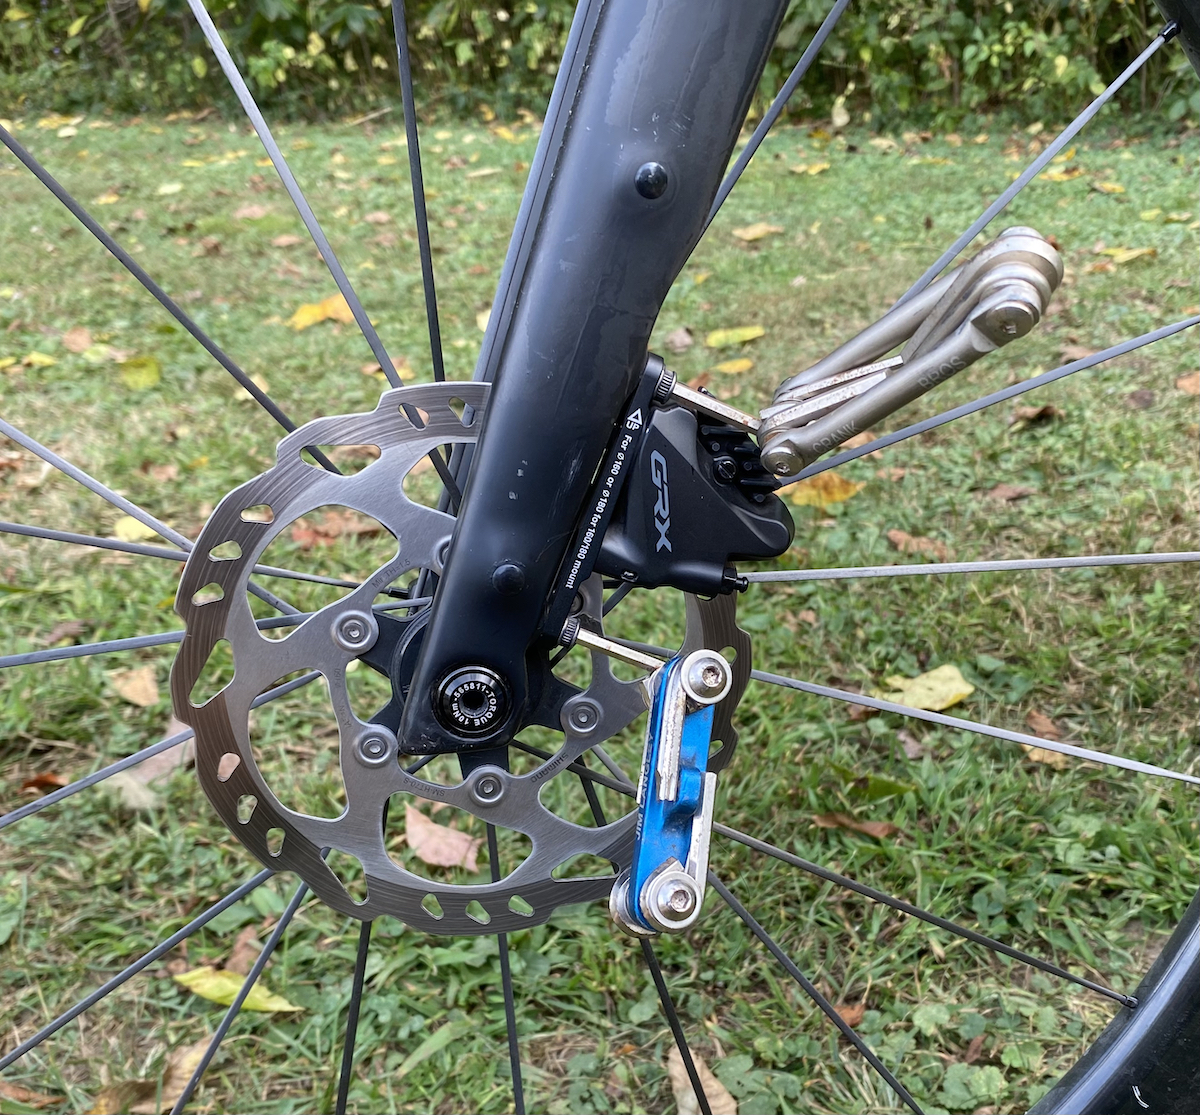
In the photos I placed 2 multi tools on the 2 bolts I loosen on my bike to give an idea where yours will be. Note that older hydraulic disc brakes may have more complicated setups with spacers and shims on the bolts and even other bolts. So look carefully to be sure you’re working on the right bolts before loosening anything. If you’re not sure, I recommend asking a shop to do it for you the first time and ask them to show you which bolts to turn. It will be worth whatever small fee they charge you.
Once the bolts are loose the second step is to squeeze and hold on the lever of whichever brake was rubbing. Don’t let go. If you can’t hold the brake lever on and reach the caliper that you just loosened, then use a Velcro strap or a toe strap (remember those?) or whatever you have to keep the lever squeezed – even a strong elastic band can work. And with the lever squeezed like this, retighten the disc brake caliper bolts. The recommended torque is about 6-8 Newton meters, which is a bit less than how tight you get thru axles, which we talked about last week.
When tightening these bolts, tighten a bolt gradually, then do the same to the other bolt. Then add a little more tightness on one bolt and then the other. Repeat until both bolts are fully tightened. Doing it this way will prevent rocking the brake out of position.
Now, when you let go of the brake lever or release the strap, there’s an excellent chance that what you just did will have recentered the brake and stopped the rubbing.
2. Centering the caliper over the rotor by eye.
If the first procedure (#1 above) did not stop the rubbing, the rubbing may be due to another issue with the brake, such as uneven pad wear or a caliper out of alignment. On some bikes the problem might be the mounts on the frame poorly aligned from the factory. To fix the rubbing, again you loosen the correct two bolts holding the caliper on the frame, but this time, you don’t want to loosen them too much. You actually want a little tension on the bolts to hold the caliper from moving on its own. Because you’re going to move it into place with your hand or by gently tapping with a rubber mallet or similar. So loosen them little by little until the caliper isn’t fully tight.
Next hold a piece of white paper beneath the caliper and look down through the caliper to spot where the rotor rubs against the brake pad. Use a flashlight if it’s difficult to see and move the paper around and change your position or the bike’s position until you can see through the brake caliper, in between the brake pads.
Once you’ve spotted the rubbing area, tap on the caliper in such a way to create clearance and stop the rubbing. Usually you will tap near one bolt or the other to rock the caliper in either direction. It will take a little experimentation and practice to learn how to get it where it needs to go, but you can do it if you keep trying.
Once you have created clearance where it was rubbing and feel good that it’s fixed, you can retighten the 2 bolts. But, do this gradually because if you just torque them fully, the caliper could move back to where it was before since it’s been there for awhile already. So, to tighten it gradually, tighten each bolt a ¼ turn or so at a time, going back and forth until both bolts are tight again to 6-8 Nm. Then, give the wheel a spin and apply the brake and see if the adjustment stuck and the rubbing is gone. Congrats if so. If not, then repeat the procedure a second time. Sometimes it might take a few tries to get it just right and you’ll get better at it each time you do it.
Watch Park Tool’s excellent video showing what I just explained
That’s a lot of words that I hope helps you fix your rubbing disc brakes. I realize it’s a lot and especially if you’re new to your bike and/or working on it. So, I searched and found a great video showing these steps by my friends at Park Tool. Here it is:
Final thoughts
In my opinion, manufacturers of hydraulic disc brakes should address the rubbing issue and invent an easy built-in adjustment to recenter a caliper and stop the rubbing when it occurs. To me, it’s crazy to have to break out wrenches and loosen, reset the caliper and retighten the bolts every time a brake rubs, especially since it’s such a common issue. How long will it be before you strip the threads on a bolt?
It seems like there ought to be a way to provide a mechanical centering screw on calipers sort of like the limit screws on derailleurs only they would push the caliper just so to recenter it. Maybe it could be turned by hand too so no tools would be needed, wouldn’t that be a great improvement? How about it disc brake makers?
Jim Langley is RBR’s Technical Editor. A pro mechanic & cycling writer for more than 40 years, he’s the author of Your Home Bicycle Workshop in the RBR eBookstore. Tune in to Jim’s popular YouTube channel for wheel building & bike repair how-to’s. Jim’s also known for his cycling streak that ended in February 2022 with a total of 10,269 consecutive daily rides (28 years, 1 month and 11 days of never missing a ride). Click to read Jim’s full bio.
With regard to your suggestion of a trimming screw. It is greatly complicated by the need to center the caliper on three dimensions. I won’t try to describe the geometry, but you need to center the rotor left to right as you look at it from the front, you have make certain the pads are parallel with the surface of the rotor from front to back, and the vertical clearance needs to be equal. The simplest way I can think to describe this is the surface of the pads must be parallel with the surface of the rotor in addition to having equal clearance by the pads of the rotor. This is why the facing of the mounts are so important.
A caliper centering mechanism is not so effective if your disk is not true. And an untrue disc is my most common observation. Centering the caliper is generally a simple task.
Good points Big Ring but a lot of caliper mounts are not faced from the factory meaning you have to do the best you can with what you have. And WJ, bent rotors are nowhere near as common as rubbing calipers in my experience repairing many bikes. I’d say 75% of bikes have at least some rubbing on 1 brake and a lot of people don’t realize it. A bent rotor you can usually see and feel.
Thanks!
Jim
And some of us live in mountainous areas with long, steep descents where rim brake overheating can be a problem, and where hands can get tired and fingers numb from a 20 mile descent. Disc brakes are brilliant for mountain riding.
I agree. I’ve seen 3 carbon wheels destroyed by rim brakes on descents. It’s quite startling when a tire blows in a large pack during a descent.
Hydro is greatly appreciated by those of us with hand issues.
The problem with road touring and hydraulic brakes is that a person with hydros will have to carry a few more tools and supplies with them vs mechanical disk brakes just to do basic/common repairs. A hydro bike will need to carry additional stuff like a compact bleed kit, a T15/T10, a plastic disk pad spreader, a small 50 ml bottle of brake fluid. When touring, weight and space is a primary concern, and hydro brakes will require a bit more stuff just to do minor repairs vs mechanical. Then of course with any fluid in a bottle there is a potential for a leak to occur, which means steps will have to be taken to contain any potential leaks so whatever is leaking doesn’t get onto clothes or inside a panner etc.
Overall, mechanical disk brakes are far easier to maintain and keep in repair vs hydro brakes, with less tools and supplies needed, either at home or on the road if a person is doing touring.
I have both types, and I much prefer mechanical brakes, plus the stopping power is the same with the only difference being that hydro brakes are more difficult to modulate because they react to quickly, whereas the control I experience with mechanical is superior, but that’s just my opinion.
Just a quick tip related to holding the brake lever tight when realigning the calipers….I often use a strip of rubber cut from an old tube to tie around the brake lever to hold it closed while tightening the bolts on the caliper. In fact, old tube strips and old tubes make great tie downs for many things bike wise (securing bikes on a bike carrier, wheel tie downs on a bike carrier, to keep a front wheel from flopping around on a carrier or anywhere where one might use a Bungee cord – to name a few).
I have had poor success with loosening the calipers, applying brake pressure and tightening unless I also use a space before applying the pressure. I’ve found using a thin plastic card on both sides, no more than the thickness of a playing card before tightening gives good results almost every time.
Hi Jim,
I’m not sure if mechanical disc brakes were mentioned?
But I have Growtec Mechanical disc brakes on my steel all- road bike.
I did this so that I could keep the Campy 12 speed Mechanical groupset.
I love the shape of the shift/brake levers, And I don’t want or need electronic shifting.
These brakes are truly exceptional, I bought mine from Velomine.
Thanks for all the good stuff, Dave
I suspect that the resistance you see to disc brakes in general is due to the “retro grouch” status of most your readers. I don’t like to characterize others with such a broad brush, but comments and responses to many polls indicate a strong grumpy old man demographic. Several others also commented that mechanical discs give you many of the benefits without the complexity. Agreed. Though they are not as sexy as hydraulic, they are much easier to work on and will generally, safely, stop the bike.
Thanks for sharing your tips everyone, appreciate it!
Jim