
Jim’s Tech Talk
Jim Langley
Today’s topics come from an unexpected page on the Road Bike Rider website (at least to me), so I’ll start with an explanation.
Like road riding meccas – Bend, Oregon and the tri-state area of NH, VT and MA are two of my favorites – the RBR website has almost endless ways to take a wrong turn following one article after another until you end up far from where you started.
When this happens you might want to chime in with a comment, which is appreciated. However, there’s no mechanism that alerts everyone at RBR that you left that comment. So, if it’s not on a page that the intended recipient is checking, they may not see it for a long time, or even not at all.
Four “Lost” Comments
I just realized that this happened to four comments related to past Tech Talk columns. The comments ended up at the bottom of my bio page where I didn’t see them until the other day.
In way of apology, I’d like to point these “lost” comments out and answer the reader who asked a question, because it’s a good one that I hear a lot. To read the comments in full, scroll to the bottom of this page: https://www.roadbikerider.com/jim-langley-3/.
An Interesting Debate About Pedal Threading
The first lost comments were posted in January of 2017. That was when the final installment of our pedal guide ran (that story is here). It led to a fun discussion between three roadies about why bicycle pedals are threaded the way they are. Right pedals are regular thread (turn clockwise to tighten) and lefts are reverse thread (turn counterclockwise to tighten).
I said in the article that James Starley came up with this innovation in order to ensure the pedals don’t unscrew when pedaling. Starley, who in the 1870s invented tangential spoking and central steering (both still standard on bikes today), was such a prolific engineer he is considered the father of the bicycle.

TIP: If you’re interested in learning more, former “Fuso” custom frame builder Dave Moulton has the best Starley history online, complete with pictures.
Eric and Ken Disagreed with Me
Two readers took exception to my statement, Eric Hollis and Ken Goldman. They said that the “pedaling direction actually contributes to loosening not tightening.” And, they presented convincing arguments.
Had I seen the comments, I would have replied. One point I would have made is that Starley’s inventive pedal threading means that there’s no need to tighten new pedals really hard when installing them. Because they tend to become tighter from riding anyway.
So just make them good and snug (be sure to lube the pedal threads, too). That way they’ll be easy to remove when the time comes rather than so tight you nearly have to bend the wrench trying to break them free (a fairly common issue for bicycle mechanics).
Stephen Settled the Issue
But, I didn’t really need to reply to the comments, because almost a year later, Stephen Barner weighed in supporting my position with a great explanation. It’s a fairly long discussion and fascinating if you’ve ever wondered about pedal threading. So you might want to click the link above to read the whole thing.
How do You Assess Carbon to Make Sure it’s Safe to Ride?
The final comment on that page, which was posted January 8, 2018, came courtesy of Robert Mandelson, who wrote,
“Jim I would like to see an article about carbon fiber. I recently bought a carbon handlebar and now I have second thoughts about it not being in a wreck or losing its integrity. Do you have any thoughts about buying used carbon parts, especially handlebars and forks? It would be appreciated.”
No Easy Answer
Robert asked a common question that lots of riders have since so many bikes and parts are made of carbon today. I have some basic tips for caring for carbon on my personal bicycle website here.
But, the bottom line answer is that there’s no easy way to know if a used carbon bicycle, frame, fork or part, like the handlebars – that look structurally sound, actually are. You can ask the seller if they’ve crashed the bike/part, but that doesn’t rule out the possibility that it was dropped or damaged somehow when they weren’t there to see it happen.
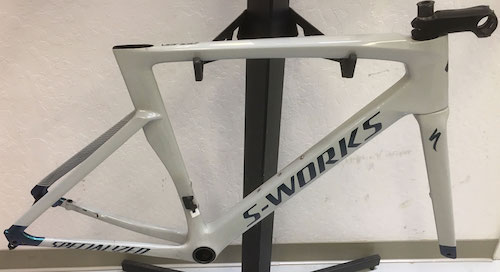
More worrisome, carbon can become damaged internally and there can be no way to know it’s damaged with basic checks. That’s why seriously crashed carbon bicycles that can still seem okay are often totalled by insurance companies, like the S-Works frame shown. Better that than have the bike fail down the road leading to an even more serious crash.
Visual Check and the “Quarter Check”
You can visually inspect carbon bicycles and components for signs of damage on the outside by looking for scuff marks, chips, even cracks. Anything like that means you should probably not purchase that carbon item. Be sure to look closely at carbon rims for signs of nipples pulling through or impact damage, too.
If you’re not sure what the mark on the carbon is, use a bright light and magnification to try to figure it out. A great tool for this is the magnification apps that come on some cell phones. My iPhone 6S lets me zoom in and see things at magnification levels I could never access before.
A test for when the carbon shows no signs of abuse or crash damage is what’s known as the “quarter test,” by bike mechanics. For this you tap a quarter against the carbon listening for changes in the sound it makes – a sign that you may have located a spot where the carbon got compromised and is now soft instead of rigid.
More Ways to Find Carbon Issues
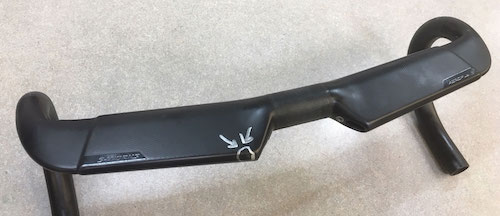
If you can’t see any issues, try feeling for them. Put on a pair of light cotton gloves first so that the cloth will snag on failed carbon and prevent you getting any splinters, too. That’s how we found the very slight crack on this carbon handlebar (it was on the S-Works bike mentioned above).
Another check is to remove the wheels and try squeezing to flex the fork blades together and the rear stays. You can also stand next to the bike, rest a foot on a pedal and push sideways on the bike as you hold it upright.
For handlebars, as long as they’re on a bike, you can push down and pull up to find a cracked or broken bar. Likewise, you can grab a saddle on both ends to push down and pull up to spot a damaged seatpost.
These stress tests might expose a crack in the carbon or cause a popping or clicking sound, both indicators of likely damage to the carbon.
A Professional Test
Finally, there’s a relatively new test to check carbon bicycles and components done by professional carbon repair outfits. They use ultrasound technology to search for any issues anywhere on the carbon. It sounds promising because it tests the entire carbon structure. Unfortunately, I haven’t been able to find more information about it to explain exactly how it’s done.
I did reach out to Ruckus Composites because they mention that they offer this service on their website. I sent them several questions, but I haven’t heard anything back yet. For more information, visit https://ruckuscomp.com/services.
It’s possible that other carbon bicycle companies offer ultrasound testing, such as Calfee Design – one of the first carbon repair companies: https://calfeedesign.com/carbon-repair/. So you might contact them or other carbon repairers.
To Make Sure I See Your comment Related to Tech Talk
Rest assured that I will make every effort to see your comment wherever it ends up on our RBR site. However, the place I check every week is the comments section below each new Tech Talk column. So, that’s the best place to post any comments about my column or to me. Thanks for reading and commenting!
Ride total: 9,352
Lug nuts on the left side of Chrysler cars used to have reverse threads, but GMs didn’t.
I don’t recall any cases where the wheels just fell off of the left side of GM cars but I can recall times when “someone” tried undoing lug nuts on a certain Chtysler product until they just about had a hernia before they realized they were turning the nuts the wrong way.
That’s funny, Mark – lug nuts can be hard to loosen even turned the right way. Thanks for the laugh.
The resistance of pedaling tightens pedals because they run on ball bearings. A ball is rolling around in contact with the larger circumference of the outer race and the smaller circumference of the inner race at the same time. So it skids, trying to send the inner race, which is attached to the pedal spindle, backwards relative to the outer race
This is the correct explanation to the pedal tightening discussion. The one from Stephen is not complete.
Thanks very much, Don. Great explanation!
While cycling one day, I came across a man trying to remove a wheel with a flat tire on a tent trailer that he had been towing. He was jumping up and down on the tire iron, to no avail. I stopped and asked if the lugs on the left side might be left-handed threads like the old Chrysler autos. He reversed the tire iron direction and the lug nut immediately screwed off. Later he pulled along side of me on a climb to the nearby State Park. The child in the back seat rolled down his window and asked “Are you an angel?”
That’s a wonderful story, Ken. You were an angel that day for sure 😉 Thanks for sharing,
Jim
Yeah, no carbon for me! I’d rather have a bike that’s 5-10 pounds heavier, than have to worry about it cracking before my very eyes (while I’m on it!).
Considering the millions of carbon fiber frames and parts on bikes that have worked well for decaded, your concern is misplaced. Do you worry that the iairplane is going to fall apart when you fly? There’s a lot of carbon fiber in those, too.
I learned the hard way about pedal threading when trying to use ‘AeroLite’ pedals years ago. They do not have traditional bearings so…you can imagine.
Ultrasound NDE (nondestructive evaluation) looks for delaminations in the composite layup. A delamination will cause a reflection of the ultrasound pulse that returns to the sensor before the reflection from the inner surface of the part. Same way that sonar works. The quarter test is basically doing the same thing using your ears as the sensor and the tapping to generate the pulse. The shorter wavelengths of the ultrasound give higher resolution that an audible sound of the quarter tap. I would expect that it’s done by sliding an ultrasonic transducer over the surface of the part. Typically a thin layer of viscous fluid (honey sometimes) is used to couple the transducer to the part and allow the ultrasound to be transmitted into the part. If you’ve ever had an ultrasound done on your body, it’s basically the same process, just with a transducer designed for a stiffer subject.