
Back in January, I reviewed Wheel Fanatyk’s Tensiometer, a consistently accurate, easy-to-use and beautifully crafted digital spoke tension gauge. Just click the link to read all about it.
At the time of that review, I was building wheels part-time for Praxis Works Bicycle Components. Today, I’m a full-time engineer at Praxis and in charge of our wheel department. We offer four models, all built right now by me.
As the company wheelmeister, I’m learning lots about modern wheel production and trying more new tools that improve wheel building and wheel quality. I’m sharing some of this knowledge today, and I’ll finish up in our first issue after the Thanksgiving break.
While you may not be interested in working on or building wheels, you might like to learn more about the things that are making wheels better. Because, after your frame, your wheelset has the most influence by far on your bicycle’s ride.
Small things make big differences in wheel reliability and performance. For example, if a spoke is twisted excessively during tensioning (ideally, only the nipples are turned, not the spokes), it can weaken that spoke enough that it might break down the road. Or you might have a wheel that won’t stay true because the tension is either too loose or too tight (where tensionometers come into play). Attending to all the important small details like these is the reason we are now starting to see low-spoke-count wheels that actually hold up to real riding.
Wheel-building robots
You might be surprised to learn that many modern wheelsets today are built by robots, such as those made by Holland Mechanics. They can actually perform every step humans use to ensure top quality. Watch their amazing automaton in action:
To afford to own or employ a machine like this, a company has to sell a fairly massive number of wheels. And even when wheels are built by robots, they are usually final checked manually with hand tools.
Plus, as new wheel models are developed, the first examples are typically built by hand since the robots are tied up cranking out the production hoops. That’s why hand tools are still essential.
A few of today’s cutting-edge wheel tools
The first step in wheel building is called “lacing,” the process of placing the spokes in the hub and attaching them to the rim so that the parts are loosely assembled into a wheel. Lacing is a good description because the spokes are placed in specific patterns that must be exact, and they’re usually woven over other spokes in the wheel.
One of the tricky jobs of lacing is attaching the nipples to the ends of the spokes. The nipples are specially shaped “nuts” that perfectly seat against the rim to hold the nipple in position. Because they’re small and slick, when trying to start a nipple on the end of spoke, it’s easy to drop the nipple.
If this happens, the nipple can fall inside hollow rims and be difficult and time-consuming to get out. You can’t leave it in there or else it’ll rattle around, driving the rider crazy.
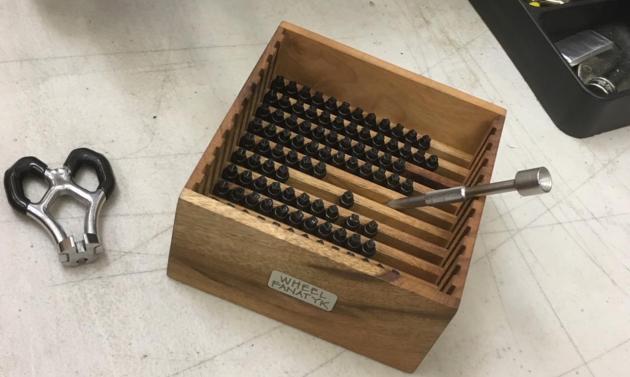
Wheel Fanatyk Nipple Shuffler and EVT Mulfinger
A great solution is the combination of Wheel Fanatyk’s Nipple Shuffler ($32-$42) and Efficient Velo Tools Mulfinger Nipple Loader ($17).
Hand-made of beautiful woods (you choose), the Shuffler is as pleasing sitting on your bench as it is to use. Just pour the nipples in, shake the tool and most of the nipples fall into the rows ready to pick up with a tool. My choice is Efficient Velo Tools’ Mulfinger Nipple Loader (shown inside the Shuffler in the photo).
You press the tip of the Mulfinger into the end of the nipple, and it holds on tight, making it easy to hold and feed the nipple into the rim and start it on a spoke with little chance of dropping it. The Mulfinger doesn’t thread onto the nipple to hold it. That would make it slow to use.
Instead, it has a tapered end sized just right to grip the nipples for picking up and for threading them onto the spokes a few turns so they stay in place. These two tools speed lacing and make it much less likely you’ll drop or lose nipples inside rims.
Next Time: In our next issue, we’ll continue this look at super-helpful wheel-building tools with a discussion of a cool wood dishing tool and a true stunner of a truing stand. We’ll see you after Thanksgiving!
At the end of the reviews, summarize with a list of essential tools that the mere mortal budget conscious mechanic should own, like the old Wheelsmith analog tensiometer for example. At the university campus shop where I work part time, we occasionally build wheels, but generally sell budget built wheels for $50-70. One of our guys/magicians can build a 700c wheel in a few hours with a spoke wrench and a screwdriver. The rest of us are much, much slower.