
By Rick Schultz

Website: https://mid-foot-cycling.com/
Price MSRP:
BOLT2 (Crank Brothers, SPD) – $29.15
ERGO3 (SPD-SL, Look, Garmin) –$31.40
SPIN2 (SPD) – $28.00 (€25)
SPPL4 (Speedplay, Wahoo) – $33.65
Source: Company Website, bike fitters
Features: Foot Stabilization to the Max
How Obtained: Manufacturers Sample
Summary: A must have for solving foot stability issues in cyclists. Three lengths of screws provided for maximum usability. ERGO3 = 24gm.
- Biomechanically, the most stable foot position
- Bike fit position is more aerodynamic
- No need to buy a special $1,100 pair of shoes specifically built for mid-sole pedaling.
- Many cyclists have reported an improved 20-minute power since more stability which equates to more speed
- Less numbness of the toes, saves calves from fatigue
- Helps solve circulatory issues
- Best suited for long endurance rides (Triathlons)
- Not best solution for criteriums (surging)
- Best off the shelf and cheapest solution to mid-foot cycling
- Standing up on pedals might feel awkward at first
- Might require new bike fit
- I would like to see a 4mm Allen wrench included in box
Before You Start
- Mark your seatpost height (silver Sharpie)
- Mark your current cleat position (silver Sharpie)
Why a Mid-Sole Cleat Placement?
- It can move the cleats away from hot spots thereby eliminating pain from Metatarsalgia or Morton’s’ Neuroma.
- It can reduce excessive heel-drop.
- It reduces strain on the Achilles tendons preventing or reducing tendinitis.
- It can save triathletes’ calves for the run.
- Due to the max leg extension and cleat placement, seat height is lowered allowing a lower seat post and lower drag.
Steve Hogg, Australia’s premier bike fitter, states that four items need to be kept in mind when fitting cleats:
- Metatarsals span the pedal axle (see 4a below).
- Foot is an inefficient lever with the fulcrum/pivot being back at the ankle, therefore the longer the lever length the greater work the lower leg is required to do which is not contributing to moving the bicycle forward but instead just stabilizing the foot. The converse is also true that the closer the cleat is to the fulcrum, the less work the muscles of the lower leg need to do to stabilize the foot.
- The higher the pedal load becomes, the more the rider drops their heels.
- When deciding on cleat position you must know what type of riding, what duration and what intensity the rider will be riding, here’s a guide:
a. Metatarsals over pedal axle? If rider drops heel, the metatarsals no longer span the pedal axle. My argument is that very few, if any cyclists drop their heels to the point of changing the location of the metatarsals over the pedal axles. Quite a few (i.e., most) cyclists I fit lack the posterior chain flexibility to be able to drop the heel period. We get the saddle height to where we still need to raise it and when we do, the cyclists’ max extension knee angle doesn’t change. Why? Because they just point their toes to get their knees to the same angle as prior to raising the saddle. Again, I see few, if any cyclists able to drop their heels to the point of changing the angle-of-attack of the metatarsals over the pedal axles.
General recommendations for cleat placement under significant (high) loading (road and MTB)
| SHOE SIZE | CLEAT PLACEMENT Center of 1st Met in front of center pedal axle |
| 36-38 | 7-9mm |
| 39-41 | 8-10mm |
| 42-43 | 9-11mm |
| 44-45 | 10-12mm |
| 46-47 | 11-14mm |
| 48-50 | 12-16mm |
- b. How to measure foot for correct cleat placement
- c. Midfoot pros and cons to thing about
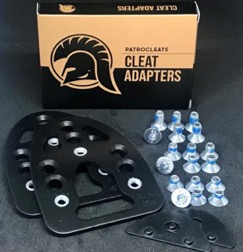
Unboxing
Opening the ERGO3 (SHIMANO SPD-SL and LOOK cleats), I pulled out all of the parts and everything was very high quality, but, to my surprise, there was no supplied Allen wrench. Luckily, as a bike fitter I have numerous sets of metric Allen wrenches but there are those out there that will have to first figure out what size wrench to buy and where to buy it? I highly recommend that these kits come with a wrench.
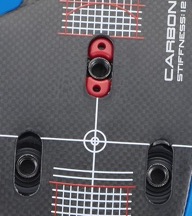
Next step was to lay out all of the parts along with a 3mm wrench (for the pedal extenders) and a 4mm (for the cleat bolts). Then I wanted to see how much I could vary the cleats by. The shoes/cleats I used in this test were an old pair of Garneau cycling shoes that I used for about 10 months (during part of the C-19 pandemic) on the trainer. When it was time to replace the cleats, the sweat and salt had rusted the cleat screws on the right shoe that they could not be extracted. I salvaged the left shoe and use it as a prop for my remote Peloton bike fitting business. The cleat is a Look Delta and is movable forward/backward 8mm.
Might be nice to see how much movement that the cleat actually has in these mid-dole cleat adapters.
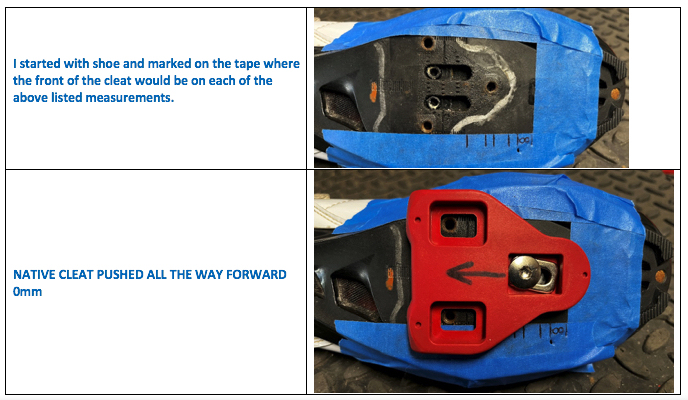
Cleat Positioning
Starting with the Garneau shoe, it has screw holes and not screw slots, so the max travel is 8mm. If you are using Shimano road shoes, there is an extra 11mm of travel due to the slots in the sole so total travel is 8+11=18mm.
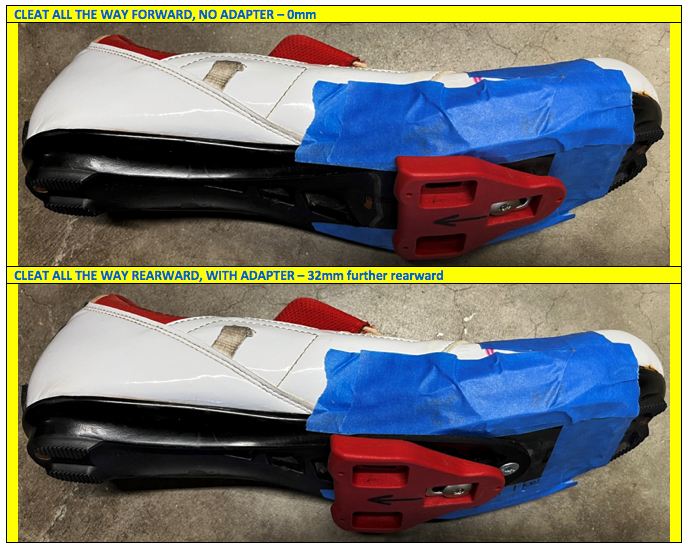
3 x 2 = 6 measurements were taken, 2 with the native cleat and 4 with the adapter. Each set of measurements were taken with the cleat all the way forward, then all the way rearward. Again, if your shoes have slots then you can add up to 11mm to these findings.
| CLEAT POSITION | FORWARD | REARWARD |
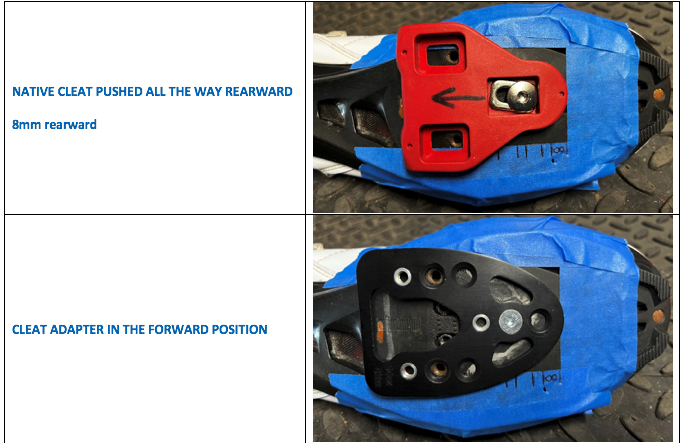
| NATIVE CLEAT | 0mm | -8mm |
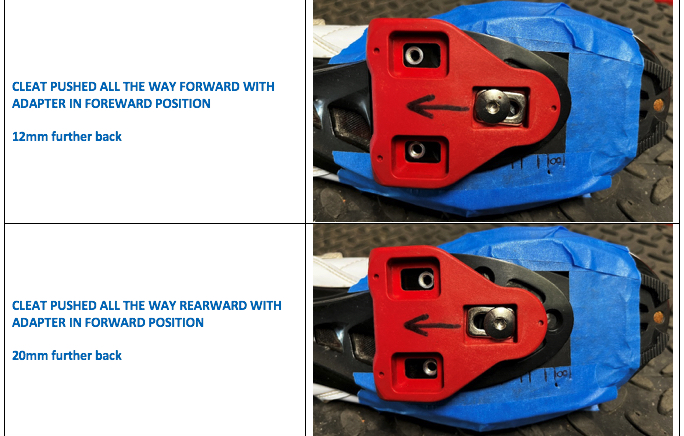
| ADAPTER FOREWARD | -12mm | -20mm |
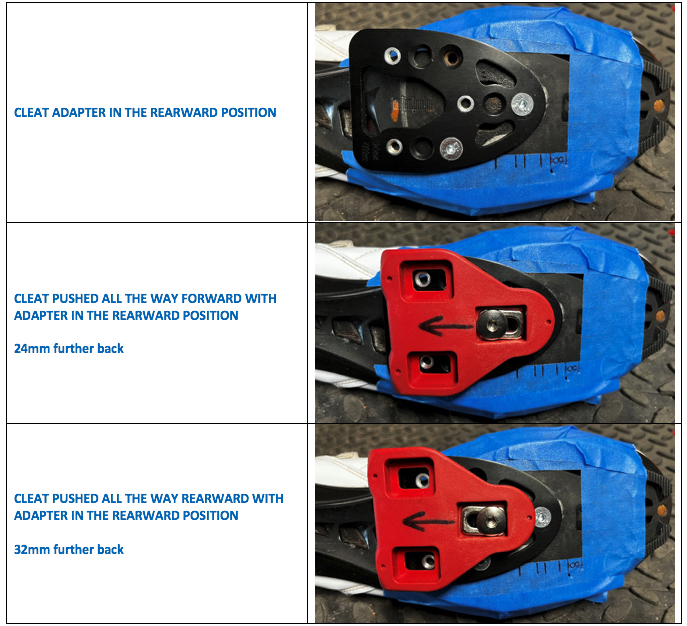
| ADAPTER REARWARD | -24mm | -32mm |
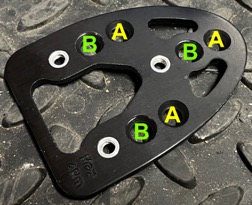
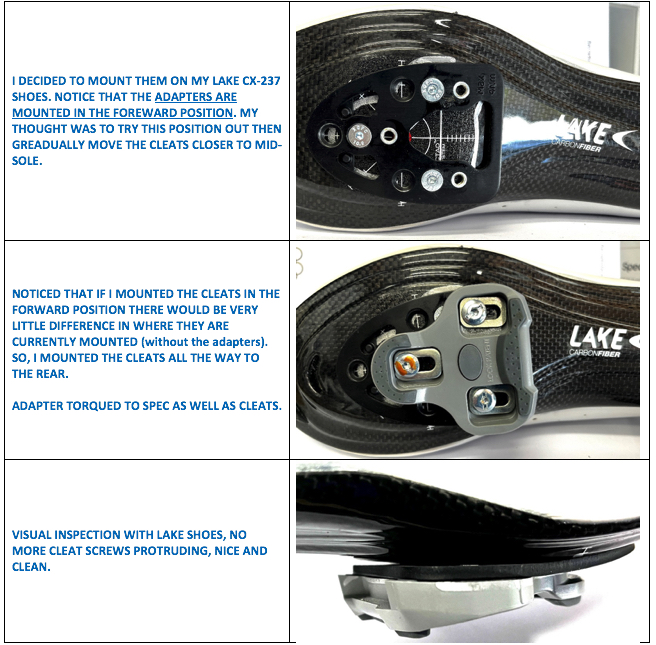
The cleat adapters can be mounted in the A position (placing adapter further to the rear) or the B position (placing the adapter further forward).
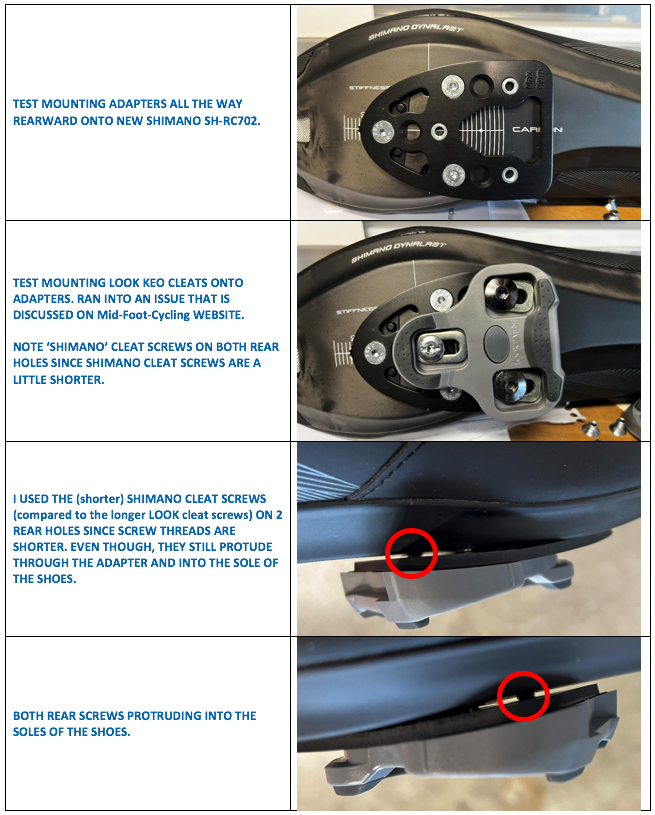
Mounting Adapters, Cleats and Special Note
The Fix
There are two options to fix this issue.
- Add 1 or 2 small washers under the cleat screw.
- Advantage – Will only allow the screw to be set so deep so it won’t protrude into the sole.
- Disadvantage – If the head of the cleat screw gets too high, it will interfere with engaging and especially disengaging the shoes, i.e., your shoes will be stuck in the pedals.
- Grind off the excess threads, i.e., length.
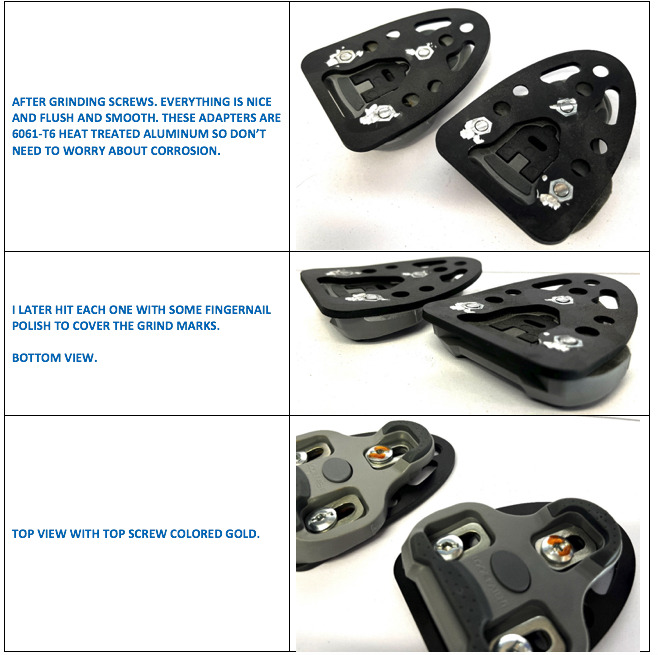
- Advantage – The cleanest solution
- Disadvantage – You will need a Dremel tool with a grinding wheel, OR, a small belt grinder.
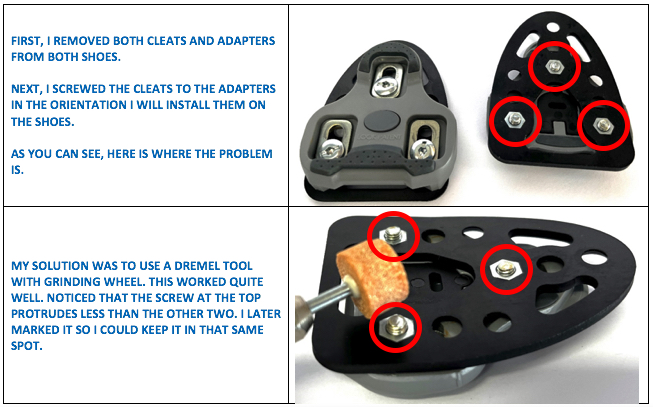
How Did I Fix This?
I chose option #2 above. Here is the fix.
How Did They Ride?
Initial Setting: My native cleat position is all the way to the rear. I will use this as 0mm setting.
From the table, ADAPTERS = FORWARD POSITION, CLEATS = REAR POSITION = -12mm (0.47”) from where I normally set my cleats.
| CLEAT POSITION | FORWARD | REARWARD | MY POSITION |
| NATIVE CLEAT | 0mm | -8mm | 0mm |
| ADAPTER FOREWARD | -12mm | -20mm | |
| ADAPTER REARWARD | -24mm | -32mm |
I did several rides and from where I am positioned on the bike, I didn’t need to change the saddle height. Everything still felt good / natural, I even retained all of my ankling when pedaling. The only difference was that my feet felt more solid in the shoes.
Next Test
Adapters = Rear Position, Cleats = Rear Position = -24mm (0.94”) from where I normally set my cleats.
I use ROUVY for indoor training. Many of their rides are uphill and usually a constant grade (7%-10%) for usually 5-6 miles (8-10km). You can compare these constant grade / grind with doing the bike portion of a triathlon or a time trial. If you do long steady efforts, using indoor training applications, for example ROUVY, TrainerRoad, Wahoo, FulGaz, RGT, BKool, etc., this is where a mid-sole cleat position really helps.
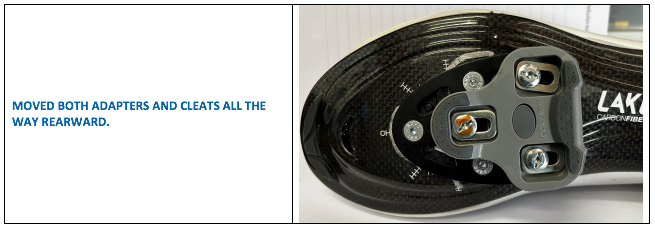
I repositioned the cleat adapters and cleats all the way rearward. Note: the cleat is still approximately 20mm forward of a true mid-sole mounted cleat. Now, here is where I did have to drop the saddle 1cm and is why I mentioned to mark your saddle and mark your cleats.
Pedaling – It felt like I was using more quads.
Analysis – Since I wasn’t ankling quite as much, I wasn’t pulling up much on the backstroke. Initially, I could really tell like the cleat was mounted mid-foot. Everything felt solid, just… different.
Conclusion
I think that there is merit to mid-sole-mounted cleats, but, at least for me, I would need to get used to such a completely different position. Don’t get me wrong, placing the cleat further back is much better than placing the cleat too far forward, it’s just that the cyclist might need to get used to this new position.
So, for me, moved the cleats and adapters again to where I felt best – adapters all the way forward and the cleats all the way rearward and saddle back to its original position. For me, this felt the most natural.
Is it worth it? Yes, I believe it is money well spent and it does work.
Summary
- Mandatory for SIDI road shoes. Two problems with SIDIs are
- They use cleat holes not slots
- Their holes are moved further forward on the sole making correct cleat placement impossible
- You need these adapters to get your cleats into the right position with SIDI road shoes
- Mid-sole cleat placement is best for TT, Triathlon, and any long-distance endurance event.
- Saddle needs to drop up to 1cm (for adapters and cleats moved all the way to the rear.
References
- Mid-Foot Cycling https://youtu.be/t7oGuel–Lc
- https://mid-foot-cycling.com/pages/the-science-behind-mid-foot-cycling
- Steve Hogg Bike Fitting – specifically his 2011 article/blog “POWER TO THE PEDAL – CLEAT POSITION – The Steve Hogg Bike Fitting Team” – https://www.stevehoggbikefitting.com/bikefit/2011/04/power-to-the-pedal-cleat-position/
- https://www.triathlete.com/gear/bike/midsole-cleat-placement/
- https://www.bikejames.com/strength/the-mid-foot-position-manifesto-the-science-and-movement-principles-behind-the-best-foot-position-for-you-on-the-bike/
- https://hal.archives-ouvertes.fr/hal-03016041/document, https://www.researchgate.net/publication/344152060_Effect_of_cycling_shoe_cleat_position_on_biomechanical_and_physiological_responses_during_cycling_and_subsequent_running_parts_of_a_simulated_Sprint_triathlon_a_pilot_study
- https://www.trainingbible.com/joesblog/2007/01/cleat-position.html
- https://getd.libs.uga.edu/pdfs/mcdaniel_thomas_m_201212_ms.pdf
Coach Rick Schultz is an avid cyclist who has trained, raced, and coached in Southern California and now resides in Bend, Oregon where he works as a bike fitter and bike fit educator. Rick is an engineer by trade and a prolific cycling product reviewer. He’s the author of Stretching & Core Strengthening for the Cyclist in the RBR eBookstore. Check his coaching site, www.bikefitnesscoaching.com. Click to read Rick’s full bio.
Part 2 – Long term testing coming soon
Thanks Rick,
Sorry if you mentioned this and I didn’t see it, but I’m wondering about toe overlap issues?
If you push cleats backward your toe moves forward in relation to the front wheel. And, when that happens your feet can bump into the wheel when you’re riding slowly, such as coming to a stop at a light, etc. This can surprise roadies and cause crashes unless they’re used to it and aware it happens and avoid it.
Just wondering in your testing what you found. Maybe you’ll report on this in part 2.
Thanks,
Jim Langley
Hi Jim, Yes, there is more toe overlap. IMHO, any toe amount of toe overlap is still overlap. I say this because many of the bikes that come with ‘crit’ geometry (i.e., shorter wheelbase for quicker handling) also cause toe overlap.
And that is the tradeoff. Do you place your cleats in the correct position for maximum power and (joint) safety or sacrifice power and (joint) safety for toe overlap. I know every Triathlete will want to place their cleats in the right position to save their calves for the run.
As a USAC skills instructor, toe overlap becomes an issue only when going SLOW. When at speed, the rider does not need to move the handlebars enough where toe overlap is a factor.
Solution? Here’s your next article … please describe ‘ratcheting’ what it is, how and why?
Thanks for a great review of this product Rick. I’ve also been importing these in bulk and reselling them in the USA through Fit Kit Systems. Customer feedback has been very positive. To help address one of the common mounting problems you identified we have been including 6 x M5 washers, for those who don’t have a suitable tool or dremel to file down mounting screws that are too long.
The popularity of them should suggest to cycle shoe manufacturers that there is a market for offering shoes with a greater range (to the rear) for cleat mounting.
John, totally agree. After reading through their website, and for safety, I went the Dremel route since there was a slim chance that the washers would cause the heads of the screws to protrude too much that there might be interference when disengaging the cleats, i.e., the cleats get stuck, and you can’t get your feet out. To your point, the readers have 2 options, washers or Dremel! Thanks John.
P.S. SPOILER – after long term testing, these things actually DO work. Will be using them going forward on every pedal stroke!
Thanks,
very usefull !
can i use this adaptor to move my shoes backwards.
thank you
No, you can only use it to move the shoe forward (cleats backward).
Please help me find where to buy the SPD mid-foot cleat adapter. Amazon has them listed for over $41. , which seems to be too expensive.
That’s cheap compared to how much they will cost shortly. The pricing in Rick’s article is quite dated.
Prices have increased significantly due to rising manufacturing costs, shipping costs, and cross border tariffs. They’ll probably be $60 soon.