Make Your Own Take-along Bike Spoke Wrench
 Jim’s Tech Talk
By Jim Langley
Great comments came in about our buyer’s guide to Multi-Tools last week. Thank you!
I liked the feedback from regular contributor Kerry Irons so much that I decided to do a short feature on them this week. I think you’ll like what Kerry shares, too. I’m going over his advice line by line and adding a few comments and a how-to for what I think is his most awesome tip.
Kerry wrote, “There must be something wrong with me – in decades of riding over hundreds of thousands of miles, I’ve never had a chain problem that kept me from getting home. I carry a couple of Allen wrenches, a couple of tires levers (that I rarely use because I can get my tires off the rim with bare hands), and have a spoke-nipple sized notch cut into my house key to serve as a spoke wrench. I just don’t experience mechanical problems other than flat tires. Proper bike maintenance goes a long way to obviating the need for a multi-tool.”
The Golden Rule For Avoiding Breakdowns
Is Kerry’s last sentence he says, “Proper bike maintenance goes a long way to obviating the need for a multi-tool.”
He’s absolutely correct. If you keep your bicycle clean and in good shape, it’s highly likely that you will enjoy breakdown-free rides. To do this, you want to check things regularly and perform any needed repairs. Or have them done by a professional.
A well-maintained bike shouldn’t fail out on the road. And, in that case you might never need a multi-tool and be able to get by with just a few tools like Kerry’s.
Kerry Doesn’t Need A Chain Tool
I’m happy to hear Kerry hasn’t had any chain problems that kept him from getting home. I bet it’s partly because he takes such good care of his bicycle. If you keep your chain clean and lubricated and replace it before it becomes too worn, it could hold up, too.
Tip: To check a chain for wear, hold a ruler on the bottom run (below the chainstay). If a chain is still good, you will be able to measure 12 to 12 ⅛ inches exactly between two pins. If you get a measurement over 12 ⅛ inches, it’s time for a new chain.
Kerry Doesn’t Even Need Tire Levers
If you can remove tires by hand like he can, your tire levers might see little use, too. And, if you are shopping for a multi-tool, you might get one without tire levers. But it’s wise to think this decision over.
As a pro mechanic, I can remove and install tires by hand. In fact, I can do it so quickly I won a cash prize at the Interbike trade-only bike show a couple of years ago.
Yet, like Kerry I still carry tire levers. Why? Because I want to be able to fix other people’s flat tires. And, some roadies today ride with tubeless tires. Tubeless tires aren’t always a problem. But once in a while you will run into a tubeless tire that is essentially locked onto the rim. (The surefire way to fix a tubeless flat is to install a spare tube, which is why you need to get at least one side of the tire off the rim.)
What happens to lock the tubeless tire on the rim is the stiff bead of the tire gets pushed up onto the rim bead seat, a shelf on the rim where the tire sits when it’s fully inflated. With some tubeless tires and rims, it can be almost impossible by hand to get the tire off this rim shelf. That’s when I like having a tire lever to wedge it between the tire and rim and work the bead off the shelf.
The other time I like having levers is when it’s winter and my hands are frozen. My fingers are useless then and the only way I can get tires off is with the levers. That’s just me, though. I have a condition where my fingers won’t stay warm even in toasty gloves. I just mention it in case you, too, can’t keep your fingers warm.
Kerry’s Most Awesome Tip
Even if you don’t have to know-how to true your wheels, Kerry’s best tip could save you out on the road, so be sure to read this.
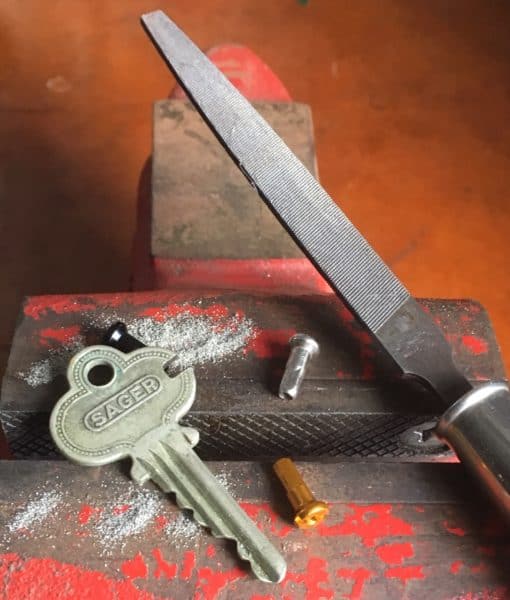
He explained that he has “a spoke-nipple sized notch cut into his house key to serve as a spoke wrench.” This is positively brilliant. Most house keys are made of brass or aluminum, which is plenty strong enough to turn spoke nipples. And these metals are also easy to cut with a file. Or do it with a Dremel grinder if you have one.
Plus, because you are likely to always carry your house key on rides, it means you’ll always have your spoke wrench along. If you don’t know how to true wheels, it can still come in handy if you ride with friends who can – or if a good Samaritan who can stops to help you.
To make your own house key spoke wrench, simply clamp the key in a vise to hold it so you can cut a nipple-sized slot in it. Don’t overtighten the key or you might damage it. Place the key so the side of the widest point is upright. That’s where you want to make the notch so you can use the length of the key for leverage when truing wheels.
You want the slot in your key to fit the spoke nipples on your bicycle. If you have a caliper, it’s easy to measure nipples on your wheels. You can also start filing and make an undersize slot and then keep removing small amounts of material until your key wrench fits your nipples perfectly.
In the photo you can see the file that I used and the slot in the key. Notice that I made mine a touch wider at the ends for easier placement on the nipples. Spoke nipples are usually nickel-plated brass or aluminum. A brass or aluminum key slotted like this works nicely to turn them.
It took me less than five minutes to make my Kerry spoke wrench. Even if you have to do yours by trial and error, I bet it doesn’t take more than 30 minutes. And you’ll then have a cool tool that you made yourself. Worried about ruining your house key? Practice on a spare key until you’re ready for the real one.
Easy Wheel Truing
In case you’d like to try your new tool out, here’s a tip to help even rookie bike mechanics true wheels out on the road. In most cases with modern wheels, the problem when a wheel goes out of true on a ride is that one spoke has loosened.
With your custom Kerry tool, to tighten that spoke is but the work of an instant. And you don’t even need to remove the wheel. All you need to do is to find and tighten that loose spoke. To find it, spin the wheel and watch it spin until you locate the biggest wobble. At the wobble wiggle each spoke until you find the loose one (don’t worry, it’ll be obvious).
Now, turn the nipple attached to that spoke clockwise in ½ turn increments until it feels as tight as the other spokes on that same side of the hub. To make sure you tighten the nipple and don’t loosen it, hold the nipple at the top of the wheel (about 12 o’clock). When it’s there, it’s like a nut on top of a bolt (the spoke) and turned clockwise to tighten it.
Another way to tell if the loose spoke is tight enough is to pluck the spokes with a fingernail and listen to the pitch of their tone. The loose spoke needs to be tightened enough to make the same sound as its neighbors. When it does, the wheel will be true enough to commence riding. Congratulations! You are now a wheel truer!
And, if you didn’t get your wheel perfectly true, it doesn’t matter. It just needs to be true enough to not rub and get you home. You can bring it to a pro to get it trued to perfection later. Or, work on it yourself at home to improve your wheel truing. Good luck!
Huge thanks to Kerry Irons for sharing the helpful and clever tips!
Ride total: 9,087

When on the road and have a wheel that becomes out of true, I do not worry much about plucking the spoke to see if it is tight enough (sometimes the rI’m wI’ll still rub the brake pad). Rather, I spin the wheel and watch the space between the brake pad and the rim. It will be obvious when the rim rubs the pad. Then I tighten or loosen spokes until there is no rub…close enough to get home.
Jim, thanks for the kudos. One correction to your comment regarding chain wear: back in the day, 1/8 inch elongation was indeed the “worn out” measure for chains. But since at least 9 speed, and maybe before that, Campagnolo (and others) have recommended replacing the chain when it has 1/16 inch of elongation. That corresponds to 0.5% elongation and means that you would see just over 1/4 inch over the total chain length.
And instead of plucking spokes with your finger, “tonk” them with your house key spoke wrench – it gives a clearer note not muddled by the flesh of your finger.
Thanks, Kerry.
I have never used a wheel truing tool, I have for the last 40 years simply use the brake calipers as a guide to true my wheels, I close down the calipers till they’re barely missing the rim and then spin the wheel and adjust where they make contact to the brake pad. Of course with disk brakes this can’t be done but it can be done if you have a couple of zip ties that you simply attach to the rear stays and adjust them so they barely miss the rim and then spin the wheel till contact is made. The zip tie thing works best if you get the kind that can be reused thus prevents you from accidentally damaging the paint by trying to get the zip tie off, instead you just release the little tab and the tie loosens.
The other issue of doing this on the road, or at home, which I may have glossed over due to reading too fast, but I didn’t see it mentioned was that before you start truing a wheel you need to take the air out of the tire, because if you don’t and you start messing with the spokes the spoke end inside the wheel could puncture the tube from the underside and now you a flat to fix.
You could also buy a key blank at the hardware store if you don’t want to or can’t mess up your house key. If you have multiple bikes check that the spoke nipple sizes are the same.
Why bother? Just buy a spoke wrench. They’re not very expensive. If you’re like me and use a numerical keypad to open the garage, you don’t carry a house key.
Nice idea, but it’s likely to gouge spokes. Even the spoke wrench on my multi tool doesn’t have enough contact area and just gouges out stripes. Maybe two or three keys on top of each other could work.