
Jim’s Tech Talk
By Jim Langley
Two episodes back, we covered chain drop fixes on bicycles with a single chainring. These bike drivetrains are commonly called “one-by,” written 1X. They’re the popular choice today on “gravel bikes” – essentially road bikes designed as much for dirt as for tarmac. And, a few 1X bikes have made their way into the pro-road racing peloton, surprisingly.
In the article we mentioned that one of the appeals – and one of the reasons for the boom in gravel bikes is that the 1X drivetrain is a no-brainer to operate. This appeals to anyone who is afraid of shifting a bicycle with a double-chainring drivetrain (2X, “two-by”).
Imagine You’re Just Getting Into Riding
If you’ve been a roadie for ages, like me, you probably learned how to shift a double-chainring road bike so long ago that hitting gears is as easy as walking up stairs. But put yourself in the shoes of a complete rookie.
I think you can probably imagine how the sight of complicated levers, two chainrings, up to 12 cassette cogs and that contraption with the pulleys, could induce a paralyzing case of gear fear. Beside not being sure how to operate the shifters, you definitely wouldn’t want to risk messing up your new pride and joy with a botched gear change.

Fear of Shifting is a Real Thing
A major bike industry-only Facebook group recently focused on gear fear, in fact, as one of the reasons standard double-ring road bike sales may be dropping while 1X gravel and road/mtb rigs are picking up.
But what sparked today’s topic wasn’t that online discussion. It was requested by my son-in-law, Frankie Machado. He teaches at Menlo School in Atherton, California – smack dab in one of the USA’s most bike-crazy counties. That’s Frankie with me in the photo (he’s in the white jersey).
Since he recently bought a new Felt and wanted to ride with a group, Frankie got the idea to start a weekly ride with fellow teachers. A few of them – new roadies all – went straight out and bought double-chainring models. And, on the first ride they had no idea how to shift their double drivetrains.
Frankie rides a Felt with a single chainring, so their shifting questions prompted him to ask me (his bike-nut father-in-law) to explain in simple, easy-to-understand terminology how to shift a double-chainring (2X) road bike for his team Menlo riders.
I’m going to do that here. Please help me out by adding your best tips for beginners in the comments.
Please note: I’m assuming here that you beginners know how to use your shift levers. Due to the power of patents, every brand operates a little differently. The good news is that you only need to know how to shift the ones you have. If you’re not sure and you just bought the bike, you might try heading back to the shop and asking them to show you. Most shops do this anyway so hopefully you learned from them when you picked up the bike.
Also, here’s a GCN video showing how to operate three of the most common shifters, Campagnolo, Shimano and SRAM
Important Rules for All Shifting
Before we get into how to handle 2X drivetrains, there are three basic shifting principles to know.
1. In order to shift, you must be pedaling
2. It’s best to only shift when you aren’t pushing hard on the pedals – because hard pedaling stiffens the chain making it much harder for the derailleurs to be able to move the chain to complete the shift.
3. On most modern road bikes, you shift by moving levers or buttons built into the left and right brake levers on the handlebars. While you squeeze these levers to brake, you push inward (toward the stem) to shift most road bikes. Some have buttons that you press. It is possible to brake and shift at the same time.
Tips for Shifting with Light Pedal Pressure
Rule number 2 might sound impossible. Because it’s logical that you will want to shift into easier gears going up hills when you HAVE to push hard on the pedals to keep from falling over. But there’s an easy trick for this.
What you do is push even harder for a couple of pedal strokes to get the bike going slightly faster. Then because you created a little momentum, you will have time to ease the pedal pressure enough to make a smooth shift. This technique takes a little practice but is not difficult to master.
And, everywhere but on tough climbs, it’s easy to back off pedal pressure during shifts. You just have to develop the habit.
2X Shifting Simplified
Now, to get to the actual shifting, here’s all that most beginners need to know to hit the road – and essentially exactly how even the most savvy roadies use 2X drivetrains. While it’s a lot to read, I’ve tried to keep it simple. If you read to the end of this article and follow our last tip, it should all start to come clear for you. If not, ask a friend who rides a double-chainring bike to give you a lesson. They’ll probably be flattered you asked and be happy to show you.
Understanding How the “Sprockets” Work
A double-chainring bicycle has two sprockets in front on the crankset that the pedals are attached to. Front sprockets are called “chainrings” or shortened to just “rings.” There are also multiple sprockets on the rear wheel. These are called “cassette cogs,” or just “cogs.”
When you shift the chain onto a different ring, it’s called a front shift. And, when you shift the chain onto a different rear cog, it’s called a rear shift.
The Way the Sprockets “Work” (the Way They’re Used) is:
1. Because there are two chainrings and the chain is already on one, when you make a front shift, you are only making 1 (one) shift. You only have one choice, either onto the smaller or larger chainring.
2. Because there are multiple rear cogs, when you make rear shifts you have many choices and you can shift many times if needed.
3. Shifts that move the chain onto larger rear sprockets make the bike easier to pedal and shifts onto smaller ones make it harder to pedal.
4. Shifts that move the chain onto the larger front sprocket make the bike harder to pedal and shifts back onto the smaller front sprocket make the bike easier to pedal.
Yes, you read 3) and 4) correctly: to make it harder or easier to pedal works the opposite for rear and front shifts. You get used to this when shifting though, because the chain moves in the same direction for rear and front shifts into easier or harder gears.
When to Make Rear and Front Shifts
The thing that makes double-chainring drivetrains confusing is those two rings up front. So here’s a way to think about them while shifting that simplifies things:
First, in case you’re new to rear shifting, I’ll explain that:
1. We’ve established that you can make multiple rear shifts because there are so many cogs. Having so many means that there are more gears to choose from and each shift onto a different cog makes it a LITTLE easier or harder to pedal. To make it a lot harder or easier means shifting down or up multiple cogs – making multiple rear shifts, which is perfectly fine. Climbing a steeper and steeper hill, for example, you will keep shifting until you’re on your largest cog, your easiest gear.
2. Now about the front shifts: We’ve established that you only have one shift, either up onto the larger ring or down onto the smaller. If you look at the rings you’ll see that they vary significantly in size. And this size difference means that shifts onto the other chainring, makes it a LOT easier or harder to pedal.
Two Sets of Gears
One way to think of this to keep it uncomplicated is to think of yourself as having a bike with two different sets of gears. When you leave the chain on the small chainring and only make rear shifts, think of yourself as using your lower/easier set of gears.
And when you shift onto and leave the chain on the large chainring, and only make rear shifts, think that you are now using your higher/harder gears. Which chainring you’re on determines whether you’re in your low or high set of gears.
In actuality the gearing on double-chainring bicycles usually overlaps which means if you wanted to hit each progressively harder or easier gear, it would require shifting between rings, not just leaving it on one. But, using the rings one at a time as I described is the way a lot of roadies do it most of the time.
Front Shifts Make it A Lot Harder or Easier to Pedal
Keep in mind that anytime you need to make the bike a lot harder/easier to pedal, the front shift is always available. And the advantage of making this shift is that the major change in pedaling effort happens right away because it’s just one shift.
A common example is when climbing over a peak and descending the other side. You used your largest rear cog to get to the top and then made a couple of rear shifts to make the pedaling feel better since the bike’s speed picked up so quickly going down the hill.
But the bike is still accelerating. So, a good choice is to make a front shift onto the large chainring. With that one shift, you’ll make the bike’s gear high enough that if you want to pedal, you will be able to.
If you don’t make that front shift, and you try to pedal, you will find that the rear wheel is spinning so fast that there’s no resistance from the pedals because the gearing is too low for the speed of the bike.
Simultaneous Front and Rear Shifts?
A common shifting questions is if it’s okay to make front and rear shifts at the same time? As long as you use light pedal pressure, it’s okay to do it. Some electric drivetrains do it automatically even. But, from a purely mechanical perspective, it’s asking a lot of the chain and derailleurs to move the chain so drastically. I recommend not making these shifts manually very often.
Finding the “Right” Gear
To share the wisdom passed down when I started road riding, the way to determine what gear is right is to think of yourself as the motor that’s driving the bike down the road.
Like a car’s motor, you only have so much power at your disposal. And, you might be riding up a long climb or fighting a fierce headwind. You don’t want to risk exhausting yourself far from home. The best way to be able to make it to the end of any ride is to find a pace that your legs, lungs and heart can keep up for the duration of your ride.
Monitor Your Pedal Cadence
That’s where the gears and shifting come in. You should shift so that you’re never working too hard for too long. As a general rule, most riders can pedal steadily at approximately 70 to 90 pedal revolutions per minute (called “cadence”). And, with a little experience (or you can use a computer that displays your cadence), you learn to feel at what RPM you’re lugging your engine and working too hard to turn over the pedals.
Before that point, you should shift into an easier gear. And by constantly shifting to ensure you keep pedaling at an efficient cadence for your fitness level, you will have no trouble finishing rides in all types of terrain and weather.
To sum up, you know you’re in the “right” gear when you’re able to spin your legs at a cadence that feels right to you for the type of terrain you’re currently riding. And if it’s rolling terrain, you will shift a lot to keep fine-tuning the gears so that you can maintain your same pace.
Best Way to Practice
I saved this for last because it’s my favorite way to teach shifting – and I find that not enough new riders learn this way. I’m hoping to change that.
Suspend the Bike
If you’ve got a new bike and a bad case of gear fear, I want you to suspend the bike to practice and master shifting while standing next to the bike, NOT while riding it. A bike repair stand works for this if you have one. Alternatively, a car bike rack with arms that hold the bike by the frame can do the trick. You can do it with the bike on an indoor trainer and the resistance device turned off, too.
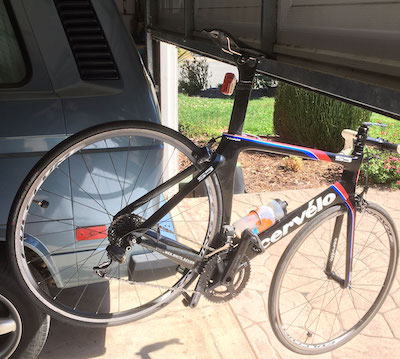
If you don’t have any of those, you might have a garage with a roll-up door. If so, you can open the door halfway and stop it there. Then rest the tip of the seat on the bottom crossbar on the door. Be careful. Make sure the door is strong enough to hold the bike and that the saddle can’t slip off the door. I have a common aluminum garage door and it works fine (photo).
If you don’t have a garage, maybe you have a door jamb in the house with trim at the top that can support the bike’s weight. Or a tree with a low branch that you can suspend the bike the same way it hangs off the garage door.
Shift by Hand Repeatedly
Once you’ve got the bike suspended, you can take as much time as you want to learn how to shift. Simply turn the pedals with one hand, operate the shift levers and be sure to watch how the chain moves over the front and rear chainrings and cassette cogs.
If that’s too much to keep track of at first, have someone else turn the pedals while you move the levers and watch what happens. But, be sure to take a turn shifting while pedaling by hand so that you can feel how the effort to turn the pedals changes as you run through the gears. Hold your rear brake on slightly while pedaling to really feel this.
When you get good shifting by hand like this, you’ll be ready to try it for real. You can do it. And don’t worry about harming anything. As long as you follow the basic rules here, it’s highly unlikely you can do any damage shifting your new machine. Just be careful out there. Don’t look down at the drivetrain while shifting out on the road unless you’re absolutely sure it’s safe to do so. And, don’t forget that even parked cars can hurt you and your bike.
Ride total: 9,403
Couple of thoughts: I always try to think of making circles not pushing hard on the pedals because I think if ya don’t you’re putting pressure on upward pedal(think rhythm). A very simple easy to understand 2 chain ring is to pick a speed range for shifts, say anything faster than 15mph use big ring. Keep it simple!
Actually 3 and 4 are not contradictory. If the chain moves LEFT you’re going to a lower/slower gear, if it moves RIGHT you’re changing to a higher/harder/faster gear.
Thanks for pointing that mistake out, Henry. I’ll rewrite that and it should change on the live page sometime soon. Appreciate it,
Jim
complicated thing that makes one thing easier:
if you are shifting to a (physically) smaller cog or ring, you do not have to be pedaling
( if you aren’t, the shift will not happen until you start pedaling, though )
‘smaller’ means lower/easier ratio on the front (chain ring),
and faster/harder on the back (cogs)
i know, it is a lot of jargon
the only thing worse than this is, music theory
wle
Front derailleurs are not remotely as complex or difficult as your preamble says.
They shove sideways and require a bit of technique. That’s it.
I bet most of the people who have gear fear have never had someone put a bike up in a work stand and have them watch the front derailleur do its simple chore while they turn the crank and actuate the shift lever.
Also: I bet most of the gear fear people don’t understand mechanical advantage, or the leverage you gain with smaller or bigger cogs and chainwheels. (Former Bike Tech Editor Crispin Miller wrote his MIT PhD thesis on how poorly MIT undergrad students understood these simple concepts.) Make sure your student understands mechanical advantage. Then s/he will have the foundation to understand how the front derailleur is used to get the mechanical advantage desired.
Eight or fewer cogs = far sturdier chain, less likely to get damaged by a shifting mistake. That’s an argument for buying the cheapest bike in the shop!
Hi John, you mentioned above “or the leverage you gain with smaller or bigger cogs and chainwheels”. Do you really gain leverage in different gear combinations of from a longer length crank arm?
Hi Rick — You busted me. That was an incorrect use of the word “leverge.” I meant “mechanical advantage.” Crank length is a whole ‘nuther discussion.
In the ‘How Sprockets Work’ I would change the last statement. You actually move the chain in the same direction in both front and hear to achieve a harder or easier ride. If you move the chain to the right in both you are making it harder because the larger sprockets are mounted differently (in front the smaler in on the left while in the hear it is the opposite) in front and hear.
Thanks for spotting my mistake, Jose. I’ll rewrite that and the change should appear as soon as Lars can get to it. Appreciate you letting me know.
Jim
For Shimano, the small lever shifts to the (physically) smaller gear, while the large lever shifts to the larger gear
JIM, here’s a question for you … since you are MIT, you should be able to answer.
Which combination do you have more leverage?
50/25 = 53.0 gear inches
or
34/17 = 53.0 gear inches
Hi Rick, I think you meant your reply to be seen by Mr. John Schubert a few comments above yours. He’s the person who wrote about Crispin Miller’s MIT thesis. I didn’t attend MIT.
Hi Rick,
I didn’t attend MIT either. I have a humanities degree.
But I aced multiplication and division, and learned a feel for machines the best way possible — by attempting to fix my dad’s lawn mowers (and occasionally breaking them in the process).
54 = 54. The larger sprockets would deliver, in theory, a very slightly smoother performance. But if you’re even trying to feel for that, you have too much free time and should spend more time on the bike.
Thanks for replying to this thread, John. I think Rick will see this and chime in. I might have those old issues of Bike Tech somewhere with Crispin’s work in them. Maybe I’ll risk an asthma attack from all the dust covering wherever I put them away for safekeeping 20 years ago – and see if can educate myself!
I think Rick is asking in which cog/ring combination you have more leverage. I think that the larger the rear cog the more leverage you have regardless of what chainring you’re using. But, that’s just a guess – nothing to do with physics or MIT credentials. Thanks again!
Jim
Jim,
You won’t feel any difference between the two combinations.
The stresses on the chain, cogs and chainwheels will be different, in ways that are almost always unimportant.
John
Hi, Jim,
Crispin here (ears burning). (Not really. Schubert tipped me off.)
Correct that the CHAIN will have more leverage with a larger cog, but that’s only half the picture. The other half is that if you’ve also moved to a larger RING, then the leverage the PEDALS will have ON the chain is REDUCED.
So it’s a wash. As Schubert says, for the tooth numbers in the question, the overall drive ratio from pedals to wheel ends up being the same. What changes is that with a larger ring (for a given pedal cadence and pedal torque), the CHAIN TENSION is lower (and the chain speed is faster) — but since (in this scenario) the chain now has a larger cog to work on, the torque and rpm’s of the wheel end up the same.
The difference can sometimes matter for the longevity of your drive train, but there too there are tradeoffs. If you’re really horsing up a steep hill, you’ll put less tension on your chain with the large ring and large cog. However, now you’re also running the chain in the most diagonal direction possible (far left in back to far right in front), so you may end up having the side plates of the chain links (steel) chew on the sides of your ring teeth (aluminum) a little bit.
Schubert and I once both lived in Media, PA, and he’d sometimes come over to where I lived, which, from his direction, sat at the top of a very steep side street that climbed out of a ravine. One time he and our friend Toby were both coming over, Schubert by bike and Toby by ’66 VW microbus (top speed 62 mph). Schubert decided to see if he could beat the microbus up the hill
He might have, except that his chain came off. When he eventually emerged up the hill, walking his bike, he said, “Hey, Crispin! I DIDN’T derail my chain. I BROKE it.!”
I don’t know what gear he was in.
This is great stuff, Crispin – thanks so much for the comment, explanation and hilarious bike versus microbus story. I drive an 87 Westy so my money was on Schubert 😉
The most interesting thing to me is what you said about the larger ring and larger cog combination putting less pedaling tension on the chain. I think that’s helpful because “we” always tell people to avoid cross-chaining and talk about the added stress on the chain from the derailleur getting pulled fully forward and the chain becoming more tight than it is on the smaller cogs.
What you’re saying suggests that if for some reason you were worried about your chain holding up on a ride (maybe you know it’s old or a stiff link is developing, etc.), you might choose to ride in one of the big/bib combinations to baby it with less tension. To me, that’s something good to know that I had no idea about.
Thanks!
Jim
Hi, Jim,
thanks for the reply.
re: “we” always tell people to avoid cross-chaining and talk about the added stress on the chain from the derailleur getting pulled fully forward and the chain becoming more tight than it is on the smaller cogs. —
True to a degree, but not so much for those particular reasons, I think.
If the chain length is set up to be any slacker than pulling the lower chain run very nearly straight (in the cross-chain gear), then even though it may feel harshly tight on the workstand, I still doubt that the lower run’s tension approaches the tension on the upper run, which the chain has to put up with all the time.. A 52T ring has a radius of 105 mm, so with 170mm cranks the chain tension works out to 1.62 times the pedal force — and when stomping up a hill, the pedal force can exceed the rider’s full weight, or also if s/he’s pulling up with the rear foot’s cleat. A smaller ring will impose proportionally greater load on the chain — for instance a 39, being 3/4 of a 52, will exert 4/3 the chain tension. And unless you have a huge rear cog to accommodate, so that then on the small ring and cog the cage wraps up so far it collides with the cogs, then, I don’t think of any excuse for setting up the chain so short it pulls the roller cage out flat. Except I guess having a chain with too short a stock length and no spare links available — but rather than come to that, I think you should bite the bullet and use what you need of a second chain (a second new one, bought to match).
However, with any cross-chaining, then at the places where the chain takes off and lands — the places where the change of direction has to occur — you do get all the tension being borne by the link plates that are on the outside of the bend. Whether this actually gets any worse with increasing angle, i’m not sure — once it’s out of line at all, it seems to me that all the load has to land on the outer plates, so I’m not sure that a greater crossing angle makes it any worse. UNLESS you’re bending it more than the play between pins and bushings has room for, so that the bend takes multiple knuckles to complete, and in that case you’re also putting COMPRESSION on the INNER-side plates, and having to balance the books for that with corresponding ADDITIONAL tension on the outer-side plates. THAT would be a situation devoutly to avoid, but current chains have so much lateral flexibility (to facilitate climbing up and down the cogs) that I doubt this situation is likely.
Does anyone with actual data know?
best,
Crispin
Thanks for giving us a lot more to chew on as we’re grinding up those long climbs, Crispin. Excellent! I do not know anyone with actual data.. I think the folks at Ceramic Speed have done some studies on drivetrain efficiency but I don’t know how far they’ve taken it. There was another company that was selling super efficient chains they had prepped through some special cleaning/lubing process to gain riders some additional efficiency/watts saving. Maybe they discovered something, too. But, I don’t recall reading anything very extensive.
I appreciate your great comments. Thank you!
Jim
And to add a bit of trivia to Crispin’s VW vs bike race: the 66 VW microbus had a reduction gear box where the axle connected to the rear hub which gave it a very low gear, enabling the traditional off roading (more clearance) that they came to be famous for, and possibly the ability to beat the bike up the hill!
gracehowler
One way that I like to explain the difference between front and rear shifts is to say that a front shift is approximately equal to three rear shifts on a 2x drivetrain. I did the math to get “three” for the gear ratios on a 50/34 x 11/32 (11 speed) drivetrain. The number three will not hold for all drivetrain options, but the math can be customized for any given set of gears. The takeaway here is that a front shift is equal to a multiple of rear shifts.
I think the article and comments are very comprehensive. The only thing I would add is that I have watched riders fall of their bikes because they did not anticipate a steep uphill immediately after and steep downhill, i.e. they needed to move to an easier gear before grinding up the hill. It is also a good idea to move to an easier gear before stopping at light (unless you have strong quads).
The Double-Shift: “But, from a purely mechanical perspective, it’s asking a lot of the chain and derailleurs to move the chain so drastically. I recommend not making these shifts manually very often.”
The double shift is a long-time necessity of riding a road bike over big rollers. It was an art form when we would do it with friction sifters. Simultaneously dropping the chain onto the inner ring in front and dropping it down one gear in back. This results in going from the big ring and slightly over-geared to then in the small ring and pedaling smoothly. While I understand your comment regarding the stresses on the equipment (they are real), my experience is that the elements and general chain-stretch will do-in your equipment long before the double shift.
Of course, what makes this an art is the tragedy of the double-shift failure: dropping the chain and then frantically spinning and shifting hoping for the miracle save when the front ring picks up the chain off the bottom bracket shortly before you come to a complete stop.
One thing isn’t clear to me: why you HAVE TO do it simultaneously, risking dropping your chain? Why not first do front shift, and then the rear shift right away?
Alex, you have this figured out. I’ve been “double shifting” for 56 years, and I never move both shift levers simultaneously. First one lever, then the other.
Hi Alex,
I move both at the same time to get a faster, smoother shift, but only when shifting to the large chain ring in front. Since the shift is to larger rings front and back, there is no slack in the chain and I have never dropped my chain. However, DO NOT double shift going to the smaller ring in front. You will get slack in the chain and drop it.
I love the “miracle save” term. It should be enshrined in the velominati glossary for cycling disciples.
Something to keep in mind when shifting is that the rear derailleur shifts on the slack side of the chain while the front derailleur shifts on the tension side of the chain.
How to set gear changes so the gear indicator reads correctly and front gear changer does not touch the chain with system functioning properly on Shimano equipment.
With regards to the double shift, I rarely, if ever, drop my chain when double shifting up but have learned to give one end, usually the rear in order to reduce the pressure on the chain, a head start before shifting the front when going down. My theory is that shifting up results in moving to bigger ring/cogs both front and back while shifting down results in moving to smaller front and back. Double shifting up takes up slack in the chain while double shifting down creates a whole bunch of slack and slop, just inviting the chain to go its own way. The other thing is that when I double shift it is usually a shift of two or three gears in the year to offset the larger difference in the front rings. The math – 52/39=1.333, or 33% difference in the front while 12/11=1.09, or 9% in the rear. It is because of this larger difference that I need to double shift in order to make a smoother transition in effort between gears when shifting up front.
Hi Alex,
I move both at the same time to get a faster, smoother shift, but only when shifting to the large chain ring in front. Since the shift is to larger rings front and back, there is no slack in the chain and I have never dropped my chain. However, DO NOT double shift going to the smaller ring in front. You will get slack in the chain and drop it.
Jim,
I have a question pertaining to upshifting the front derailleur and downshifting the rear derailleur simultaneously. You say that you can do this but advise not to do it regularly. If I need to go to a bigger chainring and downshift 2 or 3 cogs at the same time, should I move up the chainring first or downshift the cassette first?