
Jim’s Tech Talk
By Jim Langley
Since tires are the biggest trouble-makers for roadies, let’s follow last week’s story on tire seating, with another for putting them on in the first place. Even complete beginners can get tires most of the way on, but getting the last tight section on can seem impossible.
That’s when people understandably reach for tire levers or worse, some other leverage tool. But that can lead to rim, tire and tube damage. So to help, I’m going to explain how to put on that tight final section of tire with only your hands.
Please read to the end for advice on dealing with defective tires – a relatively new issue to be aware of and understand.
Props to Bruce Anderson
I call what I’m describing “my technique,” but it’s actually bike shop owner Bruce Anderson’s. He mentored me when I first went to work at Andy’s Bike Shop in 1973. Over the years I’ve taught the technique to hundreds of cyclists at camps, as a presenter at bike club meetings, at my bike shops and while I was a college professor teaching bike repair. I’ve even used it to win fastest-flat-fix contests.
So I know it’s a game-changer that works for most people. Again, I’m assuming that you can already get the first side of the tire on, the tube inside the tire (if you’re using one) and get 3/4s of the second side of the tire on the rim. Those steps are pretty straightforward. It’s when you get to putting that last tight section on that the fun begins.
For All Tires
My technique works for tubed and tubeless tires and for road and mountain bike rubber. The wheel and rim don’t make a difference, either.
Three First Checks
- With all tire installations, the rim strip or tape needs to lay flat inside the rim. It must not interfere with the tire when you’re putting it on. The less thick the rim strip/tape is, the better. You want to add the least amount of height to the inside diameter of the rim as possible.
- It’s important to mind the valve and make sure it never gets stuck beneath a tire bead(s) (the edges of the tire). The beads should end up next to, not on top of the valve.
- And, as was mentioned last week, be sure on tubed setups that you inflate the tube just enough to round it out before neatly stuffing it inside the tire. That way it won’t get beneath the tire edges causing installation difficulty or worse, a blown-off tire.
My Technique for Getting the Last Tight Tire Section On
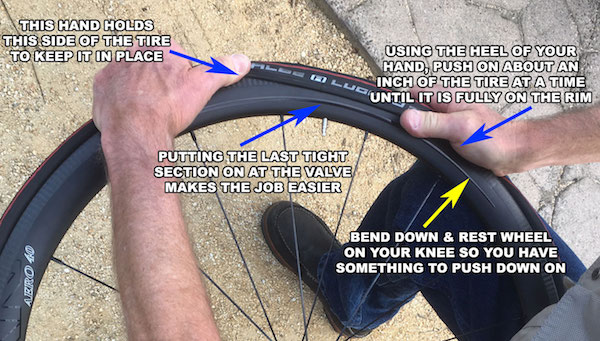
Most of what I’m describing next is explained in the photo so please study it. The six key things are:
- You should finish tire installs so that the final tight section is lined up with the valve. That makes getting that last part on easier.
- Use your non-dominant hand to clamp down on the tire and prevent that end from creeping out from inside the rim as you install the other end. You will use your dominant hand to push on the tight section little by little (keep reading for how to do this).
- For optimum leverage and control, bend down so that you can rest the part of the wheel with the tight section of tire on your knee.
- Use the heel of your dominant hand to put the last section of tire on, not your fingers or thumb. With that part of your hand you can push down hard against your knee and move the tire bead up and onto the rim… but
- Start at the very beginning of the tight section, never the middle. And then put on only about an inch of tire at a time before moving your hand in further toward the middle to put on another inch. Gradually like this, the tire will pop completely onto the rim. Most people try to put on too much at a time and that makes it too hard. Just go little by little to get it on.
- If the tire seems not to want to go on, there’s always a reason. If it’s a tubed tire, there is probably still air in the tube. Let it all out and try again to install the tight section.
- The most common reason a tire refuses to go on is that the tire beads aren’t in the center of the rim. To fix this, while you hold the tire in place with one hand, go around the wheel with your free hand squeezing the tire and wiggling it to get its beads to go to the center where they need to be to give the slack for you to put on the tire. You should feel the beads as they find center. You may need to switch hands to go all around the wheel. But keep one hand gripping the tire firmly at the tight spot so it doesn’t start coming off the rim again.
John’s Great Tip
That’s all there is to it. I’ve seen that with a little practice, even pre-teens can install road tires with this technique. I hope it works for you, too.
Coincidentally, RBR reader John Jauss offered a tip for seating (last issue’s topic), that is also a great trick for installing tires. He wrote:
“I’m an old roadie, riding since the 80’s and just stumbled on an almost unbelievable solution for installing my Continental Grand Prix. I’ve tried heating the tire with a heat lamp, using a Tire Jack type tool https://amzn.to/31QGTgB and sometimes it turned into an hour project. Even sometimes get one on 99% and come back the next day to fight with it..
Then one day I put on some cheapy work gloves (rubberized fronts, cloth backs https://amzn.to/33hNQYx ). They grip the tires so well ya think your hands are 5x stronger! I’m 76 and I do suffer from arthritis in my hands but now I can usually install a couple tires in 15-20 minutes. A pair compresses down pretty small and I carry the gloves in a baggie in my bike bag now.”
Thanks, John!!
Dealing with Defective Tires
There’s one more important issue related to putting on tires that I want to bring to your attention. The issue is undersized tires that can actually be impossible or almost, to mount. If you’re unlucky enough to run into one of these tires, even the best technique won’t get the tire on. Because the tire is actually defective.
As best as I’ve been able to figure, these misfits are the result of tire makers ignoring long held sizing standards. Instead they essentially shrink their sizing from fear of their tires blowing off hookless rims. When confronted with the issue, the tire makers blame the rim makers saying it’s the rims that are oversize. But, in my tests, every time I’ve run into this issue, you can find tires that go on that same rim easily. So the blame rests on the tire makers.
Beware Continental GP5000 Tubeless Tires
I ran into one of these this weekend and surprisingly it was a Continental Grand Prix 5000 Tubeless tire, which I paid the princely sum of $95 for at my local bike shop (that’s for one tire!). It was easy to find lots of online comments about how impossible others say these are. It surprises me because I’ve used Conti’s GP4000s forever and they’ve been great. Unfortunately, the Continental engineers totally blew it with their first tubeless tire, the 5000.
I called Continental and complained and was told they stand behind their tires and to bring it back to the shop for a replacement. However, they did not promise that the new tire would go on and admitted that they’d heard from others about the tire’s awful fit.
Don’t Accept Defective Tires
My advice to avoid the hassle of getting a defect like this is to do your research before purchasing a tire you haven’t tried before. If you’re buying from a shop, ask a mechanic at the shop if you’ll be able to put the tire on with your hands. Not if they can, but if you can. If they can’t confirm, ask if you can try one in the shop before buying it.
If you’re buying tires online, the best you can do is make sure they have a return policy that allows returns, no questions asked.
And, finally, if you run into one of these defective tires, the best solution is to get a different tire. If you force a defective tire onto the rim with a friend and multiple tire levers, etc., you risk damaging the tire and it could fail on the road. And, you could find it impossible to fix a flat out on a ride, plus it’s unlikely you’ll be able to return a used tire.
The best reason to return these tires, though, is to get the message across to the tire makers that we won’t accept defective tires and they need to make tires that go on by hand.
Ride total: 9,424
Jim Langley is RBR’s Technical Editor. A pro mechanic & cycling writer for more than 40 years, he’s the author of Your Home Bicycle Workshop in the RBR eBookstore. Tune in to Jim’s popular YouTube channel for wheel building & bike repair how-to’s. Jim’s also known for his cycling streak that ended in February 2022 with a total of 10,269 consecutive daily rides (28 years, 1 month and 11 days of never missing a ride). Click to read Jim’s full bio.
A cycling buddy shared this tip w/me one day (for putting on a new tire that is stubborn at that last section): he puts the tire on as completely as possible, then pumps up the tube with a lot of pressure. This puts stretching stress on the new tire’s circumference. He lets it set (I forget for how long, but maybe an hour or more, even overnight would be OK). Then he deflates the tube and the tire will pop on with MUCH less effort. I haven’t tried this myself, so I’m not giving it an unreserved recommendation, but it’s worth a try for some of you out there.
That’s an interesting idea, Greg. I would just add to anyone who wants to try it, to be VERY careful inflating a tube in a tire that’s not fully on the rim. The difference between putting a little air in the tire to help round out the tire – and the amount that causes the tube to expand out of the tire and explode is small. The tube can look fine and then the pressure causes it to suddenly balloon out and bursts. It only takes a second and that’s not enough time to let the air out at the valve usually.
So if you try this err on the side of caution – put some eye protection on and ear plugs in too just in case,
Jim
carry a small bottle of eye drops for dry eyes. they contain a (very) small amount of oil that makes for normal tears.
A little spit on the rubber bead edge helps with that last part.
That’s a good tip, Mike. A little water from a bottle would work, too. Just don’t get the part of the tire you’re trying to grip/push on wet because if it becomes slippery it’s hard to hold onto enough to push it on. Keep the spit/water down between the tire bead and the rim.
Good one. Thanks, Mike!
Jim
I’ve been using the VAR tool since the early 80’s. Works great at home and on the road. It’ 2 pieces and fits easily into the seat bag. I always start seating the tire bead at the valve and it works well for me.
Step three of First Three Steps – adding a little air to the tube – also tends to give the tire a circular shape. My tires tend to collapse into a figure eight when there is no internal support. I also like to season my new tires by mounting them on a rim before I need to use them. This stretches my new tires so that they are then easier to mount when I use them on my bike.
I put talcum powder on the tube, to eliminate some of the friction.
To make sure that the valve stem is properly situated, I push it up once the tube is loosely fitted.
The “Kool Stop Tire Bead Ja.ck” solves all my mounting issues. To carry one on rides, I just cut the handle down since the long handle isn’t a critical part of the tool.
Previously I used a VAR Tyre Tool but they aren’t readily available now and were somewhat easy to break.
For years I have used leather gloves to help roll a tire onto the rim, so agree it works well.
I also agree that Continental missed the mark with its Grand Prix 5000 Tubeless. I’ve successfully mounted all kinds of tires–road, MTB, clincher, and tubeless for decades, Like many others experienced, the Continental Grand Prix 5000 Tubeless could not be mounted on a 700c rim because it was too small. I returned it. I’ve had much better luck with Hutchinson and Maxxis tubeless tires.
How about a video showing your technique, instead of just a picture?
I have found that when I tire won’t go on, it may help to work from the opposite end you are trying to get mounted and push the tire around the rim from the tread side and that may give the extra little working room to get the tire to go on.
Jim, I was just about to challenge you to mount the Conti GP5000 tubeless by hand, knowing that you couldn’t, when there it was, a paragraph on its difficulty. I’ve always used Continental and became an early adopter of its first tubeless tire earlier this year. To my everlasting frustration and embarrassment it became the first tubeless or clincher I couldn’t mount myself. Head hanging down, I took it to my LBS and the wrench struggled but ultimately got it done.
The flip side is that it’s the best tubeless I’ve ever used. It excels in comfort, traction and puncture resistance. For me it’s another Continental tire that’s exceptional.
Just last week I changed out the rear for a new one after 3500 miles. Very good wear for Tucson road use. Same problem mounting it, but this time instead of stubbornly struggling with it, I got it to the last part and took it to the LBS. It took the wrench and me together with 3 levers to get the damn thing seated. Just before that I mumbled to him that “If I didn’t know better I’d think it was a 650cc tire.” Little did I know how close to the truth that was.
I hope you can convince the Conti folks to re-engineer its design. It’s otherwise a keeper.
I’ve been a fan of the GP4000 for many years and was considering switching to the GP5000, but I guess I’ll hold off on them for now. I had the same issue with Schwalbe Pro One tires on my girlfriend’s bike and ultimately switched tires, as dealing with a flat on the road would be too much of a headache for me and impossible for her (due to less hand strength, not less skill).
Another gripe with Continental is the pricing here in the US, which is essentially double what it is in Europe. This is not a knock against LBS’s, as they’re apparently getting gouged by the US importer. I end up buying my Continental products from the UK or Germany most of that time and save a substantial amount of money, even with the shipping cost.
I also had a real problem mounting Conti 5000 tube type tires. I can usually mount a pair of new road tires in a few minutes, but worked for a couple of hours using every trick I knew, including soap as a lube,work gloves, and extremely creative expletives! I finally remembered a Kool stop tire jack that has never been needed getting dusty on my work bench that enabled me to install the last tire in just a couple of minutes. I hate to have to carry another tool in my jersey pockets, but don’t want to push my bike home or call my wife for a sag ride home. I emailed the seller on Amazon describing my experience but not get a reply and was unwilling to take the damn things off and return them. As many riders have found, I have loved the 4000 versions in the past and did not want to like this new version, but alas, they are fantastic on the road! A very noticeable difference in cornering and speed was immediately obvious. As advertising hype, IMO, seldom translates into reality, I am pleasantly surprised! Hopefully Conti will fix these issues before I have to replace these tires, (I go through at least two pairs of good quality (read expensive!!) a year). I need to mention how much I enjoy your newsletter and appreciate the extra issue during our pandemic experience! Dr. Dan
Dan, I couldn’t get my Kool Stop tool to mount the GP5000 — lucky you.
There is some good news with these tires: they are durable, very durable. I got 3500 miles from the rear and I’m amazed the front still has life after 6000 miles. Note that I’m not one who gets the last mile out of every tire. I ride in Tucson where there’s a mix of smooth tarmac (25%) and rough, choppy asphalt (the rest) — not conducive to a long-lived tire. These are the best tubeless I’ve owned and though I dread changing the front very soon it’s worth the hassle.
If Continental adds a MM or two to the circumference I doubt they’ll tell us. German pride or, perhaps, arrogance might get in the way
What difference does it make if you start the mounting process at the valve or opposite the valve. I’ve done it both ways and find it is easier to keep the valve straight by starting at the valve. Thoughts?
You may be right about keeping the valve stem straight. That can be a hassle. But that’s really a matter of how careful you are when you put the tube in.
I put talc on the tube so that it’s a bit easier to manipulate if I don’t get it exactly right. But Once the tube is in and the valve stem is straight it doesn’t make much difference to me.
i have allways started seating the bead at the valve section first, the reason being you can make sure that valve is pulled all the way up and its sitting properly,if you do the valve section last you can end up with the tire not seating properly or you can end up with a damaged valve,when removing a tire allways start opposite the valve its easier.
I stopped to read the commentary after I saw the picture. I own the same wheel in the pic, an ICAN Areo 40mm (2-way fit) and mine are just 2 weeks old.. $720 and so far. they hold up very well. Checkout Icancycling.com. I obviously am here because I couldn’t get the damn Conti 5000 clincher tire over the rim. Sore thumbs and palms and much sweat. All kinds of tools. – Nada! Anyway, I followed Jim’s instructions and had no problem at all. WOW! I did use a Gator tire lever for the very last section and it was a snap; mountiing a tire on a 40mm carbon rim now takes me just a few minutes. Thank you Jim.
This was very helpful! thank you so much.
What do you feel is beneficial by putting the last section of the tire on near the stem? I find that starting at the stem I have better control of keeping the stem straight, especially schrader valves, while working the bead on.
Thanks so much for this post and the comments from others. I thought I was losing my touch when I could not get my lovely new Conti 5000 tires on my (much older) Fulcrum rims. I did manage to find an old Specialized tire to finally seat, using the method you described and by letting the tire sit on the rim, partially installed, over night. This was also more of a fight than it should have been. Replacement Conti Gatorskins are on the way!
It still amazes me that tires and rims can end up so poorly matched!
I’ve always struggled getting my tire back on and got it immediately after this. Thank you so much!
for years i have fitted all bike tires by hand only,some lube around the bead and on they go,but these new tires are very very hard to put on,even putting the first bead on the rim is a struggle,the second bead is next to impossible,two brands i have had great trouble putting on a rim is maxis re- fuse and pirelli p zero velo 4s,its time to buy several tire bead jacks
just a follow up the tires i mentioned were tube type tires only and tube type tires need to be easy to install and remove as folk do need to change these tires on the side of the road,we need a decent tire review site site so we can find out which tires are easy to fit and we need user reviews so we can see which tires are durable and have good puncture protection,its hard to find any website that does full tire reviews but google can find tires that dont make the grade as users will post a review on tires somewhere
for extra tough tires lube under the bead and use tire bead jack tool,koolstop make one,ezclincher make one there are many more different brands,dont even bother with tire levers for those extra tough tires you will only pinch tubes and break tire levers
if it’s that hard to get tires on, they are the wrong size. Send them back!
We should not have to deal with such things and sometimes I cannot tell if the problem is tire or rim. Should I be yelling at Continental when Fulcrum is the problem? I love the idea of a database of compatibilities to guide my tire purchases. Once I have my wheels, it is too late and expensive to return them. And when one brand of tires works, we assume others will too. At least we assume that other styles of tires from the same company will work, but wrong on both counts.
Also, I tried the tire bead jack tool from Koolstop and broke it almost instantly, then proceeded to get the tire on by hand, albeit with a fair bit of time and struggle.
Oh yes, when I tried to return the infamous Continental Grand Prix 5000 to BIke Tire Specialists, they so far refuse to answer my emails.
I have been using Pedro tire levers (https://shop.sportsbasement.com/products/pedros-tire-levers-colors24-sold-as-2x) to wrangle stubborn tires on and off. They haven’t broken yet.
Thanks very much for this. I’ve just spent all day trying to mount Conti 5000 tube tyres on my new Mavics and have pinched 5 tubes in the process. Thankfully I have loads of tubes (I buy tubes to make up the numbers when I order things online). One tyre is on which by coincidence was finished by the valve, something I normally try to avoid. I will revisit the other tomorrow. I have been mounting tyres for years with no problems and was starting to think I had turned into an idiot/weakling.
As others have said, magnificent tyres once they’re on but I’m going to have to consider something easier to get on in future I think. Thankfully they’re very puncture resistant but I can only imagine how unpleasant it would be to have to replace a tube by the roadside.
I have similarly deep experience with mounting tires and just gave up on the Conti 5000. Even if I could get them on in the shop, I need to be able to work on the road and get tires (or tyres) off. Continental should be sued for ever releasing such poorly dimensioned rubber.
Hey, this worked like a charm! Excellent tip thanks!
Thank you – this really helped me!
There is a new tool, Smart Lever which fits the tightest tyres quickly and easily and its portable and made in Britain. To fit a tyre it lifts the bead from the inside (also pushing the inner tube out the way so it is not nicked) and pushes the tyre over at the same time. For ultra tight tyres that cannot be pushed all the way on, Smart Lever has a second trick – it becomes a pivot to lift the bead also from the outside so you can push forward again and repeat until the last section pops on. Bike Radar said that Smart Lever fitted the tightest mountain bike tyres they had with ease. Tyre removal is similar – hook under the tyre like a standard tyre lever (but much stronger) then rotate the handle 90 degrees and push in towards the wheel – this pulls more of the tyre over so you can just push around the tyre under the bead to remove. Cycling UK described Smart Lever as ‘next level’.