
Price: $179.99 (rack); $22.99 (hooks)
Size: 4’x8’
Height: Adjustable from 22”-40”
Capacity: 600 lbs
Colors: Black or white
Material: Cold-roll steel
I’ve never heard anyone say they have plenty of room in their garage. You are always looking for more space and as cyclists we need to find a way to store our bike collection. When Fleximount approached me to review their GR48 overhead storage rack with optional accessory hooks, I knew just the person to test it out, my nephew Adam. I remember him complaining about tripping over their two bikes in the garage and figured this might be the answer.
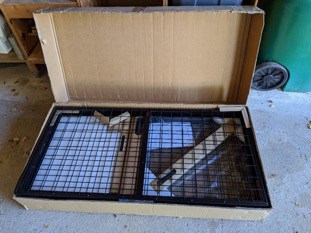
The GR48 arrived in one 49 lb box, and the hooks arrived a few days later in another shipment. Everything was well-packaged and arrived in perfect condition. It was easy to find all the parts, with the screws bagged and labeled. There was one piece of styrofoam in the packaging that could be easily replaced with eco-friendly cardboard.
The instructions were easy to follow with some minor language/grammar issues, but nothing that made it unclear.
Required Tools
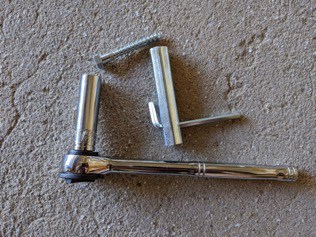
A socket wrench was included in the box, but was very hard to use. Instead Adam used his own ratcheting socket wrench which provided more leverage and made installation much easier. There are installation instructions for both wood studs and solid concrete ceilings. This installation was in wood studs. If installing in concrete, you’d need a hammer drill and a 0.45″ bit.
Installation
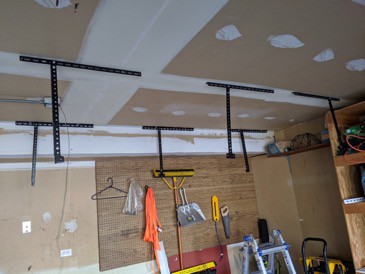
Total install time took one person about 2.5 hours, with marking off the ceiling holes being fairly tedious. The company did provide a template in the box, which Adam found unnecessary. The first row of holes (farthest in pic) was the easiest, since he was able to mark each hole exactly 3″ off the wall to keep it all parallel. The second row (closer in pic) was harder to get perfectly straight, since it is measured 48″ away, perpendicularly. Adam felt you could draw lines all the way across each stud to keep it straight, but with the flexibility of the metal uprights, it didn’t need to be perfectly aligned.
After holes were marked off (across 2 studs for each support), Adam drilled pilot holes and installed angle brackets with some beefy hex head screws. The screws installed with 1/2″ socket. As mentioned earlier, Adam’s own socket wrench worked much better than the one the company supplied.
Assembling the uprights and setting the height was easy using shoulder bolts with a nylon lock nut (2 per upright). The height was set to the highest point since it was a 8’6″ ceiling. At that height the bottom of the rack measured 6’7″ from the ground giving him enough room to walk under and not hit his head. Mounting the uprights to the ceiling brackets used the same shoulder bolts and lock nuts. But because Adam set it close to the wall, it was difficult to tighten the bolts that stuck out towards the wall. If possible, he recommends installing at least 6″ from the wall.
The 36 remaining screws were difficult to install, requiring each one to be tightened with an Allen wrench. The screws were threaded into the sheet metal, which had very tight threads. This part of the installation took a very long time.
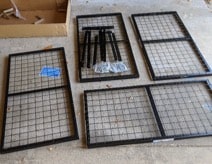
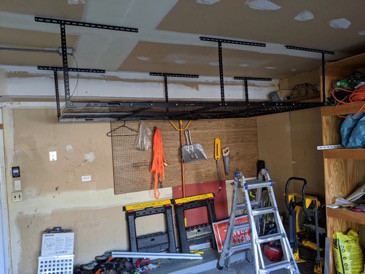
The storage rack comes in four 2′ x 4′ sections, which are then bolted together prior to installation onto the uprights. They weren’t hard to line up, but once again the screws were very difficult to install. In fact, two of the threads were so messed up Adam couldn’t get the screws to thread at all. Since he was installing the unit alone, he put the four sections together as two pairs instead of all one unit or he wouldn’t be able to lift it all together. Each pair hooked into the corner uprights, then screwed into both the corner and center upright. After both rack pairs were up, they were then screwed to each other. Hindsight, there should have been two people installing the rack, making it easier to hook it all in as one big piece instead of two.
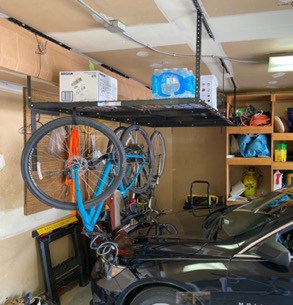
Once installed the unit itself was very sturdy and did not move when pushed on. The company claims it will hold up to 600 pounds.
Adding the Hooks
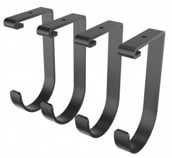
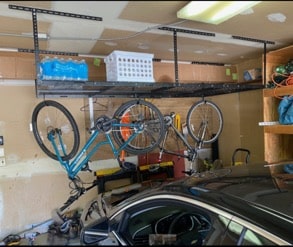
The optional hooks come four in a pack for $19.99, slide on securely, and can be placed anywhere on the rack. Even after installing the rack at the highest height, we needed to get creative hanging the two bikes in order to keep the handlebars or seat from hitting the car hood. As visible in the pictures below, the blue bike has the wheel at an angle so not to block the path to the house door.
Bottom Line
The GR48 rack is easy to install and extremely sturdy. It’s nice to be able to utilize “air space” and store items above the car and then hang a couple of bikes. Just make sure you take key measurements to make sure the bikes won’t hit the car hood when pulling into the garage.