Maintaining Your Road Cycling Shoes

By Jim Langley
The off-season is a great time to catch up on maintenance that is super important for riding, yet easily forgotten or ignored since it’s not specifically on the bike. When planning your pre-season mechanical schedule, be sure to include everything related to your cycling. It can become a long list these days, with shoes, helmets, gloves, clothing, accessories, power meters, car racks, and so on.
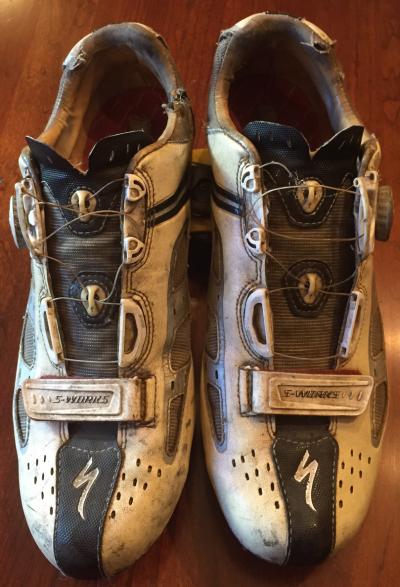
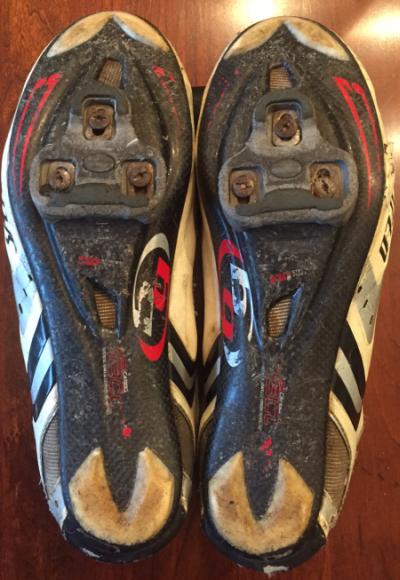
I’ll leave your list up to you and stick with shoes today. Perhaps nothing’s more important for efficient riding, so it’s worth keeping them in tip-top shape. If you take a close look at the photos, you’ll see that mine are in anything but good shape. Look at the worn cleat edges and about-to-fail frayed Boa closure laces (actually tiny steel cables).
Don’t blame the shoes for looking so tired. Since 2008 they’ve seen about 40,000 miles, multiple crashes and downpours. Also, I don’t baby them since they’re for all my training. Racing is done in different shoes saved for competition only. But here’s what I’m going to fix on my trainers, plus some of the other things to check when inspecting and maintaining shoes.
Closures
My shoes feature Boa closures, a ratcheting laces system that was cutting-edge when I got these shoes but is now found on many types of shoes and widely used in cycling. I’ve recommended the Boa system in the past in this column and love how it allows tightening and loosening shoes evenly with a quick turn of the dial.
 In my experience the Boa laces last about 4 years of constant use before they begin to crack and fray. The first time, I went back to the bike shop and bought a replacement kit. It wasn’t too difficult to replace them following the directions with the kit. It even included a special screwdriver for removing the dials.
But this time around, the same bike shop informed me that replacement laces this old aren’t available anymore from Specialized (so they don’t stock them), and that I should contact Boa directly. I did that and almost immediately got a reply saying to send a photo of my shoes. Once I did that, another speedy reply said that a free replacement kit would be sent right out. Made my day!
If you have Velcro strap and/or strap and buckle shoes, check the Velcro’s grip and the buckles for loosening or wear that can make them stop working or not perform as they should. Velcro usually keeps going and going. But if crud gets in it, blocking the interlocking “fingers” from holding, the gunk should be removed. Use an awl or pick to get under and pull out anything stuck in the Velcro.
Depending on the shoes, buckles and straps can sometimes be tightened to the shoe via small screws, so look for these to check if they’re secure. This type of fastener also lets you replace the parts if replacements are available from the store where you purchased the shoes, or direct from the shoe company.
Cleats
The other part of cycling shoes to check is the cleats. These typically wear far more quickly than the closures, especially if you walk in your shoes frequently.
Tip: Carrying and slipping on rubber cleat covers before walking is the best way to keep road cleats like new as long as possible. For my Speedplay Zero pedals, I use Keep on Kovers, which, like the name implies, stay on even when riding so you never forget to carry or use them.
Cleats are the key to clipless pedals working properly. As they wear out, it can be harder to get in and out of pedals, and they can make noise or move around annoyingly on the pedal under hard pedaling. To tell, look for signs of wear and weakness on the edges of the cleats that are grabbed by the jaws on the pedals.
 Another good way to spot cleat wear is to always keep a set of new spare cleats on hand. That way you won’t have to go buy them when you need them, too. And, with a new set, it’s easy to hold the new up to the old to see exactly whether or not the old cleats are toast. It’s better to replace cleats well before they let you down out in the middle of nowhere.
Even if the cleats look great, go ahead and check the cleat bolts to make sure none are working themselves loose, which they have a bad habit of doing. They’re usually allen bolts. If you find the hole messed up from walking in the shoes, try holding the allen with a pair of pliers as you hold its end on the bolt and tap the other end with a hammer. You can usually force the allen wrench in this way and reshape the hole. It takes a little finesse, so be patient and you should get it.
IMPORTANT: If you do need to replace the cleats, first trace a line around the old cleats on your shoes. Use a Sharpie marker in a color that stands out against your sole andwait for it to dry. That will save you the huge hassle of having to find the right cleat positions all over again.
Frozen Cleat Bolts
Cleats bolts can become frozen (rusted) into the soles and seemingly impossible to loosen or remove. But you can always get them out one way or another. Penetrants work but can take a long time to free frozen bolts. Heating the screw works faster. But be careful! You don’t want to get oils and penetrants dripping over and into the shoe, and if you heat anything but the bolts you can ruin the shoes. So think through your approach.
As an example, shoes can be wrapped in wet rags so that they’re protected as heat is applied to only the screw. Some cleats can be cut to pieces and knocked off the soles, leaving the bolts protruding and much easier to grab with pliers, for instance, and turn. Whatever you do, work carefully, pay attention to what you’re doing and you can get the screws loose and out to replace the cleats.
Other Things to Watch For When Caring for Cycling Shoes
You can see in the photos that my shoes need some repairs around the ankles where the fabric is fraying. That’s one type of maintenance to look for. If you stop the fraying or patch uppers with small holes, etc., it should allow shoes to live longer.
Another shoe problem is having the soles separate from the uppers. It’s caused by walking too much in cycling shoes. Unlike your feet, the stiff soles don’t bend, so the sole is essentially being peeled off the shoe with every step. And most soles are glued to the upper, so it’s not at all a permanent bond.
You can spot problems by pulling on the soles around the shoes gently by hand and seeing if it’s coming free anywhere. To fix it, try gluing it back in place with a contact adhesive like Shoe Goo.
If you’ve ever repaired your shoes (minor, major, or anything in between), please comment below to share any great tips and advice.


All good suggestions. But what about insoles? That’s what I find wears out, and I’m missing the E-Soles that are no longer available.
A tip to help with two of your cleat problems. When installing cleats I put a drop of blue loctite on the screw. Keeps them from loosening and stops them from rusting in place. I also like to use a good allen wrench when working with the screws (a T-type) to ensure a good purchase on the tiny screws.
Put a dollar in jar time you go for a ride. Before you know it you’ll have enough to buy a new pair. Seriously I’d sooner walk than ride with those.
Icebug – the BEST insoles out there for cyclists – [url=http://thepartsshoppe.com/product-category/insoles/][/url]
ICEBUG = http://thepartsshoppe.com/product-category/insoles/
I reattached the soles of my mtb shoes with shoe goo and a wrap of twine. Then I waited 24 hours before unwrapping and using them. They’re still going strong 2 years later. I’d guess that wrapping the shoes tightly with an old tube would work even better than twine.
When I saw those pictures I thought it was going to be a joke about how your shoes should NEVER look. Instead the article describes getting more years of use from those piles of crap. Seriously? I’d be embarrassed to give those shoes away. Embarrassed that people would think those shoes had been in my house or even in my garage. Homeless people would shun those shoes.
Interesting idea to use Loctite. I’ve never had a screw come loose, but I’ve had some rust in. Since then, I just put some grease on the threads before I install the cleats, and the screws come out easily. One problem I have with Look Delta (the old kind) cleats is that as the cleat wears from walking, the screw heads start to get scraped up. I try to replace the screws when they look like an Allen wrench may soon not be able to grab the screw head.
I have to agree except even at $.50 per ride, you could buy a new top notch pair in less than 3 years.
I always use Anti-Sieze on cleat screws every time I install them to prevent problems with them rusting in place. Never had a problem with them loosening, either. For that matter, I use Anti-Sieze on just about every threaded part on my bikes.
Kevin,
What’s most funny about yours and the other similar comments is I know for a fact that Jim has many pairs of fantastic, clean and shiny cycling shoes. He’s one of those people who likes to milk every ounce of life out of a product before finally relenting and tossing it. (These particular offending shoes must be incredibly comfortable!)
So don’t cry for him or think he needs to scrimp and save for new shoes! He’s not embarrassed to wear these like some of the rest of us might be. To each, his own.
Thanks, will have to check them out.
To each his own in trying to save money or maximizing other value. I would just like to add that in the spectrum of buying new or renewing old, please remember the value of time and the advancement in technology that offsets the “cost” of purchasing new.
why I really came to this website/link: I been searching for what I cannot find on internet: how to indicate/measure — weardown in sole/bedding of shoe. (underneath inner-sole) As for cyclists who have a lower grade of lifestyle who end up standing far more frequently than other cyclists. As standing longer is said to put more weardown on shoes. In my case, I being a Disabled cyclist — who uses public transportation.
Hence when waiting for a trolley, I am standing — wearing my $ Sidi shoes. Waiting for the trolley. As that standing puts further weardown on my shoes, as I am not making progress with the shoes.
If my comments are used, please do not use my email address.
Cleat screws can become packed with dirt or small pebbles over a period of time. Take a few minutes with a sharp pointed object (Ice pick, safety pin, shop scribe, etc.) to thoroughly clean out the screw head before inserting the hex key.
Never us a bondhus or similar ended key as you want as deep an engagement with the screw head as possible which requires a dead flat & square end.
(Bondhus ended keys are helpful & excellent for off-axis use but shouldn’t be used for attempting final tightening or initial loosening of any bolts)