
|
HOT!
|
NOT!
|
https://www.f3cycling.com/ |
Unique Mount Almost, But Not Quite, Nails It
Last November, we did a First Look article on the FormMount when it was still in the Kickstarter phase of its product cycle. It did well enough to make it to market, and we’ve now had the chance to do the full review we had anticipated back then. Refer back to that First Look piece to view all but one of the possible ways to mount the product.
Real World Problem Presents Perfect Test
My daughter’s Cervelo R5 is a 51cm frame; because she is quite limber and races, she likes her setup to be a slammed -17°stem. This causes extremely tight cable routing, so much so that we had to mount her head unit onto the stem. The main problem with mounting the head unit on the stem is that she hits her chin on the head unit when descending in a tucked position, so I have been looking for a good solution to solve this problem.
Based on what I knew about the FormMount, it seemed like it might be the perfect solution. So, after unpacking the FormMount, I laid everything out on the workbench and took a look.
The FormMount was very easy to assemble, and the directions were straightforward. But it turned out that finding the perfect mounting option from among the five available required extensive trial and error. (Again, take a look at the First Look piece to quickly get the picture of the mounting options available.)
There were 2 sets of different length stem cap bolts. One set short, one set long. I started with the short.
Unscrewing the top 2 stem cap bolts, I mounted the unit in the TOP:FORWARD:UP position. My daughter looked at it and said, “Way too high.”
Taking everything back apart again, I mounted it in the TOP:FORWARD:DOWN position. Height-wise, it was better, but now the unit was so close to the stem cap that we couldn’t mount the Bryton GPS head unit.
So, I removed the FormMount and took it completely apart again, this time assembling it with the longer bolts. This time, I again mounted it in the TOP:FORWARD:DOWN position, using the top stem cap bolts. But, now it completely interfered with the cables. So, again, I took everything back apart andreattached the cap to the stem.
Maybe the fourth time would be the charm?
Next, I unscrewed the bottom stem cap bolts and mounted the FormMount in the BOTTOM:FORWARD:UP position. Voila! This worked perfectly (see the before and after photos to note the vast difference).
In the Proper Position, How Did it Work?
There are 2 inserts that come with the unit, one for Garmin and one for Wahoo. The Bryton 310 works perfectly with the Garmin insert. (Most head units typically fit either the Garmin or Wahoo insert.)
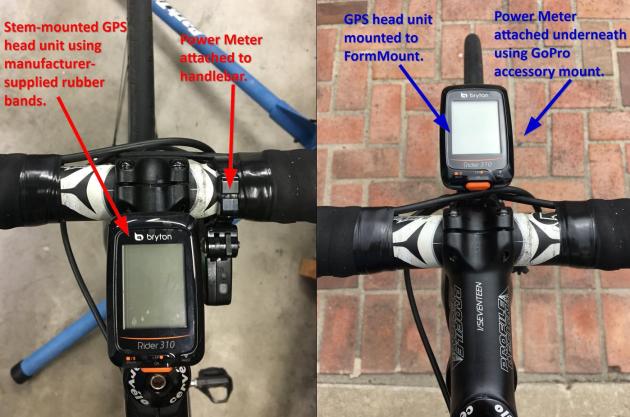
As you can see in the BEFORE photo, left, because the cabling is so tight on the Cervelo, the only place to mount the Bryton was on the stem. There is just enough room to mount the PowerPod (power meter), but it is not an ideal location since the cables want to block the front of the PowerPod (where the air intake is).
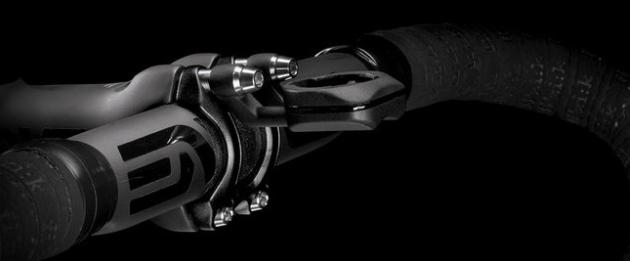
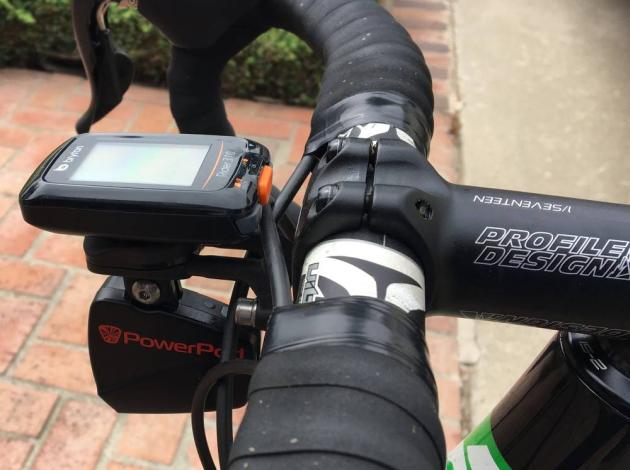
But as you can see in the AFTER photo, right, mounting the head unit onto the FormMount (again, in the BOTTOM:FORWARD:UP position) really cleaned up the cockpit, which is exactly what the FormMount is designed to do. With the optional GoPro mount, I was able to mount the PowerPod under the Bryton. You get a close-up view of how it all came together in the photo below.
A Few Surmountable Issues With the FormMount
As mentioned in the subheadline above, the FormMount is truly a unique product that almost, but not quite, hits it out of the park.
The single biggest issue is that the current version has no tilting adjustability. In effect, the mount takes on whatever angle your stem is. That could mean that your head unit will be, in the best case, level. It could also mean that your computer is tilted down and away from view, or tilted up to the point of being in another awkward viewing angle.
We’ve been told by F3 Cycling that the company is working on a new model that will allow for tilt, thus overcoming the issue.
The second main issue was that, when tightening the M5 bolts to secure the FormMount at the specified torque, both “arms” wanted to turn, causing the whole unit to twist and lean sideways. After several attempts at tightening, I finally resorted to holding each “arm” with a pair of channel lock pliers. This worked, but scuffed up the arms. One final check with the torque wrench and channel locks and the FormMount was straight and set to 4Nm.
Other, lesser, issues included the trial and error of finding the best mounting option. It was a real pain reconfiguring the stem 3 different times. Also, the FormMount can only be used with 4-bolt stem caps AND those with parallel bolt axis – a minor issue since most stems come in a rectangular 4-bolt pattern and use the required M5 bolts. Finally, the only 2 mounts available are Garmin and Wahoo (though a number of head units utilize one of these “standards.”
The Last Word
As tested, the price for the mount and GoPro option was $74.90 (the mount alone is $59.95; $14.95 for the GoPro attachment). That’s on the higher end of the scale of a number of quality mount options.
On the plus side, mounting a unit using the stem bolts really does free up the handlebar and cockpit. The FormMount can be configured in any of five positions; three using the top stem bolts and two using the lower stem bolts.
With its use of over-molded stainless-steel arms, the FormMount is most definitely solid, and should be long-lasting. Its unique design allows the arms to adjust to stem cap bolt distances from 16mm-41mm!
In its current configuration, it’s useful for those special purpose solutions like with my daughter’s bike and on bikes that have a close-to-horizontal stem.
I think F3 Cycling’s FormMount almost hit thenail on the head. It is a great idea, and with a few tweaks to the product, it will be a winner. We look forward to seeing the new version with tilt adjustability, and whether some of the lesser issues have been overcome as well.
August 2017
Coach Rick Schultz is an avid cyclist who trains, races and coaches in Southern California. Rick is an engineer by trade, and in addition to being a coach, he’s a bike fitter and prolific product reviewer. He’s the author of Stretching & Core Strengthening for the Cyclist and Bike Fit 101: Your Toolset for a Great Bike Fit in the RBR eBookstore. Check his product reviews website, www.biketestreviews.com, and his coaching site, www.bikefitnesscoaching.com. Click to read Rick’s full bio.
I was part of the F3 Kickstarter program. I got the product during it’s first shipping period. The insert for the Garmin broke during a greenway ride and sent my Edge 1000 to the ground (silicone cover saved the Garmin). When the company was contacted they sent a re-engineered part to the hotel since I was on a road trip. The company is very consumer friendly. I now have been riding with the Edge 1000 on a Zipp stem cap on the lower bolts and a Cycliq 12 under it using the GoPro mount. I find placing a temporary spacer between the F3 arms prevents the arms from twisting while torquing stem cap bolts.
Will buy when they have a model that will accommodate an angled stem.
I got these through the Kickstarter as well, but only just installed them this past weekend. I, too, used channel-lock pliers to keep the arms from twisting in place while torquing down, but I wrapped the pliers in a rag first. First test rides went well. Glad to hear the mount holds both a bigger Garmin and the Fly12; I have an 810 on now, and plan to add a Fly12 – I’ve been worried about the weight load.
I bought two from the Kickstarter introduction, one for my long-distance road bike (allows much easier insertion of the re-charger plug necessary for double centuries on my Garmin 800) and one for my recumbent. Both fit and work extremely well though the one on the recumbent sits a bit high so I need to experiment with the other (lower) mounting positions.