
Jim’s Tech Talk
By Jim Langley
Not too long ago in one of our Quick Tips stories, we answered the question, “Are drop bars better?” Here’s a link if you’d like to read the original Q and A: Are drop bars better?
I want to add a little to the original answer because dropped (also called “drop” or “racing”) bars are often misunderstood. For example, people new to them can assume the only way to use the curly bars is to ride on the lowest positions – because that’s where it’s easiest to brake and shift. Then, if they feel uncomfortable down there all the time, they may decide the only solution is to swap out to flat bars. You’ve probably seen people riding with them turned upside down, too!
The 2 Benefits of Dropped Bars
I think that’s a shame because these new riders never had the opportunity to experience the two biggest benefits of dropped bars: more comfort and efficiency.
More Comfort
Dropped bars boost comfort by providing multiple hand positions. This lets you move both your body and hands to relieve pressure on all your contact points, stretch out and stay comfortable on even the longest road and gravel rides.
Hand pain and numbness are among the most common roadie complaints. The ulnar nerve runs through the hands and it’s susceptible to constant pressure. Riding with dropped bars the pressure can usually be relieved simply by moving to another hand position every 10 to 15 minutes. If you suffer from hand numbness, pain and nerve issues, check out our helpful tips in these articles: https://www.roadbikerider.com/avoid-hand-numbness-bicycle/.
More Efficiency
And in the same way they boost comfort, drop bars optimize your riding efficiency. Again, you change your hand and body positions to do it, such as gripping the brake hoods when standing to climb, riding on the drops where it’s more aero and you can cheat the wind, and gripping the tops when sitting up to relax and drink or eat. Those are just a few examples.
Handlebars Must Be Set Right For You
It’s important to understand that these benefits are only available if the dropped handlebars are the right size and shape for you. And only if they are correctly positioned on the bike for you. But, before we get into how to know if the bars are right and in the best position, we should look at the many ways you can hold on to drops because that knowledge helps in evaluating how your drops are set up on your bike.
Always Hook a Thumb, Wrap Fingers or Hang On
Also important to know is that as you move your hands to different grip positions on the dropped bars you always want to maintain a good hold of them with at least one hand. Otherwise if you hit a bump or hole, your hands can slip off the bars, which usually causes a crash. I lost it and broke an elbow this way by letting go of the bars and trying to reset my cyclometer with both hands – stupid!
To stay holding on and in control, always be sure you’ve hooked at least one thumb beneath the bar, wrapped your fingers around them or have a sure purchase with your palms. That way, that rut, hole or wobbly rider next to you won’t cause a crash.
Mixed Hand Positions
Next I’m going to go over 9 hand positions on dropped bars. I don’t include mixed hand positions you might see and use, like having one hand on the brake hood to do the shifting and braking while the other is holding onto the top of the bar. As long as you like it and can still maintain control of the bike it’s fine to grip however you want – that’s the beauty of having so much handlebar!
9 Positions
I’m not sure every roadie will agree on this list of hand positions, so feel free to comment with your take on the number of positions drop bars have (or that you use) and which you would add or delete. Keep in mind that these are for the latest road bikes that have aero brake levers – no cables protruding from the tops.
From my experience, though – and based on observing this year’s professional ranks, I’d say there are 9 commonly used positions on dropped handlebars. Note that position 3 here may not be available on smaller, compact handlebars.
Note on the “Faux Aero Bars” Position
I’m not including the forearms-on-the-handlebars position that mimics riding with aero bars because in my opinion having tried it now and then, I think it’s the riskiest of all positions since you’re not holding onto the bars at all. I believe the UCI (the governing body of pro racing) recently outlawed it, too. But they have no jurisdiction over anyone else.
Here’s my list with photos – that were incredibly challenging to take!
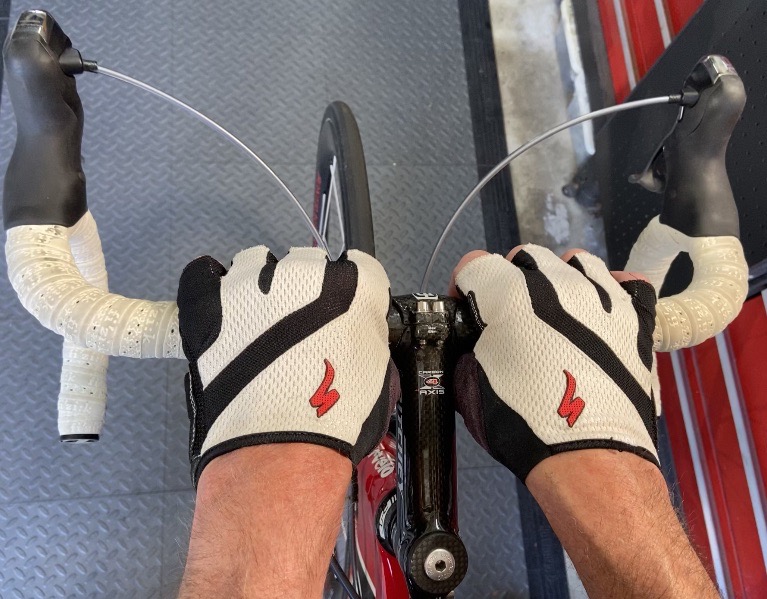
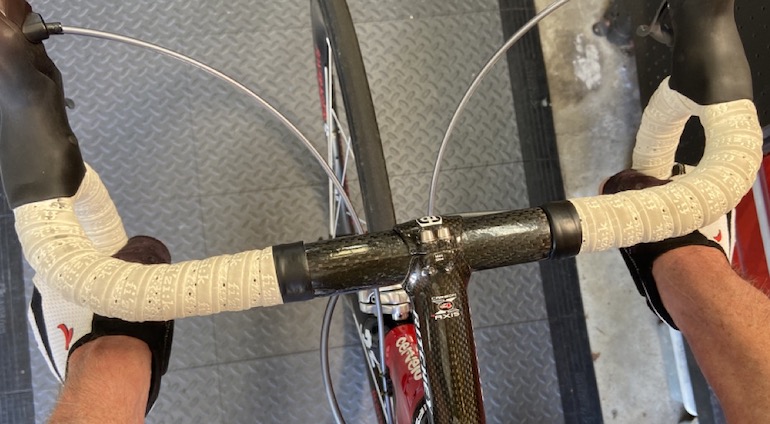
1. On the top with hands palms-down holding on right next to the stem. The highest position, great for sitting taller to see, and good if you need to turn to look back since you’re less likely to swerve with a hand so close to the center of the bike.
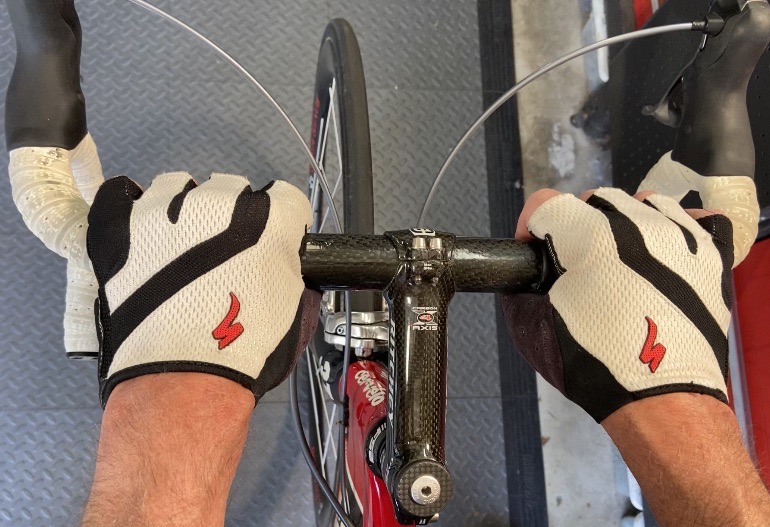
2. On the tops with hands palms-down holding on in-between the stem and brake levers. The second highest position and a popular one for extended climbing while sitting since it opens your chest and diaphragm for breathing. Keep reading for the favorite position for climbers who prefer standing.
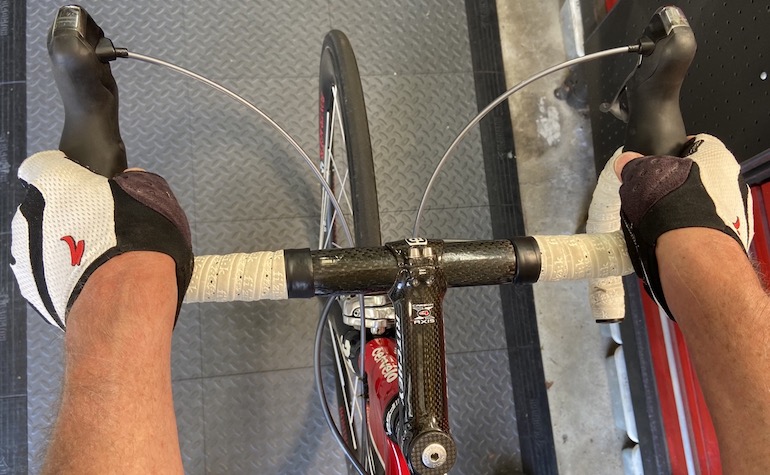
3. Hands rotated with palms facing in, holding onto the bars just above the brake hoods. As mentioned earlier, this position is usually only available on large size bars with big curves. This grip puts you a little lower and rotates the hands which relieves any pressure on the nerves.

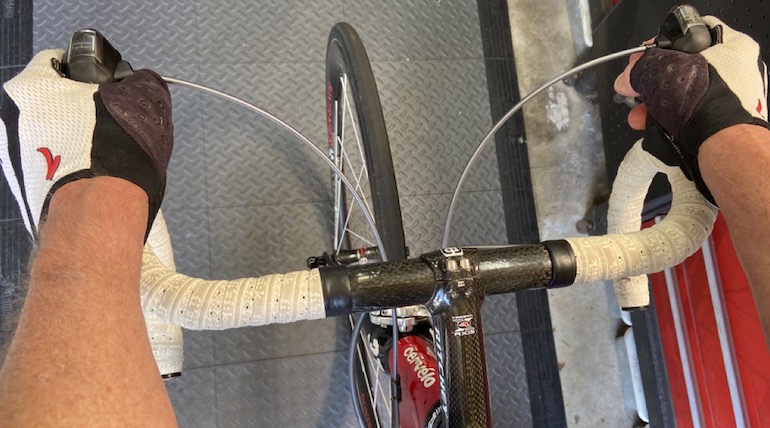
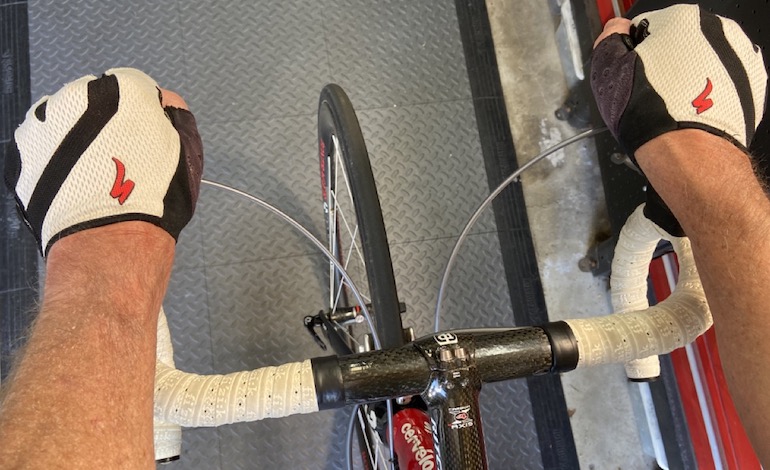
4. Hands rotated with palms facing in, holding on and resting partly on the bars and brake hoods. Nice cruising position because you’re a little more aero, have easy access to the braking and shifting and the palms face in relieving pressure. It’s also good for standing to climb if you like to grip both the bars and hoods.
5. Hands rotated with palms in and hands fully on the brake hoods to be able to brake from there and stand and climb. This position has the benefits of position 4 and a little better grip since you can wrap your fingers around the hoods. It’s the preferred position for roadies who like to do long climbs while standing because it lets you relax your hands and upper body as you rock the bike to weigh and drive each pedal.
6. Hands palms-down and resting on the front of the brake hoods. This is done in different ways. Some roadies put their hands so that the hoods’ ”knobs” are in the thumb/forefinger crotches as a way to get a better grip. Others, as shown in the photo, put the knobs centered under the palms and let their fingers dangle over the front. NOTE that this is the one position that’s a little dangerous because a bump could knock your hands off. Still, it’s popular because it lets you stretch out your back and with the hands punching holes in the wind out front it’s a semi aero position without going all the way down to the drops. And you can brake and shift without moving your hands much, too.
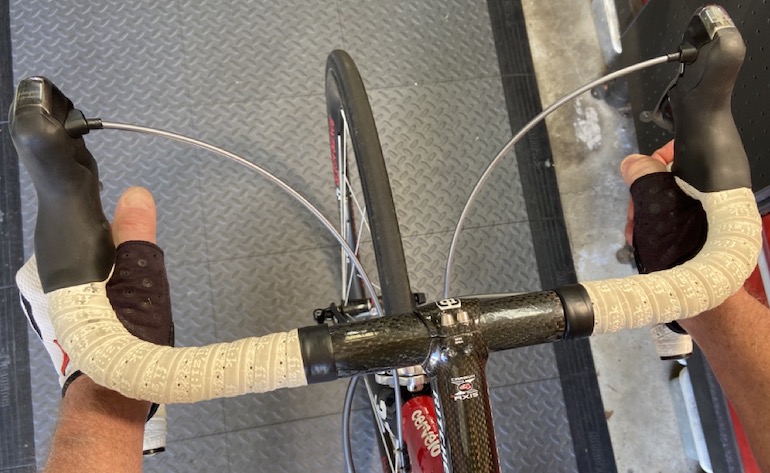
7. Hands rotated with the palms in fingers wrapped holding onto the hooks/the bends right below the brake levers. The first of the lower, more aero/efficient positions. Provides maximum grip for braking and shifting so it’s the preferred descending position. Sprinters love this position since they’re as low as they can crouch and have a great draft: can pull on the bars for max power; and can hit the exact gear needed fast.
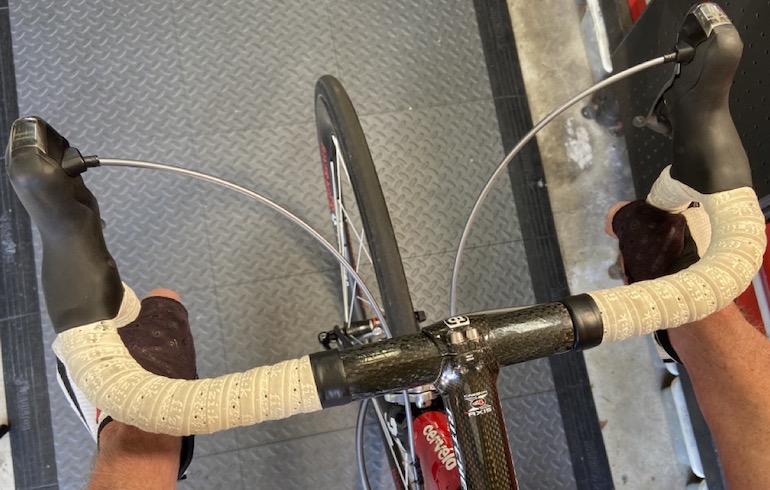
8. Hands rotated with the palms in and fingers wrapped holding on in the middle of the drops. Another lower/efficient/aero position that’s good for cruising when you don’t need to shift or brake that much. You sit a little higher than position 7. Popular for time trialing and descending when it’s safe and you won’t be hitting the brakes much.
9. Hands rotated with the palms in and fingers wrapped holding on the ends of the drops. The same benefits and use as position 8 with the hands are a little closer to the knees, more under your shoulders, which can raise your upper body and head a little higher than position 8. See the next paragraph for another benefit of this position.
Ride in the Drops for Safety in the Group
Another wonderful benefit of drop handlebars, specifically when using position 9, is safety when riding in a group of cyclists. If you grip the ends of your drop handlebars when you’re in a group of riders, your arms block access to your bars. Then if someone bumps into you from the side or if you bump into them for some reason, their handlebars cannot “hook” onto your handlebars (because your arms prevent it). And, if you can’t get hooked by another rider, you have a good chance of just “bouncing” off them and continuing riding rather than crashing. It’s one of the first rules they teach in road racing classes for riding in close proximity to others and especially if you don’t know if the group you’re with is made up of good, safe bike handlers.
How You Know Something’s Wrong With Your Bars
At the beginning I said in order to enjoy the benefits of dropped bars they have to be the right size for you and also positioned correctly. The giveaway that you might need a different size or shape handlebar or have your bars repositioned (such as with a shorter stem or higher stem position), is that you can’t get comfortable when you try to ride in the different positions.
When the bars are right you’ll be able to use all the available positions and none will feel like they cramp you or make you reach or bend too far. You can try shooting a video of yourself on a trainer and moving around on the bars to find and address issues. Or have a professional bike fitter do it. Getting it right will be worth the fee.
Summing Up
If you’re new to road riding or gravel, I hope we’ve made a good case for giving drop handlebars a try. If you have any questions, leave a comment and I’ll reply and if you’re an experienced drop bar rider with additional tips, please drop a comment and share. Thanks!
Jim Langley is RBR’s Technical Editor. A pro mechanic & cycling writer for more than 40 years, he’s the author of Your Home Bicycle Workshop in the RBR eBookstore. Tune in to Jim’s popular YouTube channel for wheel building & bike repair how-to’s. Jim’s also known for his cycling streak that ended in February 2022 with a total of 10,269 consecutive daily rides (28 years, 1 month and 11 days of never missing a ride). Click to read Jim’s full bio.
Great article! I use everyone of the hand positions, and the “hooked thumb” as well, learned that the hard way. Some of the hand positions I learned from watching countless hours of spring and summer cycling races on Eurosport. The pros use 1 and 2 often during climbs and breakaways.
Thanks, Kenneth. I think lots of us learned the hard way 😉
I usually find your articles very informative and respect your knowledge and experience. But, to say you have 9 different positions based on a slight shift of the hands strikes me as a bit over the top. Based on this standard, there are an infinite number of hand positions.
Thanks for the comment, Richard, but I’m actually very surprised by it – and somewhat disappointed since I spent 2 days working on this article and the photos.
Going back to the 60s when I first started riding, we were taught 7 hand positions for drop handlebars. I tried to find an original diagram from back in the day because I remember seeing them. If I find one I’ll post it.
In writing this article and taking the photos, I based it on those original 7 positions and then thought about the “modern” positions based on changes in bar geometries and the new levers and cables/wires.
The different hand holds on drop bars are definitely NOT “slight shifts of the hands,” they are significant changes in how you’re holding on not just in where but how you’re gripping, too. And, as I wrote in my intro, yes, you might make up some of your own positions and I was interested in hearing about them. But there isn’t an infinite number because the dropped handlebars aren’t large enough for that.
Hope that helps explain,
Jim
“2. On the tops with hands palms-down holding on in-between the stem and brake levers.”
I often use a variation of this with pinky fingers resting outside the downward curve of the handlebar.
As for riding on the drops… I know I’ve achieved in-shape riding fitness when my belly is no longer preventing me from assuming this position. See also: neck flexibility.
Yes, riding in position 9 will prevent your bars from “hooking” another rider’s bars….but, unless the other rider is also in position 9, his/her bars can still “hook” your bars.
Thanks, Walt. Since riders in a pack are usually all moving forward, it’s unlikely that the cyclists not riding in the drops will be able to hook those who are because in order to do it, they need to overlap or go backwards to hook someone’s bars. So in a crash it might happen with the slower/stopped bikes; but the riders on the drops still have a better chance to avoid getting hooked and taken down.
Thanks,
Jim
This is a great, well thought out article. I tend to use all 9 positions. Thank you for all the time you put into taking the pictures. What I’ve noticed is when in the lowest part of the drops I am seeing pressure on my knees having trouble turning over the top of the stroke. Just purchased 165mm cranks which I think will add to my comfort overall. Again, thanks for all your effort putting this together.
You’re welcome, David, glad you enjoyed the article! If you are feeling some pressure on your knees when you’re on the lowest position, you might check your handlebar shape. If you have a deep drop bar you might try one of the compact bars, which will raise your lowest position a bit. That might solve the pressure issue.
Another possible solution would be to get your bars a little closer to you so you don’t have to reach down quite so much. You’d do that with a different stem. You can figure out where you’d like to move the bars by placing pads on the bars and experimenting to figure out what change would allow you to be comfortable riding in all the positions you enjoy riding in. Shorter crankarms can help, too, but 5 or 10mm may not be enough and if so you might want to experiment with a different bar position for more of a change in the reach.
Thanks again,
Jim
Let me add that riding with your hands on the drops promotes better engagement of the gluteal muscles for more power.
Riding with hands on the brake hoods once caused a thumb sprain. I had to stop quickly when a car pulled out in front of me. My bodyweight was forced onto my thumb. I find that strong core muscles keep me upright if I slip off the bars.
Thanks for sharing your tips and story about spraining your thumb in an emergency stop, David, great stuff!
Jim
Jim,
Thanks for the interesting and thought-provoking article.
Among the first things I learned about cycling was to maintain a straight line and to keep my upper body relaxed. And one of the keys to both was not to grip the bars tightly. Rather, one should keep one’s hands in good position to grip tightly if needed, but otherwise mostly keep them just resting on the bars. Hooking one’s thumbs was frowned upon because it tends to encourage a tight grip.
Collateral to that lesson was to learn to let the front wheel float over obstacles rather than to grip the bars tightly and try to steer through them. Learning to do this enables one to be more relaxed on the bike and to maintain a straight line, which benefits everyone else in the group. Gripping the handlebars tightly tends to cause one to wiggle down the road, which no one in the group appreciates.
Different circumstances warrant use of different hand positions, e.g. climbing, sprinting, tucking and freewheeling downhill. Of course, other circumstances will require hanging on for dear life with a tight death grip such as when hitting a patch of cobblestones at 25mph or a road that’s been chewed up in preparation for repaving, or one littered with potholes.
I would add to the nine positions a couple more if one accepts that when riding on the tops, riding with the thumbs on top is acceptable. When one hooks one’s thumbs, the palms of the hands tend to sit on the bar. However, when one places the thumbs also on top, the heels of the hand sit on top. Depending on the size of one’s hands, this changes one’s effective reach by about 5cm, which might be significant..
Thanks a lot for making these additional helpful and excellent points, Fixieguy! Much appreciated,
Jim
IMHO, the most aero of the 9 hand positions you note is 4 and not any of those with the hands in the drops. The big qualifier on my assertion is that the forearms need to be parallel to the ground. That is, the upper body is oriented as if the hands were in the drops, but with the forearms level to present less frontal area.
This image illustrates:
https://capovelo.com/wp-content/uploads/2015/10/forearms-on-bars.jpg
Thanks, Jeff, you could be right – thanks for linking to that great photo. I wasn’t thinking of that body position in my list of handlebar positions but with the arms like that it should be more aero than with the arms straight. Excellent point, thank you,
Jim
notes on position one confirm a different problem. riders should have a rear view mirror. its impossible to look over your shoulder without swerving or at least pulling a little to the left.
I respectfully disagree. With just a bit of training, it’s possible to look back while maintaining a straight line (or even drifting slightly right if one chooses). It’s all about being aware of the orientation of your hands on the bars (especially your right hand, assuming you’re looking over your left shoulder in a driving-on-the-right-side-of-the-road scenario) and not changing the orientation of the bars relative to the centerline of the bike.
It as we age, many of us lose the ability to turn our head sufficiently to get a good look over our shoulder. In those cases, a mirror is an important addition to the bike setup.
I use “no hands” position when I’m texting or recording my podcast. but then, I do stunt falls.
wow, I’m impressed!
I ride near or on the hoods and move around alot. Rarely in the drops.
I can ride one handed when I’m waving at all the friendly and not so friendly cyclists. My falls aren’t impressive and I have pictures to prove it. Happy trails!
What about splitting the fingers over the brake hoods? That can offer some relief as well.
As an “older” cyclist I need to add a consideration to your great article, Jim. Due to my progression from “casual” cyclist, commuter cyclist, competitive triathlete, old (very old) and stubborn cyclist who continues to ride his over 20 year old custom fit bike and having put on a “few” pounds, my custom fit no longer allows comfort in all 9 positions, Changing the position of my bars – higher and closer to the headset – is what I need, But, as I said I’m stubborn and have talked my self into believing the discomfort of some of the 9 positions you described will motivate me to lose weight!
Thanks for the comprehensive article. I’m using it for more motivation to lose weight, which I’m sure wasn’t your intention in writing it!
I’m happy to hear you got so much out of the article and especially that it’s motivating you to achieve your goals Neil. Thanks for letting me know and keep it going, you can do it!
Jim
>> Riding with dropped bars the pressure can usually be relieved simply by moving to another hand position every 10 to 15 minutes. <<
10 to 15 minutes? I generally find I have to change positions every 30 to 60 seconds.
Although I have used position 6 a few times in the past, I no longer do for exactly the reason you stated. I had a friend riding that position in a small group who hit a pot hole that was not properly pointed out. His hands went off and down he went. Not sure that is really a good position for amateur group rides anyway. This position reminds me of a wife’s friend who often tells us “preventable” when we are doing something that could have risk. At our ages, preventable is the better choice.
Super helpful article! I also find myself shifting positions very often when riding and did not know about some of the risks with some positions. Really appreciate the photos, thanks!
You’re very welcome Michel. Thanks for reading and commenting!
Jim
I also get some side stretching by having hands in different positions – right hood – left center etc. etc.
And the classic…. right hand on bars, left holding the dogs leash!
Thanks for all the articles, been reading/following for years (first time comment)
Thanks for all the support and your first comment Arch, appreciate it!
Jim
As an 80 year old rider who suffers the numb finger problem I really appreciated both articles on this topic. The pictures were a great addition! One thing not mentioned … no matter which position was discussed, is that it’s extremely important when removing one hand to point out a road hazard, the hand on the bar regardless of position, should be squeezed tighter to maintain control.