
By Stan Purdum
Hot!
- Easy to install
- Stores bike out of the way
- Parts are well made and operate smoothly
- Locking mechanism keeps cord from slipping backward when hoisting bike
Not!
- Directions are unclear about how to get the locking mechanism to release when lowering bike. But this is easily figured out when using the hoist system
Price: $39.99, but when you visit the site the first time, you are often offered a 10% discount on any purchase
The same system is available without the straps for $32.99
Available here: Delta
How obtained: Sample from Delta
RBR Advertiser: No
If you are like many readers of RoadBikeRider, you likely have more than one bicycle; in fact, you may have several more than one. And eventually, parking all those bikes becomes an issue. In my case, even though my garage is fairly spacious, I often find myself moving one or more of my three bicycles out of the way while doing other projects — or leaving one of our cars outside because the parking space in the garage is occupied by bikes.
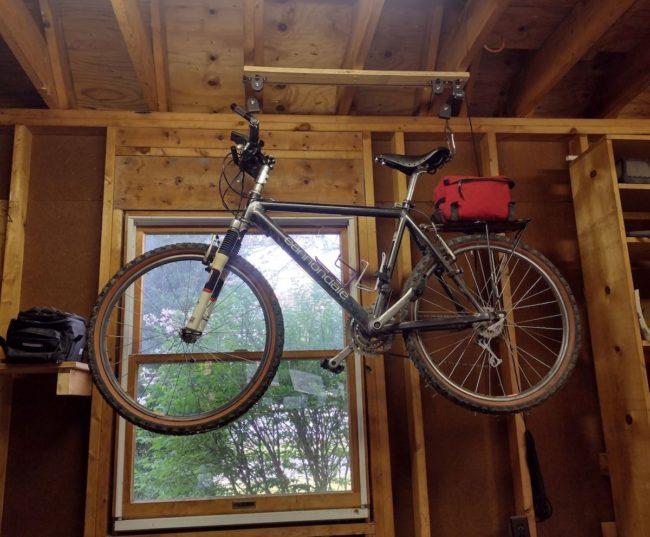
Delta provides an elegant solution. Using their Single Bike Ceiling Hoist With Straps, I was able to store my mountain bike, which I ride less often than my road bikes, aloft. The hoist is a system of cord, pulleys and hooks by which you can quickly hoist a bike up near your ceiling and keep it there until you want it, and then just as quickly lower it to the floor.
The kit includes all those parts, as well as directions and screws for installation of the system. It also includes straps in case you wish to elevate something other than a bike, such as a canoe, a cargo box or a ladder. The same system is available without the straps if you are only hoisting bicycles.
The installation itself is simple enough, but the placement of the system requires a bit of thought. You want to hang the bike in a location where you won’t need to walk beneath it because most ceilings aren’t high enough to haul the bike above head height. At 9.5 feet, my garage ceiling is higher than some, but when my bike is hoisted up, there’s still only about five feet of clearance beneath it. So in my case, it made sense to hang the bike near the back wall.
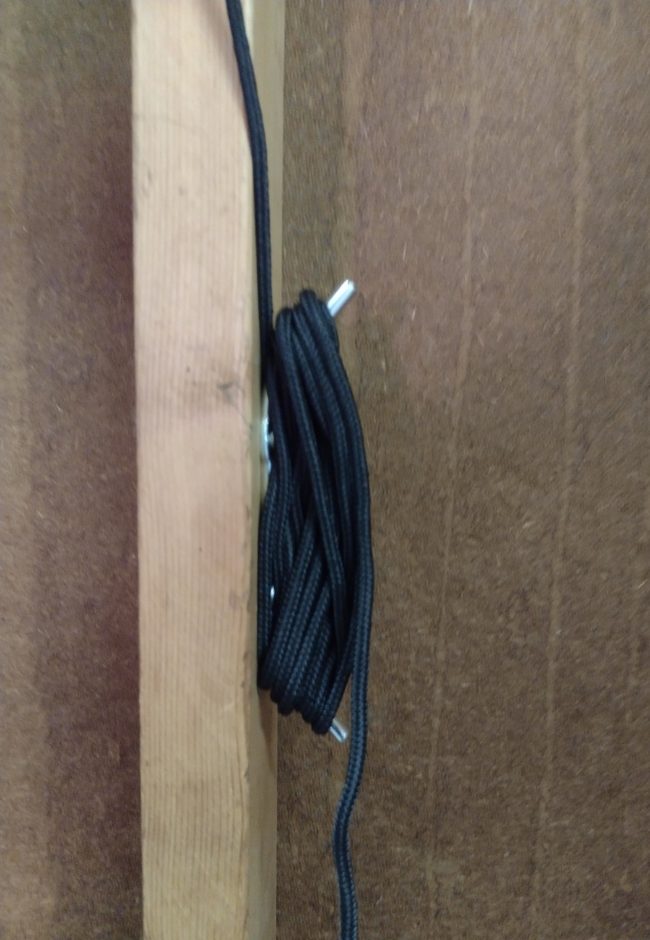
You also want a location where there is a vertical surface nearby where you can mount the cleat to which you secure the cord when the bike is hoisted in place.
The next decision is whether you will hang the bike in line from a single rafter or across three or four of them. My garage rafters are exposed, so I was able to decide this quickly. If your rafters aren’t exposed, you may need to use a stud-finder (available anywhere tools are sold) to locate them. The predrilled holes in the pulley frames make it easy to use the provided screws to attach them directly to the rafters if you are hanging the bike from a rafter, but if hanging it across a few of them, as I was doing, it’s best to first screw a board across the rafters where you want the bike to end up.
The provided directions spells all this out, and none of it is rocket science. A tall stepladder and a drill with a Phillips screw bit should make quick work of it. Here’s a quick video that gives an overview.
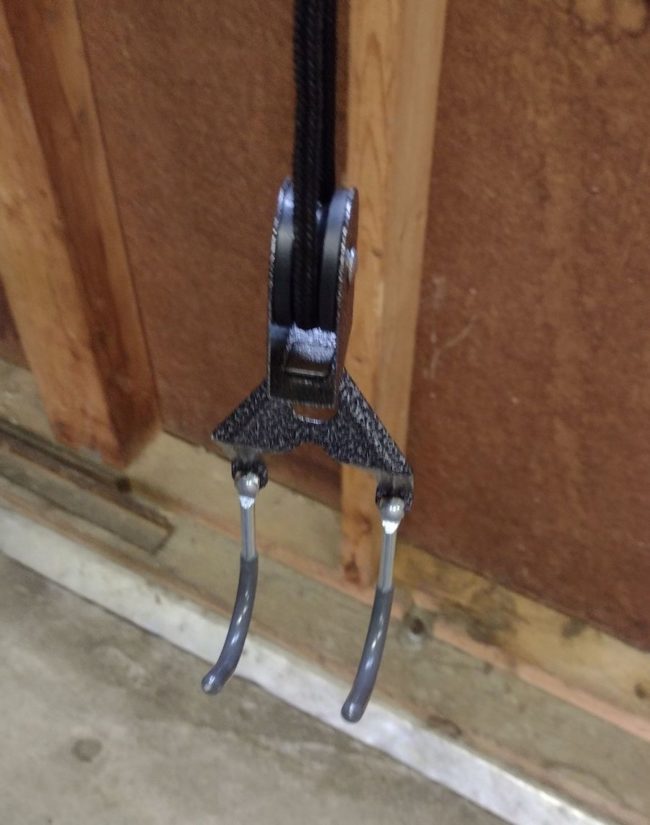
After screwing the pulleys into place, I threaded the supplied cord through them and the hooks (each hook is actually a dual hook, for security). I placed one dual hook under the bike saddle and the other under the handlebars. I then pulled the bike aloft.
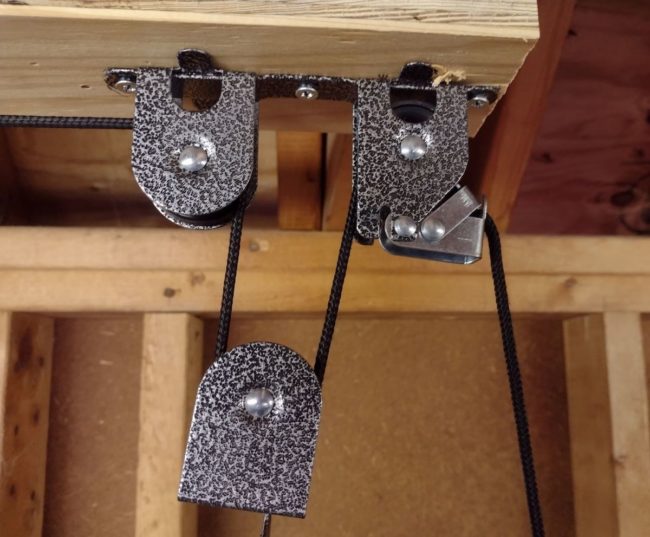
This did not require great force, but to keep the cord from slipping backward, there’s a clever locking mechanism on the pulley frame where the cord completes its journey through the whole assembly. When lowering the bike, you angle the cord the opposite direction to release the locking mechanism. In other words, if you have the cord ending its journey through the pulleys at the right end, you will angle the cord to right when hoisting the bike and angle it to left when lowering the bike. If you have the cord ending its journey on the left end you will do the opposite. (I’ve described this in detail because it’s the one thing the otherwise excellent directions are unclear about.)
This is a good hoist system and a good solution to how to store a bike I don’t use every day.
Stan Purdum has ridden several long-distance bike trips, including an across-America ride recounted in his book Roll Around Heaven All Day, and a trek on U.S. 62, from Niagara Falls, New York, to El Paso, Texas, the subject of his book Playing in Traffic. Stan, a freelance writer and editor, lives in Ohio. See more at www.StanPurdum.com.
I have 2 of these in my garage and they work great. I also used a board to attach the screws for the pulleys, but I screwed the pulleys to the boards at floor level, then attached the whole assembly to the rafters. This just meant less time working up on the ladder over my head.
Lee, your method makes perfect sense, and less time on a ladder is always a good idea.
What’s the weight limit? Stan, will you try it out with your ebikes?
Delta puts the weight limit at 100 pounds. I ride my ebike so often these days that I don’t hoist that one, but it weighs less than 100 pounds, so it should be able to be hoisted.
Thanks, Stan, nice review. What’s the cord made of and will it stretch over time from the bike’s weight? Seems that might be a concern??
Thanks!
Jim
Delta says the cord is nylon tensile. The US Netting company says, “For superior strength and remarkable stretching capabilities, nylon is the rope of choice. Stronger than both manila and polypropylene, nylon commonly finds itself pulling the heaviest loads and bearing the most weight. Having superior strength, nylon also maintains a smooth surface and its resistance to abrasion makes it ideal for pulley systems or winches.”
Elsewhere, I read, “Nylon can stretch when greater force is applied suddenly, and then return to its original length. This ‘memory’ feature of nylon makes it especially advantageous, since the stretching it can absorb does not change the tensile strength of the rope.”
So it sounds like the cord provided with the Delta system will do the job.