
No matter how long and how hard you train on your bike, as the decades pass your aerobic capacity and muscular power will inevitably decline. You can slow the rate of decline as explained in my 106 page eBook Anti-Aging: 12 Ways You Can Slow the Aging Process.
Improving your strength – both generally and especially your core is one of the ways to slow – even reverse – your declining performance.
Why Core Strength is Important
Core strength is important on the bike for four reasons:
- Your legs are levers and your pelvis is the fulcrum on the bike. If you have a strong core, the pelvis is stable and you get maximum power out of your legs. If you don’t have a strong core, with each pedal stroke your pelvis moves a bit and you waste energy.
- Your lower back is held in neutral alignment by a strong core. If your back is rounded, you’re pulling on your back muscles and during a ride, especially climbing, your back muscles will get tired and start to hurt.
- Your upper body is straight, not bent forward. Looking down the road your neck is minimally flexed preventing neck fatigue.
- Your hands rest lightly on the handlebar when your upper body is supported by a strong core. This prevents sore / numb hands.
Off the bike, a strong core holds your torso in neutral, i.e., with your spine in normal alignment. Without a strong core, your lower back will bow slightly, straining your lower back muscles and resulting in low back pain.
Testing Your Core Strength
Here are three tests of your core strength:
- Are your hands resting lightly on the bars like you’re typing so your upper body is supported by your core, not your arms and hands? Ride with your hands on the brake hoods, if you take your hands off the hoods will your core support your upper body at the same angle?
- When you are riding are your torso and pelvis moving around?
- Is your core strong enough that you ride with a flat back like this:
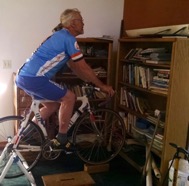
Or is your core weak so you ride with a rounded back?
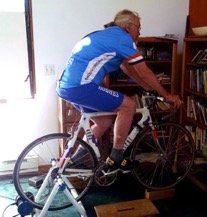
Riding with a flat back is the key to prevent lower back muscle fatigue and pain when climbing. When riding with a flat back you also flex your neck less to look down the road, which prevents fatigue.
Core Muscles
The surface muscles you use for crunches run up and down your abdomen; similarly, the surface muscles you use for arching and bending your back run up and down your back. Below these surface muscles are the core muscles, which run around your body. Because the deeper muscles form a girdle around your core, they are more effective at holding your pelvis, back and neck in alignment than crunches.
Core exercises are designed to teach you to activate the core muscles: your transverse abdominis, multifidus, internal and external obliques, diaphragm and pelvic floor muscles. You can’t feel the core muscles working — their action is subtle. Here are ways to visualize engaging them:
- Imagine a clock is resting on your belly with the 12 toward your chin. Imagine that you are pulling the three and the nine down toward the floor.
- Imagine that you are pulling your belly button down to your anus.
- Imagine that you are tightening the muscles around your bladder and sphincter.
- Imagine that you are trying to make yourself thinner to slip sideways among people in a crowded room.
- Imagine that you are pulling on a tight pair of jeans.
My Experiences
Over the last 50 years I’ve had three accidents requiring surgery. I was hit by a truck on my bike, I slipped riding on an icy road and I fell off a ladder. I also had elective foot surgery. I wrote a column about Preparing for Time Off the Bike before the elective surgery.
All four times I was in bed for weeks and lost a lot of fitness. Each time I had an excellent physical therapist (PT) who worked with me to regain strength, particularly core strength. I’ve also taken multiple clients to PTs at the Boulder Center for Sports Medicine. None of these PTs recommended crunches or back extensions to strength the surface muscles. The PTs prescribed exercises to strengthen deeper core muscles described above.
Core Exercise Program
Here are three groups of exercises. In each group just do one exercise. Three repetitions of an exercise will take you about five minutes, which is 15 minutes a session. Four sessions a week are all you need to do to improve your core.
Progression:
Progressively increasing the number of reps or duration of the exercise is the key to improving your core strength. Here’s how to progress through each group:
- Group #1 Bridging build up to three sets of 20 reps of an exercise with good form before moving on to the next exercise in the group.
- Group #2 Bird Dog build up to three sets of 20 reps of an exercise with good form before moving on to the next exercise in the group.
- Group #3 Planks try to increase the duration of all three reps by several seconds a week.
Group 1. Bridging
For each of the bridging exercises you can stretch your arms out to your sides for balance or keep your arms along your sides with you hands in your lap.
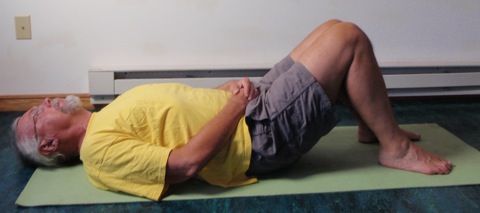
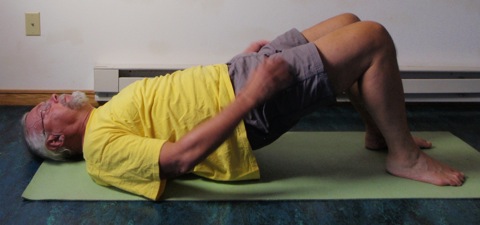
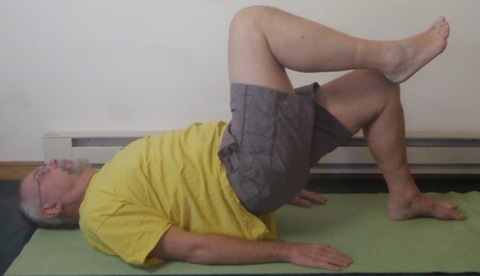
Bridging: Lie on your back on the floor with your knees bent and your feet flat on the floor near your butt. Tighten your core muscles and then tighten your glutes (butt muscles) to raise your butt about 8 to 12 inches off the floor and lower your butt to the floor. Three sets of 10 repetitions building to 20 repetitions.
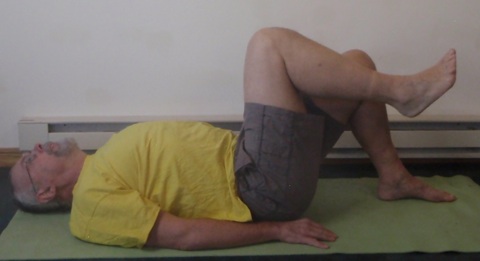
- IF you can do three sets of 20 reps of Bridging with good form, then progress to Single Leg Bridging on the floor.
Single Leg Bridging: Lie on your back on the floor with your knees bent and your feet flat on the floor near your butt. Tighten your core muscles and lift your right leg off the floor; we’ll work the left glute first. Tighten your left glute (butt muscle) to raise your butt about 8 to 12 inches off the floor and lower. One rep is to lift one foot, use the other leg to raise butt, lower your butt to the floor and lower your other foot to the floor. (You can make this harder by not lowering your foot in between each rep.) Alternate sets of left and right legs. Three sets of 10 repetitions building to 20 repetitions.
- IF you can do three sets of 20 reps of Single Leg Bridging with good form, then progress to Ball Bridging.
Ball exercises
You’ll need a “Burst-Resistant” exercise ball, also called a balance or stability ball. You can order one from Amazon. Do not get a department store play ball – these aren’t strong enough.
Exercise Ball Sizes
| Height | Ball Diameter |
| Less than 5 ft. (1.5 m) | 45 cm |
| 5 ft. to 5 ft. 6 in. (1.5 – 1.7 m) | 55 cm |
| 5 ft. 6 in to 6 ft. 2 in. (1.7 – 1.9 m) | 65 cm |
| Over 6 ft. 2 in. (1.9 m) | 75 cm |
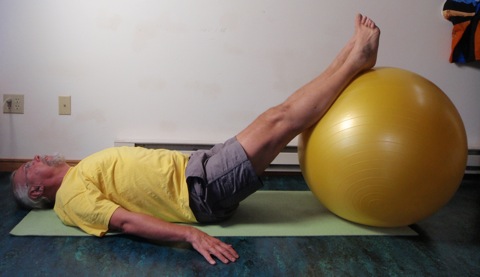
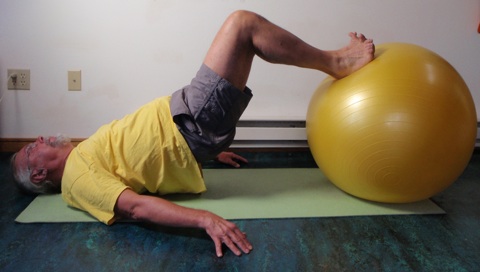
Ball Bridging: Lie on your back on the floor with your heels resting on the exercise ball. Tighten your core muscles and then tighten your glutes (butt muscles) to raise your butt until your torso is in a straight line and lower your butt to the floor. Three sets of 10 repetitions building to 20 repetitions.
- IF you can do three sets of 20 reps of Ball Bridging with good form, then progress to Ball Hamstring Curl.
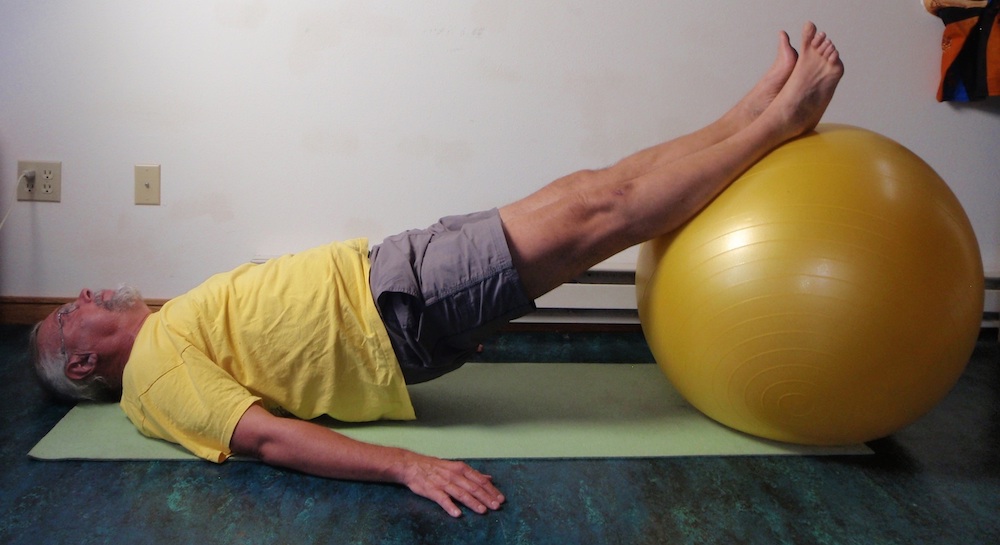
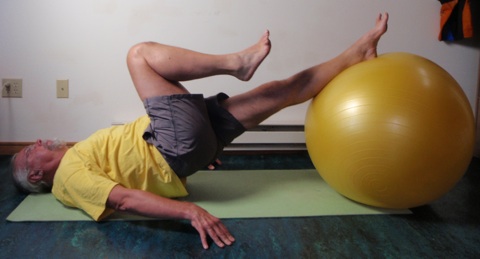
Ball Hamstring Curl: Lie on your back on the floor with your heels resting on the exercise ball. Tighten your core muscles and then tighten your glutes (butt muscles) to raise your butt until your torso is in a straight line. Hold and use your hamstrings to draw the ball toward your butt and return. Keep your butt in the air between each repetition. Three sets of 10 repetitions building to 20 repetitions.
- IF you can do three sets of 20 reps of Ball Hamstring Curl with good form, then progress to Single Leg Ball Bridging

Ball Single Leg Bridging: Lie on your back on the floor with your heels resting on the exercise ball. Tighten your core muscles and lift your right leg off the floor; we’ll work the left glute first. Tighten your left glute (butt muscle) to raise your butt until your torso is straight and lower your butt back to the floor. Keep one foot in the air for the full set of reps. Alternate sets of left and right legs. Three sets of 10 repetitions building to 20 repetitions.
- IF you can do three sets of 20 reps of Single Leg Ball Bridging with good form, then progress to Single Leg Hamstring Curl.
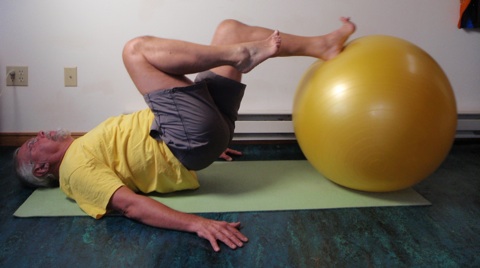
Ball Single Leg Hamstring Curl: Lie on your back on the floor with your heels resting on the exercise ball. Tighten your core muscles and then tighten your glutes (butt muscles) to raise your butt until your torso is in a straight line. Lift one foot off the ball and use your hamstrings in the other leg to draw the ball toward your butt and return. Keep your butt in the air for all of the reps in a set. Three sets of 10 repetitions building to 20 repetitions.
- Maintenance: When you can do three sets of 20 reps with good form then continue doing three sets of 20 reps.

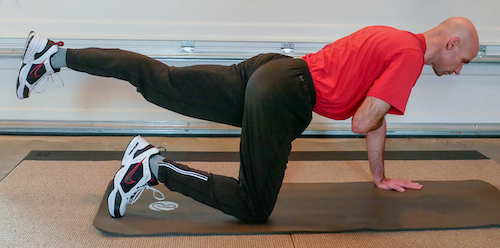
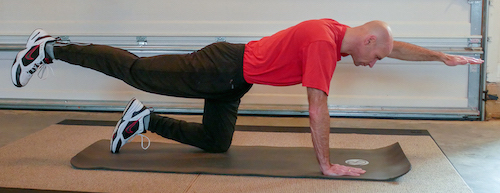
Group #2 Bird dogs
The bird dogs are simple – all you need to do is lift your opposite leg and arm. The objective is to raise your opposite leg and arm and lower without moving your torso. As a friend to place a hand on your back to see if it’s immovable.
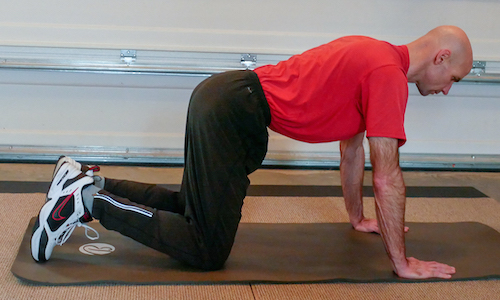
Bird dog #1: Start with your hands and knees on the floor. Tighten your core so that your pelvis is in neutral and doesn’t move. Raise your left leg until almost parallel with the floor. Lift your right hand off the floor, touch your chest, put your hand back on the floor and lower your leg. Repeat with the other leg and arm. That’s one rep. Your back should not move— just like a table. Three sets of 10 reps building to 20 reps.
- IF you can do three sets of 20 reps of Bird dog #1 with good form, then progress to Bird dog #2.
Bird dog #2: Start with your hands and knees on the floor. Tighten your core so that your pelvis is in neutral and doesn’t move. Raise your right arm and left leg until almost parallel with the floor, hold 3-5 seconds and lower. Your back should not move— just like a table. Repeat with left arm and right leg. Three sets of 10 reps building to 20 reps.
- Maintenance: When you can do three sets of 20 reps with good form then continue doing three sets of 20 reps.

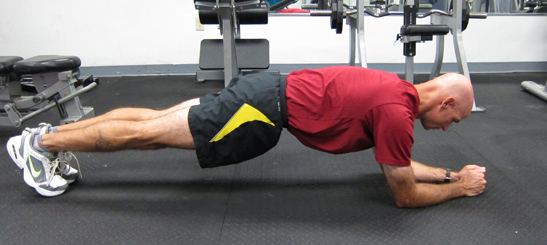
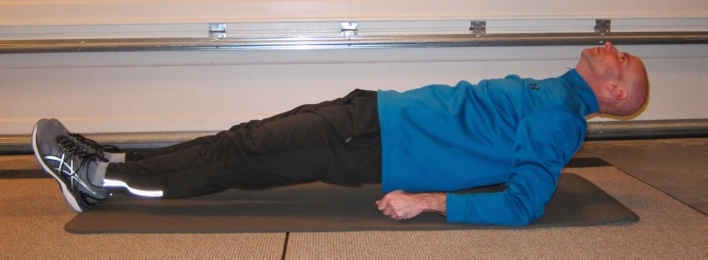
Group #3 Planks
Rotate through these for variety. The first day you practice the plank, do the front plank, the second day do both side planks, the third day the back plank, the fourth day the front plank, etc.
Group #3 Planks
Rotate through these for variety. The first day you practice the plank, do the front plank, the second day do both side planks, the third day the back plank, the fourth day the front plank, etc.
Day #1 Front Plank: Lie prone on your front on the floor with your toes bent and resting on the floor. Your elbows are bent resting on the floor under your shoulders with your forearms extended along the floor in front of you. Tighten your core muscles to raise all of your body off the floor except for your toes, elbows, arms and hands. Use your core muscles, not your surface abdominal muscles. Your body should be in a straight line. Three repetitions. Try to increase the duration of all three reps by 5 seconds each week or two. Rest 30 – 60 seconds between reps.
Day #2 Side plank: Lie on your right side on the floor with your right foot and elbow resting on the floor. Your left leg is on top of your right leg and your left foot is on top of your right foot. Tighten your core muscles to raise all of your body off the floor except for your left foot, ankle and elbows. Your body should be in a straight line. Hold—use your core muscles, not your surface abdominal muscles. Do all three repetitions on right side, then three repetitions on left side. Try to increase the duration of all three reps by several seconds each week or two. Rest 30 – 60 seconds between reps.

Day #3 Back Plank: Lie prone on your back on the floor with your heels resting on the floor. Your elbows are bent resting on the floor by your shoulders with your forearms extended along your sides on the floor. Tighten your core muscles to raise all of your body off the floor except for your heels, elbows, forearms and hands. Your body should be in a straight line. Use your core muscles, not your surface abdominal muscles. Three repetitions. Try to increase the duration of all three reps by several seconds each week or two. Rest 30 – 60 seconds between reps.
My eBook Anti-Aging: 12 Ways You Can Slow the Aging Process includes chapters on how to meet the American College of Sports Medicine’s recommendations on aerobic, high intensity aerobic, strength training, weight-bearing exercises, balance and flexibility. I include sample weeks and months for different types and amounts of exercise. I give you plans to build up to 100 km and 100 mile rides. I include a plan to increase over two years your annual riding from around 4,000 miles (6,500 km) to over 5,000 miles (8,000 km) a year. You can easily modify the plans for different annual amounts of riding. I discuss the importance of recovery and how to gauge if you are getting enough recovery. I combine the different kinds of training into programs that balance training and recovery. The 106-page Anti-Aging: 12 Ways You Can Slow the Aging Process is $14.99.
Coach John Hughes earned coaching certifications from USA Cycling and the National Strength and Conditioning Association. John’s cycling career includes course records in the Boston-Montreal-Boston 1200-km randonnée and the Furnace Creek 508, a Race Across AMerica (RAAM) qualifier. He has ridden solo RAAM twice and is a 5-time finisher of the 1200-km Paris-Brest-Paris. He has written over 40 eBooks and eArticles on cycling training and nutrition, available in RBR’s eBookstore at Coach John Hughes. Click to read John’s full bio.
Thanks for this article. This group of exercises is so important for people, whether the ride or not. I have low grade spondylolisthesis that was occurred from a snowboard fall about 20 years ago. I had a lot of trouble cycling more than 1 hour and would tweak my back regularly. Went for to top orthopedist at an academic center thinking I’d need surgery. He ‘prescribed’ the exercise Coach Hughes shows here. I was doing some on the ground but not on a Swiss ball. I was told I needed to really strengthen my core to preserve my spine.
It worked!!! I’ve done many, many century rides and not to mention rarely having back issues from what I do in my non-cycling life which includes manual labor on a hobby farm. I religiously do my core workout 3x per week.