
Jim’s Tech Talk
By Jim Langley
In recent newsletters we’ve mentioned ultradistance legend Lon Haldeman. We reviewed his new book Cycling Pioneer, A Record-Setting Ride from New York City to Los Angeles and Back . And we also shared an article written by Lon and RBR co-founder Coach Fred Matheny with tips on riding multi-day tours on e-Bikes.
After setting his record crossing the USA both ways, Lon teamed up with Pete Penseyres in 1987 and set the tandem record across the country. Pete had won the Race Across America in 1984 and 1987 so he was the perfect partner to team up with and the pair set a new record of 7 days, 14 hours and 55 minutes. If you’d like to watch, on the PAC Tour YouTube channel there are videos from many of the races including Lon and Pete’s.
What’s “hot foot”
During that ride Lon suffered from hot foot. If the term’s new to you, in its worst form hot foot is an excruciatingly painful condition that feels like you’re standing on hot coals. Taking the pressure off the pedals doesn’t relieve the pain, nor does getting off and walking, so there’s no easy way to continue riding, you just have to suffer.
If you’re in an organized century where they realize the potential for hot foot, they might have prepared buckets full of ice water at rest stops to stick your feet into for as long as it takes to relieve the pain and get back on the bike. I spent an hour doing that once at the top of the infamous resurrection climb during the Davis Double Century in Davis, California. I would have had to abandon the ride otherwise.
Lon’s cure for hot foot
In his own words, Lon told me, “I was in agony from hot foot for many years. It wasn’t until Pete and I started using Aerolite pedals that I decided to be radical and move my cleats back (Aerolite pedals were one of the first clipless pedals with a very minimal platform).
To move the cleats, I was using drywall screws at the time drilled from the inside of the shoe. There wasn’t any float in the Aerolite pedals or cleats but I was using some flimsy leather shoes without heel cups so my heels could float side to side about half an inch.
We were doing a lot of ergo-meter power testing at the time and my power was the same with my cleats moved forward or back. So I felt that changing the cleats was well worth the effort and it finally eliminated my hot foot problem.”
Lon’s step-by-step for moving the cleats back
Avoiding Hot Foot by Moving Your Cleats Back by Lon Haldeman
The purpose of moving the cleats back is to move the pressure from the nerves at the base of the toes. A new location 3/4 inch back on size 8 shoes or 1 inch on size 12 shoes will make a be difference on changing the pressure points on the sole of the foot.
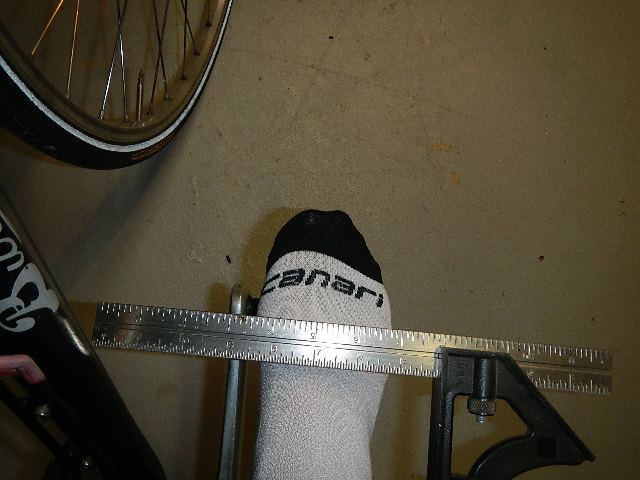
Old Cleat Position
The above photo illustrates the old cleat position where the pedal spindle passes under the big
bump joint (Bunion) on the inside of the Big Toe.
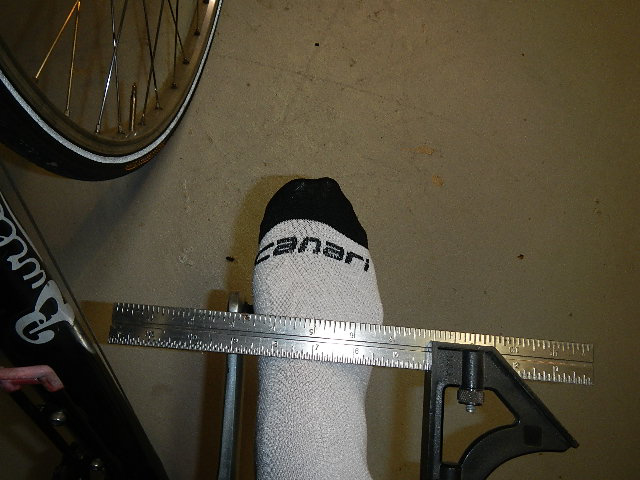
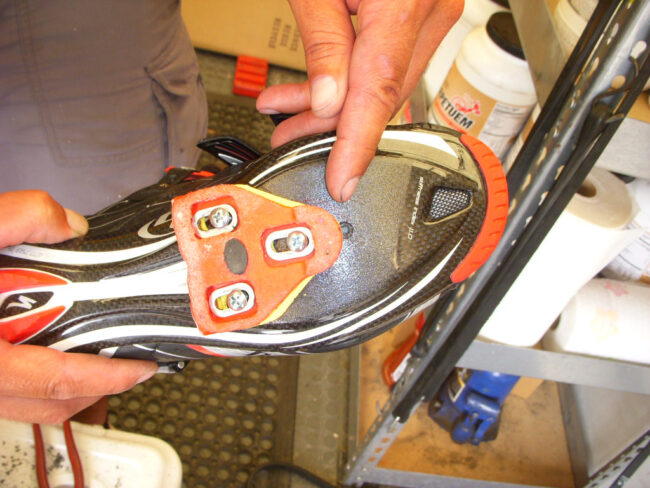
New Cleat Position
The above photo illustrates the new cleat position where the pedal spindle passes under the bump joint on the outside of the Little Toe.
Things you need:
- Electric (battery) hand drill
- Screw driver
- Side cutter (Dyke cutter)
- 1/8″ drill bit
- 9/32″ or 3/8″ drill bit
- 6 Pronged T-nuts thread size 10 x 24 (30 cents each)
- 6 small round head machine bolts size 10 x 24 (10 cents each)
- Bolt length could be 1/2″ or 3/4″
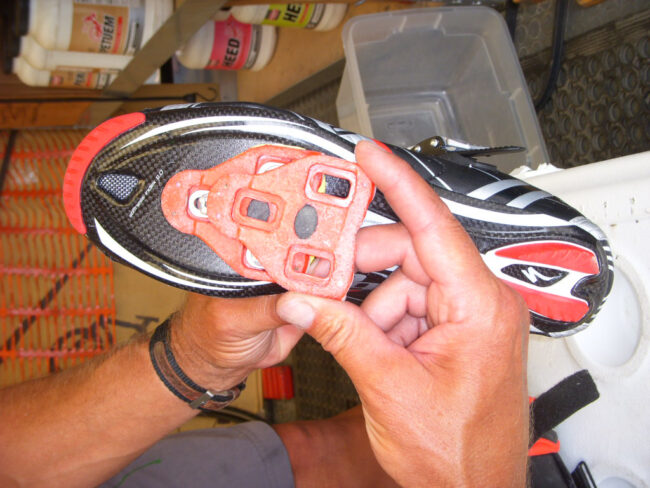
1. New cleat position will be about 1 inch back of the standard mounting holes.
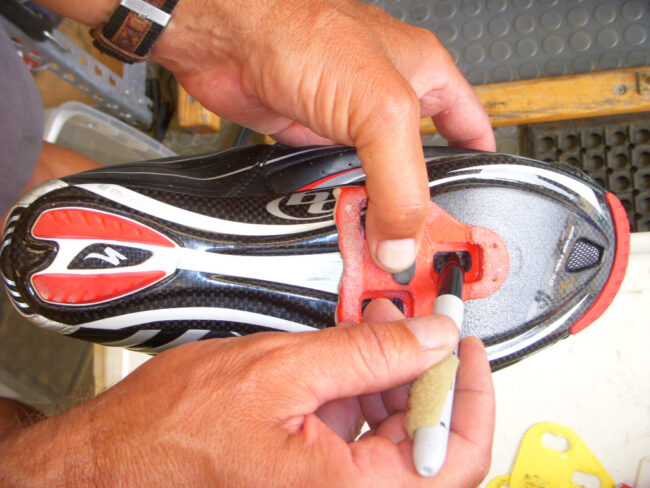
2. Use a permanent marker and trace the new mounting holes.
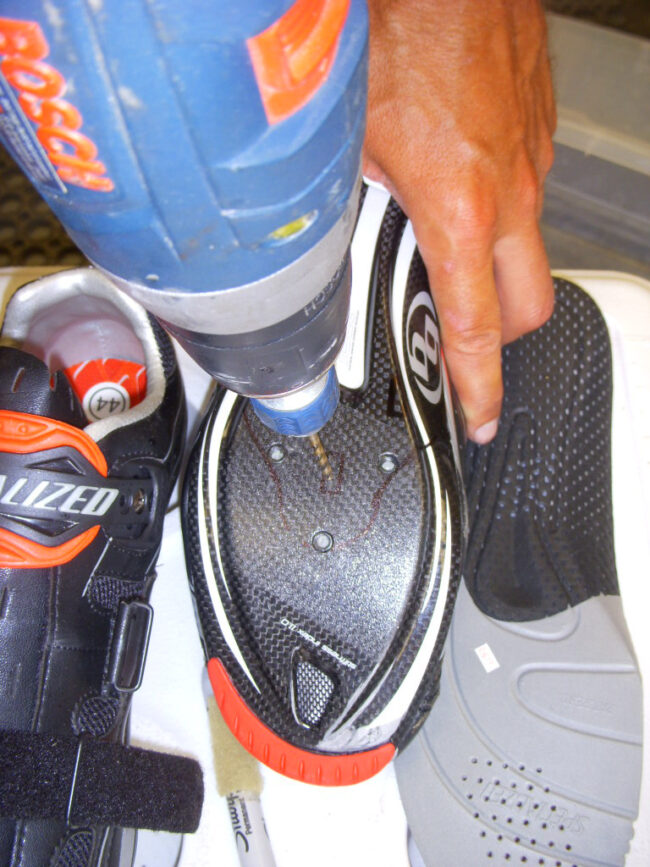
3. Drill a pilot hole with a 1/8 drill bit. Center your drill bit in the middle of your new outlined hole location. Be sure to remove insoles before drilling. Put a small bock of wood inside the shoe to drill into. Expensive carbon or thick plastic shoes drill easily. Some cheap shoes have a 1″ x 4″stainless steel stiffener which is very difficult to drill through. Make a small test hole to determine if you want to proceed with this project.
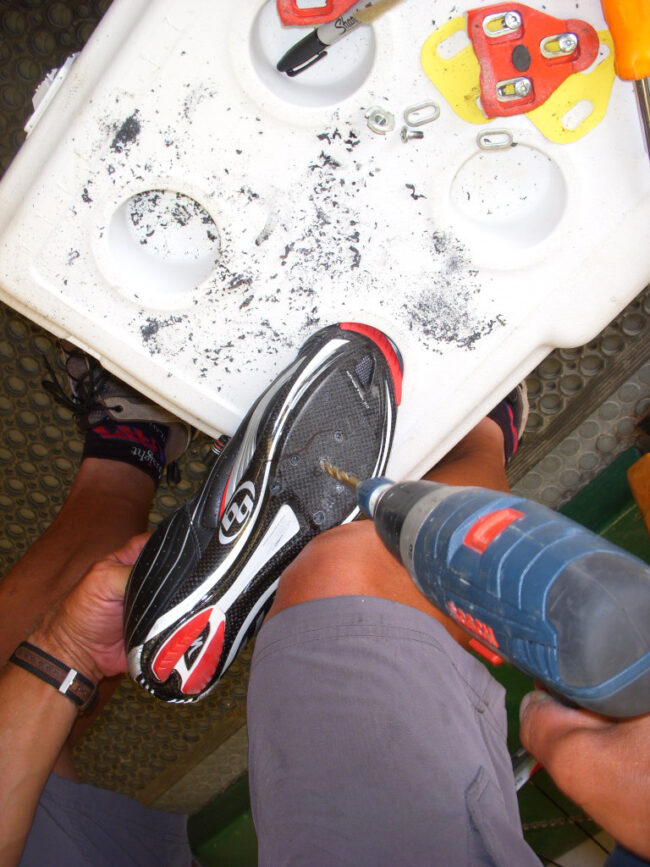
4. After drilling all the small 1/8″ pilot holes, switch to a larger 9/32″ or 3/8″ drill bit. Ream out all 6 holes to the larger size.
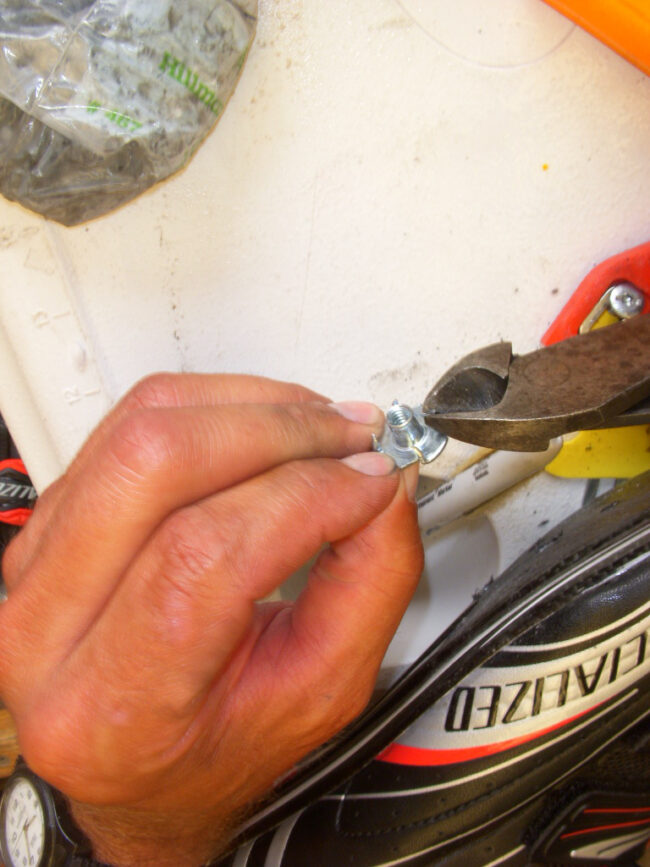
5. If your T-nuts have long 1/4″ prongs, clip off the prongs to 1/16″ length. The T-nuts need some prongs to keep them from spinning when the bolts are installed.
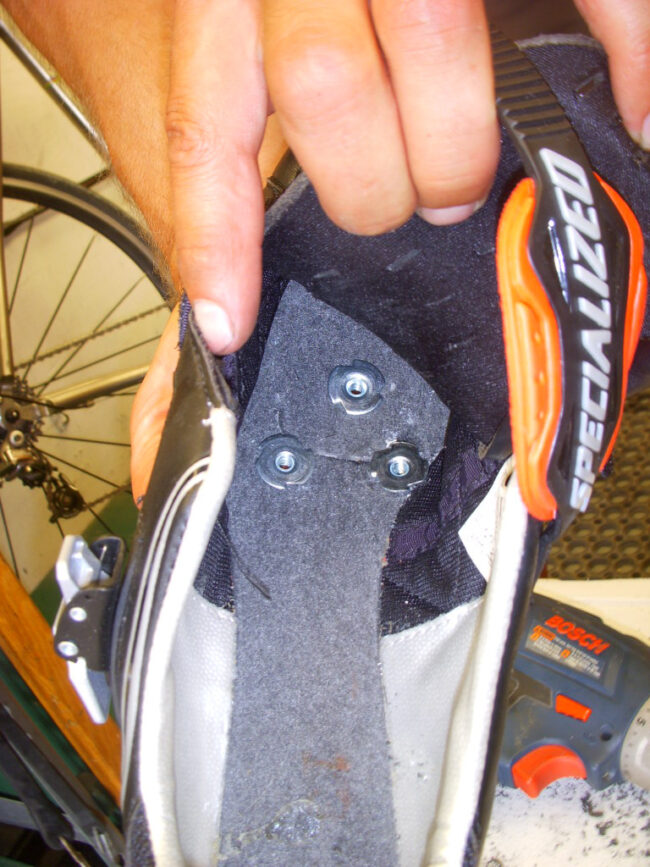
6. Install the T-nuts inside the shoes. The T-nuts should have enough room in the holes to float or tilt slightly. Pound the T-nut flush into the sole of the shoe.
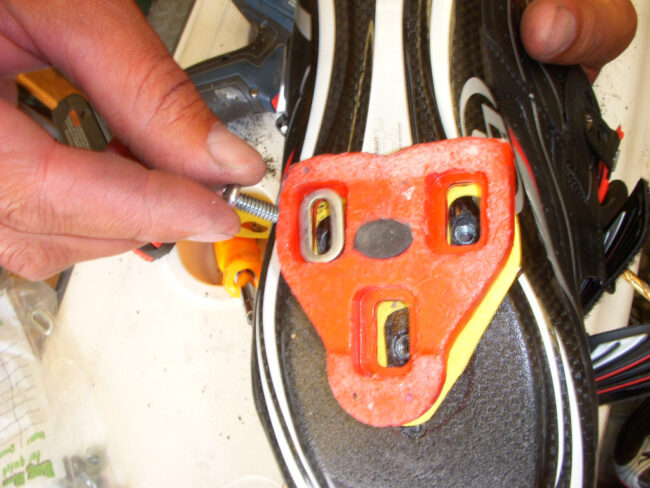
7. Install the cleat, washer and machine bolt on the bottom of the shoe. Install all the bolts a few turns then tighten all the bolts equally a few turns at time. The bolt will pull the T-nut flush into the sole of the shoe. If the bolt is coming through the T-nut inside the shoe, then use a slightly shorter bolt or cut off a few threads.
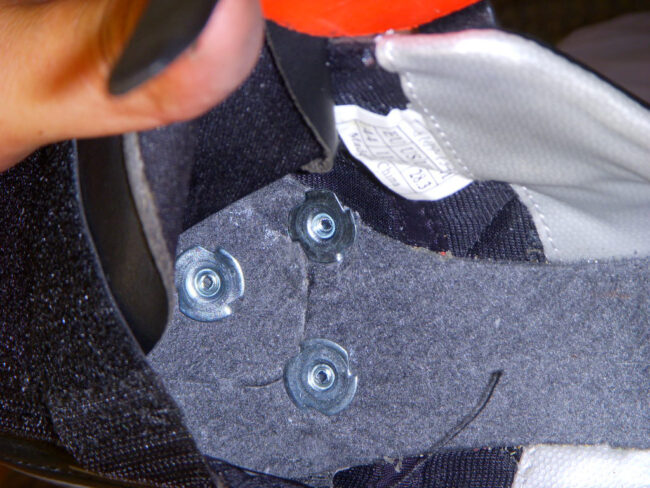
8. The bolt should not be coming through the T-nut inside the shoe.
9. Rotate the new cleat position so your heels feel properly aligned when pedaling. Retighten all bolts.
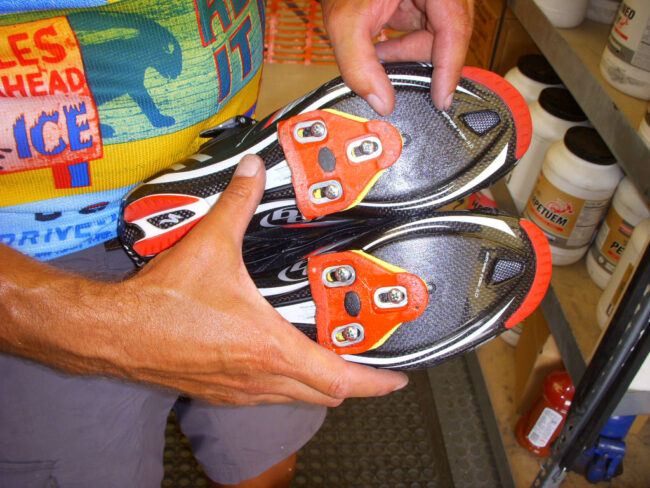
10. New cleat position 1″ back
Saddle Height?
If you pedal with a flat foot then moving the cleat will not affect the saddle height much. Riders that pedal with their foot at a 45 degree angle will need to drop their saddle height 1/2″ if they moved their cleats back 1″. Test and reposition your saddle height as needed.
Should you be concerned about toe overlap with the front wheel?
It occurred to me while writing this that moving the cleats back would move the toe of the shoe closer to the front wheel, which might cause toe overlap with the front wheel. This usually only happens when you’re riding slowly but it could cause a crash if it catches you by surprise. So, I asked Lon about it. Here’s his advice about that and some more helpful tips on curing hot foot issues too.
“I have not noticed any toe overlap problems while riding or turning. There might be overlap when doing a track stand at a traffic light. Maybe my bikes all have enough fork rake and top tube length to avoid any problems.
Some shoes today do NOT need to be drilled
Also, I wanted to add that some shoes are now being made with the ability to move the cleats back without drilling the shoes. I have a pair of LAKE shoes with SPD cleats slid all the way back and I am able to get my little toe bone over my pedal spindle.
I think having the pedal spindle under the little toe bone is a good gauge of where the cleat placement should be. I know for years my pedal spindle was under my big toe bone… the bunion bone and I had hot foot pressure. That is why I found moving my cleats back one inch for a size 46 shoe seemed like a good location.
The other big factor for hot foot are shoes that are too tight. Shoes that feel fine for 50 miles can be uncomfortable on longer rides when the temperature gets warm and the rider’s feet start to swell. When I buy new shoes I wear thicker wool socks that simulate my feet when they swell. My LAKE shoes are the wider version made of real leather and they are the most comfortable shoes I have ever used. For years I suffered with hot foot because my shoes were too tight and even riding without socks didn’t allow enough room for my feet to swell when it was warm.”
Jim Langley is RBR’s Technical Editor. A pro mechanic & cycling writer for more than 40 years, he’s the author of Your Home Bicycle Workshop in the RBR eBookstore. Tune in to Jim’s popular YouTube channel for wheel building & bike repair how-to’s. Jim’s also known for his cycling streak that ended in February 2022 with a total of 10,269 consecutive daily rides (28 years, 1 month and 11 days of never missing a ride). Click to read Jim’s full bio.
My solution was to go with the Catalyt pedal,from Pedaling Innovations.
I’ve been suffering with hot foot for years. It used to hit around 70 or 80
miles, but lately, it would start around 20. The new pedals work great, plus
I can wear whatever shoe I want. In the summer, my favorite shoe is Keen
Newport. Sandals.
I moved my cleats back after PBP 99 I had Mortons neuroma for almost 9 months. Should have done this much earlier as I do not have the hot foot issue any longer. Shoe are another important consideration. Most shoes do provide enough room for your feet particularly in the toe box. Lake shoes are my shoe of choice now
My solution to “hot foot” was getting shoes with a wide toe box, then moving the cleats (SPD) to the most-rear-ward position. Works for me, but it’s good to know there’s a way to get the cleats even farther back if necessary. Thanks!
I moved my cleats all the way back years ago. The idea is that the load is transferred off of the foot and places it on the leg much more which is far stronger. I’m a firm believer that it helps with 99% of our riding. Those who can actually sprint can keep theirs further forward. I’ll go with the less stressful positioning.
I had HF only once, going up that hill toward Brest at PBP 2003. When I got to the top of the hill I saw dozens of spectators cheering us on. I headed for the nearest one, demanded to use his lawn chair and a bottle of water in my rough French. I sat down, ripped off my shoes and socks and poured the water over my feet. That felt amazing, and got me going again, only to quit because of Shermer’s Neck on the way back to Carhaix.
I have had a neuroma a plantar fasciitis, but nothing compares to hot foot. Fortunately I never had it again. I was probably using SPD in those days.
Having done PBP in 1999 and 2003 I remember that hill well. Fortunately I learned about moving the cleats back during the 1998/9 brevets so hot foot was not a problem in either PBP.
I too suffer from Morton’s Neuroma and found shifting my cleats back really helped. I couldn’t build up the confidence to drill holes on my carbon soles and ended up using a cleat adapter made by Patrocleats. The adapter anchors solidly to both my shoes and look keo cleats – works great!
For me my solution to HF was getting wider shoes and installing Icebug Slim high insoles. I originally had 2011 Specialized S-Works shoes but as I got older I guess I feet would swell more. After researching hot foot problems and shoe widths I found out Specialized S-Works shoes were designed for pro racers who are really this people and thin feet as well. In 2023 I bought another pair of S-works because Specialized started making wider shoes available. Now with wider shoes and the Icebug insoles I don’t have an issue with HF.
DO NOT drill your shoes, use these instead., highly recommended – https://mid-foot-cycling.com/en-us
Also a sufferer of Morton’s Neuroma I switched from SPD pedals and shoes to a flat pedal with wide platform and gripper pegs matched with wide “flat pedal” shoes. While they are more BMX or Skate style it allowed me move my foot around eliminate the pain.
Hi Jim,
What type of- brand of shoes are you using?