Tech Q & As: Pete’s Pulleys and More

Jim’s Tech Talk
By Jim Langley
Today’s topic comes from Pete Royer who reached out to me while I was on vacation in coastal Oregon a few weeks back (nice cycling!). Since I was busy sightseeing, I gave Pete some tips to get him started and he did the rest and kept me in the loop via email.
I’m sharing our back and forth – and to help I’ve included a link, a photo, along with a few thoughts on things that should help, if like Pete, you’re getting ready to tackle annual maintenance on your baby. As always, feel free to chime in with a comment to Pete with your tips for him!
Pete’s Starts:
“Jim, I wonder if you have a tip on how to make sure your derailleur pulleys are still good. I had to tear down my 2008 Felt 1, team issue to get a repair done on my front derailleur mount. Now putting my bike back together I am cleaning the bike bits. I was surprised how gritty my bottom bracket was, as I had cleaned it out a few years ago after getting caught in a thunderstorm at RAGBRAI.
Behind my water bottle holders was also very dirty; annual maintenance now. But my biggest find was that one of my rear derailleur pulleys was not spinning freely. I could turn it but it was not moving freely. Granted it is a 2008 Dura-Ace, on which I do not remember when I last checked the pulleys.
I also found my right brifter derailleur cable was only being held on by a few strands. I was lucky it never snapped. Do you have any tips on an annual maintenance routine to spot these types of issues? Thanks a lot!”
My Initial Reply:
I’m actually on the road in the RV Pete, so for now I’ll answer about the pulleys to help you deal with that.
Since the derailleur is from 2008 and you obviously put in plenty of miles, I’d first check to be sure the teeth are still good. The best way is by comparing them to new ones. You should be able to find photos of new pulleys to compare (Shimano sells most of their product line on Amazon so it’s an excellent and easy source to use to find photos from them of their new products for comparison).
If the pulley teeth come to a point, they’re worn out and should be replaced. Also, look closely and see if the plastic is cracked, which can happen over time due to aging. If they are bad, I think you can still get replacements and probably on Amazon as I mentioned.
If everything looks good, the pulleys might still be fine and just need disassembly, cleaning, re-lubing and reinstallation.
More Tips
There are two pulleys on rear derailleurs. They both support the chain. The upper pulley (also called the jockey pulley or wheel) guides the chain for shifting the gears. Some upper pulleys have lateral play built into them so that they can self center. Lower pulleys (also called the idler pulley or wheel) provide the tension on the chain.
Those Dura-Ace pulleys were high quality. I actually have a D-A derailleur from 2007 so I took the pulleys apart to share an exploded view. I hope you can see that I pried the plastic seals off the sealed bearings, which is how to clean and re-grease them.
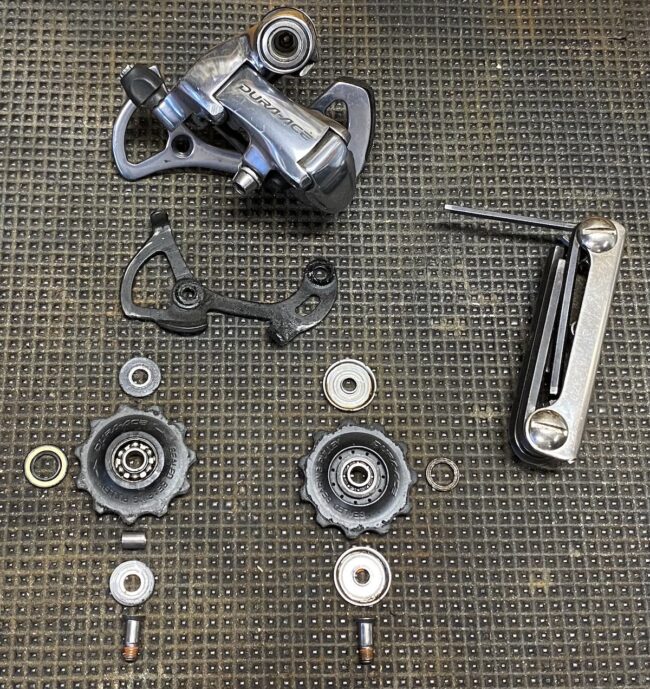
Some derailleurs have very basic pulleys. Others like these Dura-Ace ones are complicated enough that you need to pay attention taking them apart, servicing them and putting them back in place.
Take photos so you know how they were before you took them apart. You might want to work on one at a time. Pulleys can be directional and made to only work properly one way. Be sure not to get confused and put them on wrong. The parts of the pulleys fit one way too. To get it right, take more photos. Another trick is to hold everything together the way it was assembled with a piece of string or wire so you can get it back together correctly.
For more detail, here’s a thorough article from our friends at Park Tool about overhauling rear derailleurs in which they cover pulley overhauls too.
Pete’s Second Note:
“I wanted to update you Jim. I ordered a new set of pulleys after I saw that the first one seized as I figured they had lived a good life. I’m glad sites still carry them.
I cleaned the brifters [Pete’s using slang for the Shimano STI shift/brake levers], as much as I could, as well as used some silicone spray on some of the hinge parts. I also sprayed it in the brake and derailleur cables as I was replacing all my cables after I built my bike back up.
My Felt already weighed less than 15 pounds and I think I shaved some more grams of grime in places I normally have not cleaned!
FYI, while working on cables inside the levers, I used a Velcro cable tie to keep the brake lever open.” [Nice tip, Pete!]
I actually clean my drivetrain more than once a year but I must have forgotten to spin the pulleys and check the cables inside shifters.”
Me
Thanks for the update Pete, great job! Making your bike lighter is a nice bonus! 😊 I’m happy to hear you were able to get new pulleys too, appreciate you letting me know!
Pete
“One final update for you, Jim. I got my replacement Dura-Ace 10 speed pulleys. Further examining the old pulleys, I discovered that they were aftermarket ceramic pulleys. One was very hard to move, as I said before. The second one had a lot of play side-to-side but did spin more easily than the new D-A pulleys. I can not read the manufacturer’s name nor did I try very hard. I went with the known Dura-Ace ones in both.”
Me
Thanks for the update and good job finding the correct replacement Shimano pulleys and installing them Pete. In my experience, you usually get the best results with the pulleys designed by the company for the derailleur.
To wrap up, I was happy to hear you say that you clean your drivetrain more than once a year. Annual bike checks are fine but for cyclists riding a lot, much more frequent maintenance is important – even weekly might be needed if you’re putting in 100 miles a week or more (the worse your riding conditions, the more frequent, too).
And this maintenance should always include a thorough checking of all the parts on the bike (it’s always best to find and fix things ASAP). A good way to do this is to start at the front of the bike and work to the back checking everything manually and visually. That way if you get interrupted you can remember where you were.
Front End Checks
This is how we always did it in the shops I ran. Start by checking the handlebars, stem and levers for straightness/alignment and make sure they’re tight. Move on to the headset checking for play or tightness. Then check the front wheel for play in the bearings or grit/binding.
Wiggle every spoke by hand checking for any loose ones. Inspect the spoke nipples at the rim for any hairline cracks. Spin the wheel and sight to be sure it’s true (side to side) and round (up and down). Carefully inspect the tire for wear, cracks, debris stuck in the tread and make sure it’s still properly seated on the rim. Check the valve and tire pressure.
With the wheels checked, move on to check the front brake and ensure it’s working properly. Are the brake pads still good? Does the brake work properly or does the lever pull too closely to the handlebar? If it’s cable-operated, inspect the cable for any signs of corrosion or wear and tear. Check hydraulic hoses and levers for those types.
Center Checks
Now that the front end is done, move to the center of the bike and check the saddle and seatpost to be sure they’re aligned and tight. Then go down and check the bottom bracket for any play/looseness or binding. Check the crank to be sure its bolts are tight and check any chainring bolts too. Don’t forget to inspect the pedals and shoe cleats if used.
Rear End Checks
Move on to the rear of the bike and repeat the wheel and tire checks you did on the front wheel. Then repeat the brake check. After that, check the drivetrain components and shifting and you’re done.
An Alternative Approach
If that inspection routine I outlined seems challenging, I will add that some mechanics prefer to start with the wheels and move on to the components, then check the brakes and drivetrain. That’s fine too. The important thing is to find a comprehensive, repeatable approach that works for you and do it on a schedule that makes sense for how much and how you ride.
One last piece of wisdom that my old boss Bruce Anderson at Andy’s Bike Shop used to repeat, and is good to keep in mind, is that it’ll always be the one thing that you did NOT check that fails and ruins the ride.
I hope this is helpful and thanks for asking Pete!
Jim Langley is RBR’s Technical Editor. A pro mechanic & cycling writer for more than 40 years, he’s the author of Your Home Bicycle Workshop in the RBR eBookstore. Tune in to Jim’s popular YouTube channel for wheel building & bike repair how-to’s. Jim’s also known for his cycling streak that ended in February 2022 with a total of 10,269 consecutive daily rides (28 years, 1 month and 11 days of never missing a ride). Click to read Jim’s full bio.