
Jim’s Tech Talk
By Jim Langley
Last week I told you about attending a mechanics class on hydraulic disc brakes at the United Bicycle Institute #bikeschool in Ashland, Oregon. It was well worth the time and cost ($250). Here’s that story: https://www.roadbikerider.com/united-bicycle-institute/.
This week I’m sharing 10 tips about hydraulic discs and working on them that I learned at the seminar.
1. A cool tool for attaching disc hoses/lines to levers
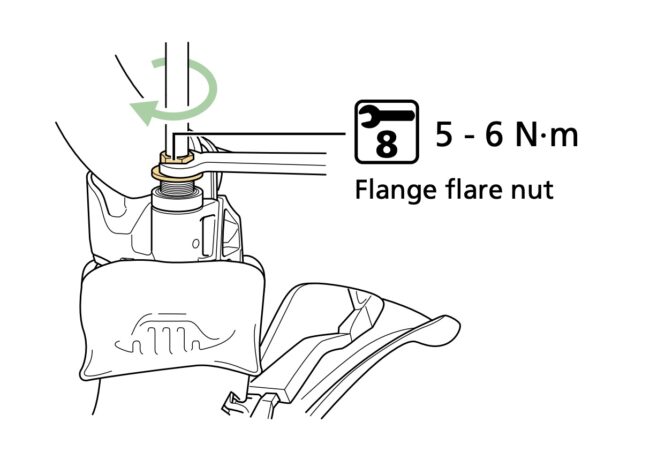
If you look closely at the illustration here I hope you can see that there’s a nut with a wrench on it. That nut is what attaches and seals the hydraulic hose to the lever. Because the nut is so close to the dropped handlebar, it’s difficult to tighten it sufficiently with a torque wrench (usually used with a crow’s foot adapter) because there’s not much room to work.
The risk is that the crow’s foot might scratch or cut the handlebar. Which would be a very bad thing because scratches and cuts in aluminum and carbon often lead to breaking the bars.
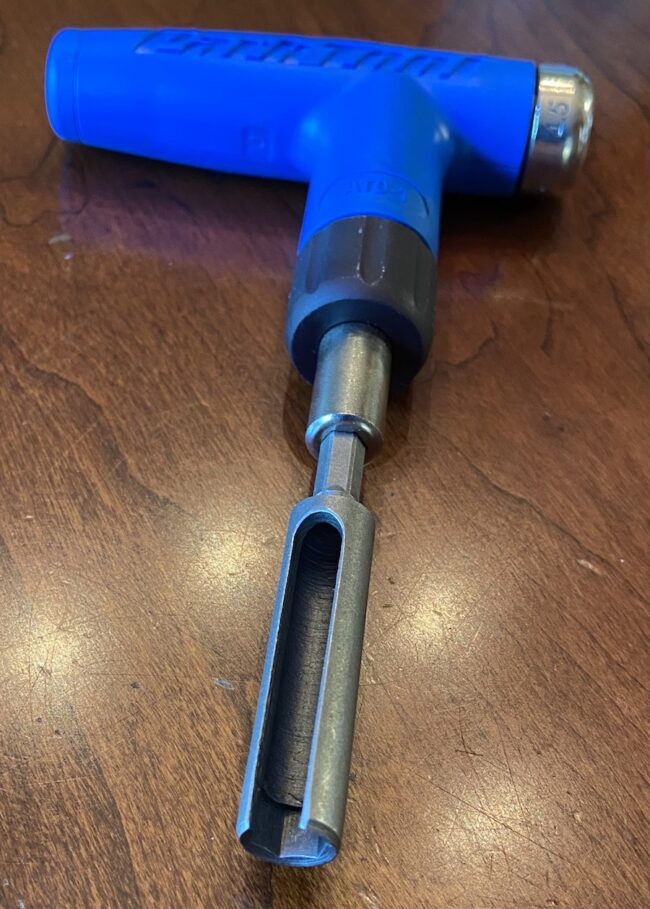
We learned in the class about an awesome tool that solves the problem, which is shown in the second photo. It’s an 8mm ¼-drive socket. Notice that it has a slot in it. This allows slipping the tool over the hydraulic hose so that the socket stays aligned and cannot touch the handlebar. Here’s a link to the tool: https://amzn.to/3Ftow6N
2. Getting air out of syringe
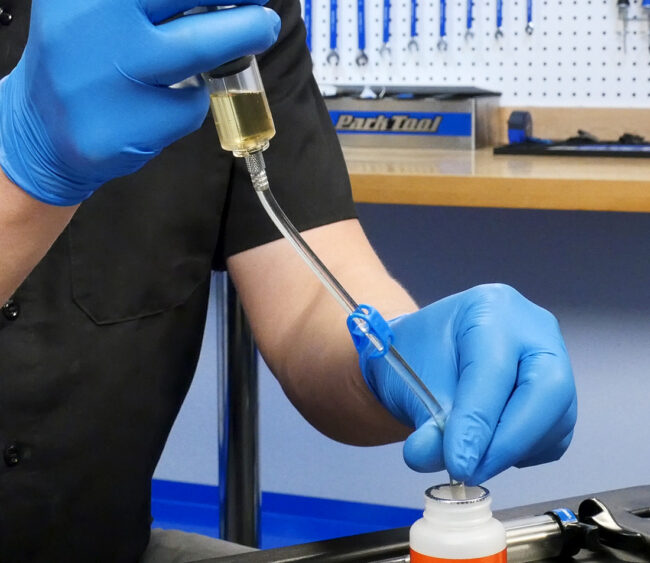
When bleeding brakes, syringes are used to push hydraulic fluid through the lines. To do this you feed the syringe hose into the container of mineral or DOT fluid and pull its plunger to suck in the right amount of fluid.
At this point you want to get any air out of the syringe because if you don’t, you will push the air into your brakes – if you don’t know any better than to try to put the fluid in with air still in the syringe.
In all the directions and videos I’ve watched, the way that’s shown to get the air out is by inverting the syringe so that the hose is on top. A rag is placed over the end of the hose to catch any fluid that comes out. You then are supposed to push the plunger until all the air is out of the syringe.
This doesn’t work. Because it’s missing one critical step. Which is to first pull on the syringe plunger to draw 100% of the fluid back into the syringe. This will also ensure that 100% of the air rises to the top of the syringe. At this point you can easily push all the air, and only the air out of the syringe.
If you don’t do this first step and you try to get all the air out simply by pushing on the plunger, you will push a lot of the fluid out with the air and probably won’t get all the air out either.
3. Creating a vacuum without sucking air through the fittings
During the bleeding process there are times when you need to create a vacuum in the syringe and the instructions say to “pull on the syringe.” I always read this to mean that you pull on the plunger enough to move the plunger inside the syringe.
Actually, pulling on the plunger hard enough to move it is a huge mistake if all you need is a vacuum. Because the bleed fittings that attach to the calipers and levers are tiny and barely connected. If you pull that much on the plunger you suck air past the fittings and right into the lines, which is absolutely not what you want.
And, unless someone explains that what you’re doing is wrong, you will probably think you’re succeeding in removing air from the system, which would be a good thing – except that that’s not what’s going on! You are drawing air from outside into the brakes and you definitely do not want that. To do it correctly you just put a slight pressure on the plunger to create a vacuum and wait to see if any air bubbles come up into the hose and syringe.
4. Hydraulic hoses are high tech
Until this class I had no idea that hydraulic hoses, even when full with fluid, are significantly lighter than any metal cable and housing system. Also, quality hydraulic hoses can withstand pressures up to 1,800 psi. Also, the thing that makes disc brake fluid superior to brake cables for braking is that it cannot be compressed (brake cables can stretch).
5. Squeaking is normal with discs and you can create it yourself if you try
According to the UBI instructors disc brakes are susceptible to squeaking under certain conditions, such as when it’s raining or wet.
They said it’s normal to want to try to stop squeaking but that sometimes with discs you just have to accept that the brakes squeak under those certain conditions and not worry about it when it happens.
One of the techs mentioned a customer of his who would walk around dragging his discs in the bike shop to get them to squeak so he could complain about it. Which the tech pointed out was the perfect way to make them squeak worse because the customer was putting a glaze on the pads.
Switching brake pads can help stop squeaks. Resin and organic pads are less prone to making noise than metal pads.
6. Bedding in, burning in new disc brakes and what it does
All new disc brakes should be broken in with a process called bedding in or burning in. This transfers material from the new brake pads to the new rotors. On a microscopic level this treatment smooths imperfections in the surface of the rotor and it also helps align the pads with the rotor.
To bed in new brakes, you get up to speed and then apply the brakes to slow down. You don’t slam on the brakes and you don’t stop completely. The goal is not to get the rotors hot. You repeat this bedding in braking about 20 times.
7. Use the whole manufacturer’s system / don’t mix up parts
Whichever disc brake system you choose, the UBI instructors say to stick with it as a system. Do not mix and match parts. Absolutely do not use a brake fluid not made for your system. The best way to do this is to only use the fluid made by the brake manufacturer.
8. Follow the manufacturer’s bleeding procedure
Just like tip 7, team UBI said to follow the bleeding steps as specified by the brake manufacturer. They said that mechanics may have bled other hydraulic systems and then want to use “shortcuts” to save time or simplify the process.
But they said that bicycle disc brakes are unique and not the same as other systems (such as on cars and trucks), and taking shortcuts can and likely will lead to brake problems. Along the same lines they recommended only using the bleeding kit designed for the brakes and also the one made by that company.
9. You may not need to bleed the brakes
One of the best tips at the seminar was that bleeding may not be needed some or a lot of the time – even if you’re convinced it is (depending on your riding conditions). For example, worn out brake pads will feel like there’s not enough fluid in the lines to stop. Replacing the pads will restore the braking not bleeding.
If air or dirt gets in the fluid and the levers feel spongy that’s a sign that bleeding may be needed.
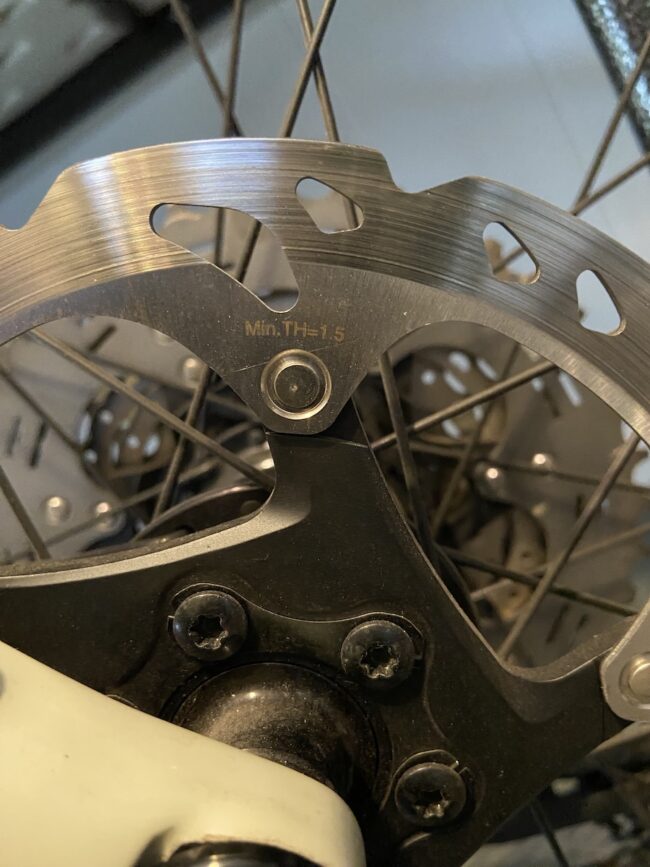
10. How to tell if rotors are worn out
This is an easy one but not everyone may know it. Rotors should have a minimum thickness written right on them (photo). So by measuring them you can tell if it’s time to replace them. Speaking of replacing rotors, the UBI techs said that if they run into a bent rotor they will try to straighten it (their favorite tool is Park’s Rotor Truing Fork https://amzn.to/45LAxiy).
However, after 10 minutes or so if they can’t straighten it, they will replace the rotor. Because rotors do a ton of work and are subjected to a lot of heat, wear and tear. So if it’s bent it might never become straight again and a new rotor is best to restore the braking fully.
I hope these tips help with any disc brake servicing you do.
Jim Langley is RBR’s Technical Editor. A pro mechanic & cycling writer for more than 40 years, he’s the author of Your Home Bicycle Workshop in the RBR eBookstore. Tune in to Jim’s popular YouTube channel for wheel building & bike repair how-to’s. Jim’s also known for his cycling streak that ended in February 2022 with a total of 10,269 consecutive daily rides (28 years, 1 month and 11 days of never missing a ride). Click to read Jim’s full bio.
I only have disc brakes on one bike, my Trek Speed Concept SLR7, and I am thankful for that. I’m not sure why Trek made them standard for their high end time trial bikes but I’m hoping that with the minimal use brakes receive on this type of bike that the maintenance will also be minimal. I have 11 other bikes, all with rim brakes. Your ten points, while very detailed and no doubt helpful in maintaining these brakes, just make me realize why I’m glad I have not gone this way with other bikes.
Thanks for your points Peter.
Jim
A friend did a bicycle mechanic course where I am from , Australia , last year , but it left out a lot of content being an 8 day course . Also brake hoses and piston rings flex under stress slightly , so therefore , there is a transitional feel , even in XTR brake sets . This is one of several things that the UBI techs got wrong .
Interesting Robert, I had no idea UBI had a school in Australia. I would think that they would standardize their classes so that all instructors teach the same thing. At my class they taught about pistons and quad seals.
They also taught about hoses getting damaged from rubbing or extreme bends. Luckily a lot of bikes protect the hoses from these things by running most of the hoses through the frame (or even the bars/stem). And as long as there are no bad spots in hoses they will keep working like new. One of the interesting things about brake hoses is that they usually have an aramid or kevlar layer, which makes them extra strong. I have hoses on some of my bikes that are over 20 years old and still working as new.
I have a few bikes with Shimano discs and have never experienced what I’m guessing you mean by “transitional feel.” I think you might have dirty fluid or air in the lines causing that.
Thanks,
Jim
These tips are great, thanks! BTW, I’ve found the faffing with disc brakes actually easier than getting the pad to hit the rim exactly right. “OK” is easy to achieve with rim brakes but “Perfect” is easer for me with discs.
Thanks Joe but can you explain what “faffing” is? I don’t understand that term.
Faffing= working on stuff/playing around or something like that.
If hoses can be shaped ,or bent , there will be potential for flex which leads to that slightly transitional feel .. Piston rings do flex slightly when pressure is applied . I have accounted for contamination or air in the lines when mentioning this phenomenon . The UBI doesn’t run coures in Australia but TAFE and Cytech UK do as well as a private college .
Thanks for teaching me a new word, I like it!
Thanks as always Jim for sharing your (in this case some newly-acquired) knowledge. A question on bedding. I’ve never been sure if I should bed if only replacing pads but not rotors, or vice-versa. Someone once advised me to rough up (sand) the rotors if only replacing pads, then bed to get the new pad material onto the rotor. And what about replacing just rotors and maybe my existing pads are near new. Just sand the pads a bit and then bed? Thanks for your thoughts Jim!
You’re welcome Pete. We didn’t discuss bedding in for only a new rotor or new pads. I wish I had thought to ask the question. I know that lots of bicycle disc brakes never go through a proper bedding in process because the place it was sold didn’t do it for any number of reasons and the new bike owner doesn’t realize it’s something they should do. Those bikes end up working fine it seems. So I don’t really know how critical the bedding in process is.
Thinking this through though, it sounds right to me to sand the rotors when replacing only the pads. You don’t want to remove much material. Remove the wheel to prevent any grit from the sandpaper getting inside the caliper. And don’t let it get inside the hub, wrap a rag around to protect it.
For worn pads, I think the best option is to replace the pads with the new rotor. Because sanding pads can be done but it can also ruin the pads if the grit gets into them.
Maybe some others will weigh in on your question.
Hope this helps,
Jim
Thanks, Jim, but after 60+ years of road riding and racing using rim brakes and never having had, what I would say, was a problem, I think I’ll just continue using them. As has been said many times, if it ain’t broke, don’t fix it.
Thanks R,
I understand. I’m not trying to convince anyone to use hydraulic discs here, just trying to help roadies who have them on their bikes.
Thanks again,
Jim
The Shimano GRX hydraulic disc brakes on my bike works great. Except. The pads drag anytime I remove the wheel and reinstall it. I’ve tried various methods of clamping the brake before securing the thru-axle, but when I listen with a mechanic’s stethoscope, and watch the disc from the rear, one pad drag or the other does not retract fully. I can hear and see one pad dragging. I’ve re-mounting the caliper, etc. It’s frustrating. I’ve also pushed the pistons out a little and cleaned the edges with an ear swab coated in brake fluid. In the future I’ll get disc brakes with independently adjustable pads. Paul Klampers maybe. I think Avid BB7 allow independent adjustment too. A rotor trueing tool is useful, simple and cheap, to slightly bend the rotor true. A mechanic pointed out that he fixes many discs that are bent when bikes are carried on back of cars. The metal is very thin and a little delicate. As for bleeding, with mineral fluid, there is usually no need. In four years and 19,000km, I’ve not opened the system or had any leaks.
I had a similar experience with Shimano hydraulics about 4 years ago. There is a disk that fits in the caliper on both sides with an O-ring that creates a seal. These disks move in and out pushing the actual brake pad. The interior side of these disks had come apart leaving small pieces of material in the cylinder behind the disk. When you released the brake fluid pressure, the disk did not retract on one side or the other. This caused the pad on that side to stay in contact lightly with the rotor. On another occasion, I had the disks not moving symmetrically. The mineral oil fluid was black when I drained the system. I cleaned the disks inside the caliper by pushing them all the way in with no fluid in the system. Then I used denatured alcohol to clean the walls of the cylinder (very tight clearance) and noticed a small amount of debris on the white cloth that I was using. After recharging the system with new fluid and bleeding, the cylinders would both retract when I released brake lever pressure and my alignment problem went away.
19,000 kilometers is 11,807 miles Ultra, but I have seen Shimano disc brakes operate flawlessly for a lot more kilometers and miles than that. So I would think you should be able to get your brake to center or if you can’t, that the mechanic you mention should be able to.
You shouldn’t need to switch to a system with independently adjustable pads – an unnecessary complication. One of the best things about hydraulic brakes is that they’re self adjusting. As you wear the rotor and the pads, the pads automatically move closer to the rotor so that your braking always works the same, unlike cable brakes where you need to use the cable adjustment barrel.
Big Ring Bob offers some great tips that might work for you in his comment. Be sure to read his advice.
Jim
I have been looking for a definitive answer to the question of changing between resin and metallic pads. Should the rotor be replaced? I assume there is some level of contamination on the rotor from the pads. I have used denatured alcohol to clean the rotors, then used a wet emery cloth to polish the rotors, then cleaned them again with alcohol. Not sure if this is actually removing the contaminates on the rotor. I also use this procedure when just changing pads. This was in an effort to stop squealing.
I have also noted that squealing is more prevalent after I change pads. I am of the opinion (no factual proof) that misaligned pads are a source of squealing. If the pads are not parallel to the rotor. This allows for unsymmetrical contact with the rotors. I have noted in a frame building article that I think was in RBR, that bedding the mounts on the frame can also address the alignment problem of the caliper. Haven’t seen any other reference to this and whether it helps address the squealing issue. With a background in physics, I am assuming the squealing is the same phenomenon that results when rubbing a wet finger around the rim of a wine glass. The pad represents the wet finger and the disk represents the rim of the glass. If the harmonic that is setting up can be disrupted, the sequealing will not occur.
We didn’t discuss this in the class, Big Ring Bob, but I try to reuse rotors until they’re worn out and I have cleaned and lightly sanded rotors when putting on new pads. I’ve also just put on new pads.
In the class we definitely discussed squeaking and the Bicycle Institute guys all said that misaligned frame mounts were a big problem. There are tools to face and align some types of mounts so that might be a solution though these tools can be pricey so it would probably be cheaper to have a shop with the tools (if you can find one) do the job.
Hope this helps,
Jim
That’s a great article Jim!
While I don’t have any bicycles with hydraulic brakes, I have been working on hydraulic brakes on motorcycles for about 40 years and I’m glad I got a couple of tips out of your well written article!
Thanks
You’re very welcome, glad the article was helpful! And thanks for the tip for Big Ring Bob!
Jim
Big Ring Bob;
We had a similar problem on our motorcycles.
This might be a little heavy duty for a bicycle rotor, but it worked for the motorcycles.
https://www.grainger.ca/en/product/p/BRRRMFH240Z25?cm_mmc=PPC:+Google+PLA&gad_source=1&gbraid=0AAAAADeC2fDPZF5X-hU-X0DJye20nHaC4&gclid=CjwKCAjwnOipBhBQEiwACyGLuida_ZflMqQ-iazsbFUKJ1z-SNxO4CLPRSWYP1avPRWufe_APDx_aBoCj5cQAvD_BwE&gclsrc=aw.ds
I have bedded in new rotors on my car, same procedure. remember a rotor is cheaper than a rim. The disc brakes are so much better, just like disc brakes on a car. I am old enough to remember rolling through a stop sign with my dads 56 chevy with overheated drum brakes.
Hi Jim, Since I don’t race down mountains, looking at the above and many other disc brake complications and problems, why are they considered superior to v brakes? Every month or so I take peek at the bits of rubber which squeeze my rims. but that’s about it . They stop me every time .
Hi Steve,
I didn’t say discs were superior to your V-Brakes and I wouldn’t say they are considered superior except by people who believe that. Plenty of people still love their rim brakes and have no plans to go to anything else. So keep enjoying your V-Brakes.
Thanks!
Jim