
Jim’s Tech Talk
By Jim Langley
Last weekend, March 15, 16 and 17, the 15th edition of the North American Handmade Bicycle Show (NAHBS) took place in the Sacramento Convention Center in Sacramento, California. As the name suggests, this is the show for small bicycle makers doing things mostly by hand, along with companies that support the handmade scene.
So, you won’t find big bike companies here like Trek and Giant. However, you will see Campagnolo, Shimano and SRAM – since fine components complete custom bicycle builds.
I’ve been to the show every time it’s come to California. The location changes every year. One of the best things about NAHBS is that it’s open to the public. So I recommend keeping an eye on their site to see if next year’s show will be in your area. For 2019 there were over 200 exhibitors, a who’s who of famous makers.
The World’s Slowest
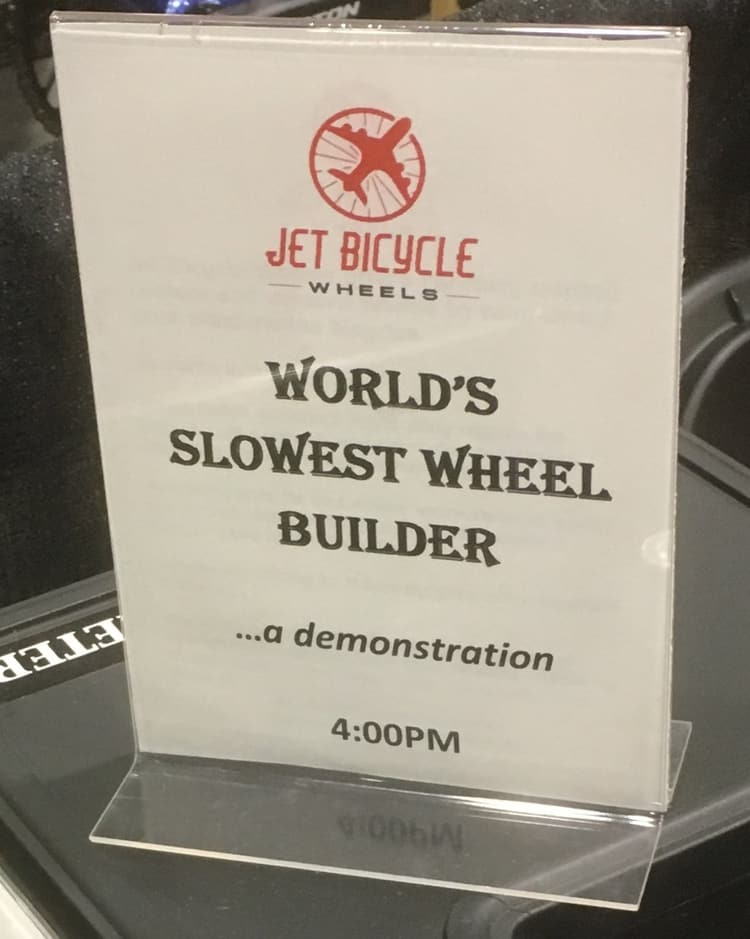
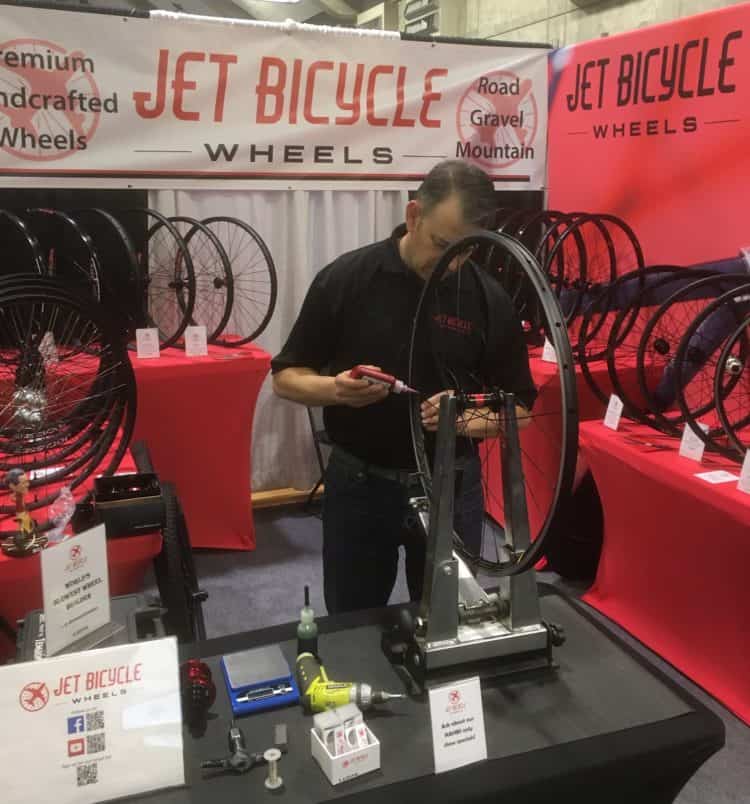
I could only attend the show on Friday. One day isn’t enough to see and talk to everyone, but I want to tell you about the highlight for me. It was a wheel building demonstration by Charles Wells of Jet Bicycle Wheels in San Diego. The thing that grabbed me as I passed his booth was a little sign that read The World’s Slowest Wheel Builder.
That’s a pretty funny slogan because today we have incredible robots that build near flawless hoops in minutes. And, it’s very common for human builders to ask “how fast can you finish a wheel.” So, speedy building is important to a lot of people and one way to judge a wheelsmith.
One of the Fastest
In case you’re interested in just how fast it can be done, I once heard of a woman who won a wheel building contest by cranking out a race-ready wheel in 17 or 18 minutes. That’s crazy fast when you consider that she had to place the spokes into the hub and then lace them in the correct pattern to the rim. Next she made the wheel round and laterally true and finally, she tensioned and stress relieved the wheel.
To do all this that fast, she had to be super coordinated and speedy with her hands and tools. It would have been fun and exciting to watch. I wish I had seen it.
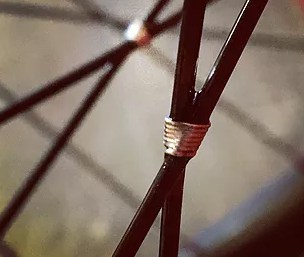
A more typical time for builders is an hour. So, when I saw Charles’ sign – and realized he was about to start his demo build, I almost walked past, not wanting to spend so much time at one booth. But, I noticed that on his workbench there were the materials to tie and solder the spoke crosses – something I’ve never been good at. I decided to stay and watch the demo.
Why Wheels Matter
There were a number of bespoke wheel builders at NAHBS and large wheel companies, too. It makes sense because you have a show full of custom bike builders who focus on the frame. In order for it to roll down the road it needs wheels. And, I think you can argue that a good set of wheels makes or breaks the ride of any bike.
Machine- Versus Hand-Built Wheels
Charles said that before he started his Jet Wheel business he spent 10 years as the wheelsmith at Holland Cycles in San Diego, one of the oldest and most renown of custom bike companies. I asked him if they ever used machine-built wheels. Charles said that while he appreciates them, handmade bicycles deserve handmade wheels.
He explained that many incremental gains in his build process ensure that Jet Wheels are some of the finest performing you can buy. You can learn more on this page on his site: https://www.jetbicyclewheels.com/our-practice.
As I watched him build a new wheel with a DT Swiss 240 hub, DT Swiss Aerolite bladed spokes with alloy nipples on a HED Belgium aluminum rim and explain what he was doing, I learned some of his secrets. In no particular order I’ll share a few with you so you, too, can appreciate the difference in hand built wheels.
Chamfering rim spoke holes: Charles uses a small hand tool with a beveled cutter to reach inside the rim and shave the sharp square edges off the aluminum nipple holes inside the rim. This leaves a wider surface for the spoke nipples’ round wide bases to rest against helping seat the nipple and keep it secure and safe.
Getting the right spoke length: He uses the DT Swiss online spoke calculator and then adds 2mm to the result. This ensures the spokes are long enough to at least reach the very top of the nipples (flush or up to 2mm past, but no longer). If the end of the spoke is below the top of the nipple, Charles will take the wheel apart and install the right length spokes. Otherwise, the nipples are not supported fully by the spoke and can break eventually.
Spoke and nipple preparation: If nipples come loose on wheels, they go out of true or worse, they can fail. So builders usually use some type of thread prep to prevent these issues. You can see in the photo that Charles is applying something to the spokes. It’s Loctite 222. He puts that on the threads and also puts a small drop of Phil Wood Tenacious oil right at the small gap between every nipple and the rim to lubricate them where they turn during the building process.
Truing and tensioning: Charles uses a Park truing stand, a standard tool within the industry. But, what was interesting for me to watch was HOW he used it. He mostly used the side-to-side and up-and-down indicators on the truing stand as noise makers and trued more by ear than by sight. He adjusted the indicators and trued in both directions until he eliminated all the rubbing noises.
Stress relieving: If you’ve read some of the information out there about custom wheels, there are a lot of sophisticated ways companies are pressing on wheels during the build process in order to relieve any stress built up as the spokes are gradually made tighter and tighter. It also helps seat the spokes to the hub and the nipples to the rim. Charles didn’t do anything fancy like that. He simply used a driver tool to seat the spokes to the hub and chamfered the rim spoke holes. He also used great care with a special spoke holder tool to make sure none of the bladed (aero) spokes turned sideways while truing and tensioning.
Final tension: Charles uses a Wheel Fanatyk tensiometer (I reviewed one of these here) to check spoke tension. I noticed that on his table he had other spoke tensiometers so I asked why. He explained that you need to make sure your tools aren’t changing. So, he keeps one tensiometer that’s never used for building wheels and uses it as a master to check his tools in use every day.
Balancing tension: This was a fun process to watch because Charles uses three tools on each spoke in quick succession. He wants spokes to be almost exactly the same tension. To do this he checks every spoke and makes small turns of the nipples, while holding the bladed spokes steady with a spoke holder, until all around the wheel the tension is the same. He says even without this step the wheel is probably going to be a fantastic wheel, but equalizing tensions is one more way to add value and give the rider the best product.
The final wheel: It actually only took Charles less than an hour to finish the wheel and it came out perfectly straight, round and tight. I was impressed with how little fine tuning was required. Once the wheel was true, it stayed true while he brought the wheel to full tension, which takes many turns of the nipples. He also only checked the rim centering over the hub one time with a dishing tool. And even though the wheel was out of center by less than a millimeter to my eye, he took a few more minutes to center it spot-on.
Tying and soldering spokes: To some wheel builders this is considered old fashioned, unnecessary or of no value. But, Charles made a great point. He explained how your new custom bicycle will surely have an amazing paint job (or some high tech finish), and wouldn’t you be devastated if you broke a spoke and it struck the paint and chipped it before you had time to roll to a stop. That’s only one reason he ties and solders spokes for riders who request. He also believes it adds strength to wheels by preventing spoke movement. Spoke movement is the most common cause of breakage.
Overall, it was fascinating to watch Charles build a wheel and I learned a lot. The most important takeaways were that builders should do everything possible to reduce stress on the spokes and nipples during builds. And also to prevent any movement of the spokes and nipples in the completed wheel. I hope you’ll consider Jet Bicycle Wheels if you’re in need of new hoops – or another maker who puts as much care and quality into their wheels.
Next week I’ll share some photos and observations on other things from NAHBS.
The 2020 show will be held in Dallas, Texas at the Kay Bailey Hutchison Convention Center, March 20-22, according to the organizers.
Ride total: 9,212
You said you wanted to weatch to see how he ties and solders spokes, but you didn’t give any details about that (only a nice picture). Tell us about this part next week too!
Thanks for the request, Doug. I meant to include links to Charles’ videos showing his tying and soldering techniques. Here they are:
Tying: https://www.youtube.com/watch?v=Xu-esTutXAU
Soldering: https://www.youtube.com/watch?v=B4CVc0hM5AU
I hope you enjoy them as much as I have and sorry I forgot to include them in the story.
Jim
Interesting how many of his techniques seem to come naturally. As an example, the use of the wheel stand noise rather than trying to eyeball gaps to the indicators and the use of lube where the nipples seat on the rim. As someone building wheels to sell, I can understand the use of thread locker, but I have only ever used grease for the spoke threads and on the rim to insure smooth turning nipples. Wheels built with greased spoke threads hold their true very well and the spokes turn easily even after tens of thousands of miles.
Tying and soldering spokes was all the rage when I started riding in the late 1960s. It faded from use but has never completely died out.
Thanks, Kerry. I have built with greased or oiled nipples and spokes, too, and found that that technique works very well, too. With carbon rims there’s some concern that those lubes may be hard to completely clean off the rim surfaces if they spread past the nipple (which can happen). But, aluminum rims are easy to clean. Spoke thread preparations like Spoke Prep or what Charles uses, Loctite 222 (temporary/not permanent) dry on the threads – like a vinyl coating helping to lock the nipples in place. They’re still easy to turn with a spoke wrench with the right spoke prep. If heavier duty Loctites are used, that can make it hard to turn nipples and true wheels as I’m sure you’ve seen some wheel makers doing.
I think tying and soldering lives on because the wheels built that way last so long. I had a tied and soldered wheel built by the legendary Spence Wolf of Cupertino Bike Shop come into my shop back when I was in a shop. He had built it around 1955 and it was still true, round and tight. That was fun to see.
Thanks, Kerry,
Jim
I think it’s a mistake not to stress relieve the spokes. It’s been proven that that prevents spoke breakage.
I didn’t mean to imply that Charles doesn’t stress relieve the spokes, “MiieD.” Every step he takes in his build process is designed to eliminate stress on the spokes. And he’s extremely careful not to twist or stress the spokes during truing and tensioning. My point was that he doesn’t go overboard and use machines or excessive lateral forces to stress relieve. And, of course, no wheel builder wants to ever see a wheel they built break spokes and they will do everything they can to prevent it.
Thanks for the comment!
Jim
I have a set of his wheels. They weren’t cheap but after going through 2 sets of stock, machine built wheels and a couple poor sets of hand built wheels I finally found Mr. Wells.
I’m a larger guy (220#) but now have 25K miles on a set of his wheels and they’ve never gone even a mm out of true.