
Jim’s Tech Talk
By Jim Langley
Last week we covered the importance of finishing the ends of bicycle cables to prevent fraying, possible injury (the cables can stab you), as well as to give them a tidy professional appearance.
We also highlighted two ingenious new tools for finishing cables, Park Tool’s $29.95 EP-1 End Cap Crimping Pliers (https://amzn.to/3QDKjiQ) and Alligator’s ($999!) Portable Wire Cutter, which cuts and welds the ends of cables. Here’s the article if you missed it: https://www.roadbikerider.com/new-tools-finishing-cables/.
Thinking that a lot of our Facebook followers would be interested in this topic I posted a link to the article there too: https://www.facebook.com/langley.jim/posts/. And straight away, the story went sort of viral.
Great comments and cable finishing tips started coming in to the column and the Facebook post. And then a member of the ClassicRendezvous Google Group shared it (CR is an awesome community made up of lovers of all things vintage road bikes; it’s free to join and take part https://classicrendezvous.com/).
As a result of all this interest, I’ve compiled a list of the methods mentioned for finishing cables. It’ll come in handy should you need another way to finish a cable someday. The list is not in any particular order. If you can access the Facebook post and ClassicRendezvous conversation you can see the who’s who of bicycle gurus who shared their best tips but suffice to say that a ton of bicycle mechanic expertise is represented. Mega thanks to everyone!
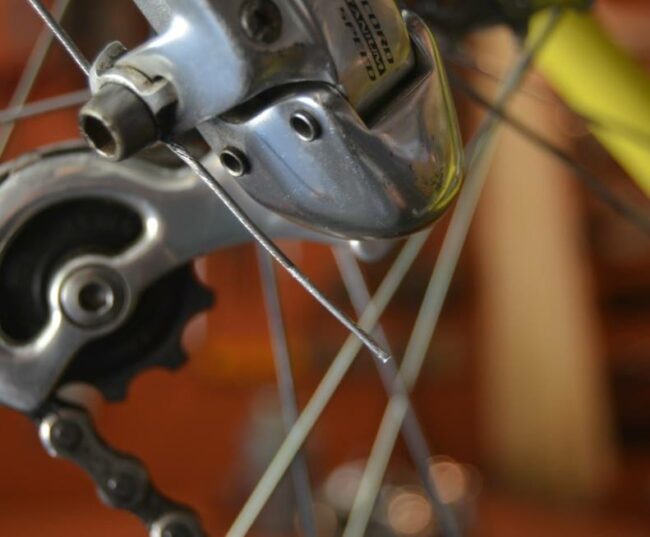
- Solder the cable end (photo courtesy of Curtis Odom). Because it works so well to prevent fraying; allows the cable to be pulled back through the housing if needed; is so minimal (nothing added to the end of the cable); this is the gold standard in cable finishing. But it requires a cable that can be soldered, a source of heat, and likely the right solder and flux to clean and prepare the cable for soldering. According to Mark Stonich on the ClassicRendezvous group (and of bikesmithdesigns.com, shorteners of crank arms and makers of specialty bike tools) the trick to soldering stainless cables is to use silver solder with silver brazing flux.
- Cut and weld the cable end. The ultra expensive Alligator tool cuts and welds the end of the cable to prevent fraying and give the cable a factory finished look. One of the ClassicRendezvous group members pointed out that the French bike tool company Var shows a similar tool in their catalog: tool #310. Also mentioned was cutting and welding the cable end with an oxy acetylene cutting torch. I haven’t seen this technique so I can’t describe it. Since the tools that make it easy to cut and finish cables like this are so expensive they don’t make sense for most people.
- End caps that are crimped on. This is the most common way to finish cables after cutting them to size. To do it you need to keep end caps on hand. They come in different types of metals in various colors and in two sizes, one for brake cables and another for shift cables. Not everyone likes the look of end caps. Unless they’re crimped on well they can come off. And if they do come off the cable will usually fray because when the cap was crimped on it crushed the cable. On ClassicRendezvous framebuilder Richard Sachs reminded everyone that Campagnolo had end caps, part #652, which he used a lot. Fellow CRer Brooks Watts said Campy’s caps first appeared in their 1953 catalog!
- Heat shrink electrical tubing. This one only requires some heat shrink tubing and a flame. Reader “Merle” pointed out that by cutting the cable to length after installing the heat shrink tubing you’ll end up with a nice clean cut. Some tubing comes in different colors for matching your bike too. I don’t know how long it lasts.
- Super glue. Some mechanics say this works well. And if so it should offer the same advantages as welding while being much easier to apply. I haven’t tried this method. But cables are usually lubricated before or during installation which I assume could prevent the glue bonding unless you clean the cable end really well. One of the ClassicRendezvous guys said they’ve also used 2-part epoxy in their shop but only when finishing a batch of cables since otherwise it would be a waste to mix it and have it dry.
- Electrical tape wrapped around the cable. As with the glue, I don’t think the tape would stick well if the cable end wasn’t clean.
- Spoke nipples that are crimped on. I can see how it’s kind of cool to use a bicycle part you might have on hand to finish bike cables. But spoke nipples are oversized for cables so they look a little “wrong” to me plus they’re significantly heavier than other finishing methods which might bother you too.
- Electrical wire connectors. Reader “Barry” uses crimp-style electrical wire connectors. He says “Select a size that fits the cable. Snip off the connector (typically round, flat, or half-round) and crimp on the cable. Leave the insulated cover on for a bit of red, blue, yellow for bling; or cut it off.” I asked him for more specifics and he added “I would suggest a 16-14 wire gauge for the brake cables, and 22 – 18 for shift cables. Though one could crimp down the 16-14 for it if needed. A complete set from Harbor Freight with a crimp tool can be found for under 10 bucks. Any hardware store would carry them as well. Ask for Solderless Terminals or Wire Connectors.”
- Seal it with wax plus a crimp-on. Reader “Ken” has an interesting technique. He says, “I heat the cable where I want to cut it with a heat gun, then drip paraffin wax into the strands. This stabilizes the ends from fraying. Once hardened I use a crimp-on end. If I have to rethread a cable, the wax holds the strands so they slide through the housing.”
- DIY brass end caps. I mentioned these last week. CR stalwart Larry Black explained “In the model and hobby shops there was a display of foot long tubing for modelers – used for frames, landing gear struts, and so on. Easy to cut, bend, solder. A small section would be glued, soldered, or crimped onto the cable end. It looked very classy and still would.”
Jim Langley is RBR’s Technical Editor. A pro mechanic & cycling writer for more than 40 years, he’s the author of Your Home Bicycle Workshop in the RBR eBookstore. Tune in to Jim’s popular YouTube channel for wheel building & bike repair how-to’s. Jim’s also known for his cycling streak that ended in February 2022 with a total of 10,269 consecutive daily rides (28 years, 1 month and 11 days of never missing a ride). Click to read Jim’s full bio.
Nice summary, Jim!
I’ve been leaving my cables a little (like a centimeter) long, and crimping the end caps with the crimp feature on my Park cable cutters. A centimeter is enough to allow several “end trims” during the normal life of the cable.
One small nit to pick: Epoxy cements don’t *dry*… they *set” or *cure*.
(Exiting Pedant Mode)
Cheers,
Steve
Thanks for the correction Steve, appreciate it!
Jim
I use Yokozuna reusable cable ends. The have a tiny collet the holds them on. They stay put in all conditions I’ve ridden in. I expect them to outlast my bike. https://www.somafabshop.com/shop/yokozuna-reusable-cable-ends-1-pair-2836?page=3&category=968#attr=279,996
Thanks very much for telling us about the Yokozuna reusable cable ends Chris – very cool!
Jim
This is great. Thanks for the suggestion, Chris. I love finding and supporting good products.
I like the Super Glue trick. I give the cable end a dip in chain cleaner or Alcohol, rinse it with a little water and then a dab of super glue, the moisture is good for the super glue. I also like the Dispensers with the squeeze triggers on the side. A consistent spot of glue, and consistently available, unlike some of the tubes that get contaminated and useless after a couple of uses.
I like soldering. But I also use hot glue with success.
Don’t use the trigger, but rather the hole in the nozzle of a small glue gun is just big enough to plunge the cable end into and slide back out with a small sleeve of glue on it.
The glue comes off with a fingernail for rethreading!
I use the shrink tubing method. I can say that they last a long time. When you shrink the tubing, the plastic becomes more rigid and durable. They are also re-usable since the are not sticky and can be slipped off with your fingers. The friction is enough to keep the in place as I never had now shake off the cable end.
Just dont cut the cable. then the cable is soldered. no special skills or tools needed. easier for removal or reuse or whatever.
just wind it at the end in a neat spiral where you twist the end around the bunch so it locks.
Loctite 603 (oil resistant green retaining compound) with crimp on ferrule, no need to crimp. Allows removal and reuse using a little heat and does not distort cable or ferrule.