
Jim’s Tech Talk
By Jim Langley
When it comes to cyclists’ comfort and ergonomics, saddle position comes first so it gets the most attention. But, a lot of discomfort, even pain comes from another main contact point, the levers.
Before shifting brake levers became standard issue, it wasn’t as important to hang on to the levers most of the time. Now that it is, what might seem to be slight issues with the levers could result in significant pain in the hands, wrists, elbows, shoulders and neck.
The Trickle-down Influence
Contributing to the possibility that you might end up with a lever position that causes problems, is the fact that pro riders recently started angling their levers extremely inward to cheat the wind. Which the governing body of pro cycling, the UCI quickly made a new rule to stop (no more than 10 degrees). But, even so I’ve seen roadies who suddenly angled their levers just like the pros. (The UCI’s pro rules can’t stop amateurs.)
Or if you go back to the Lance Armstrong era, he was famous for running his levers much higher on the bends than was ergonomically sound. And some pro mechanics adopted this as gospel and started setting up levers Lance’s way. This actually was the way my Shimano GRX levers were set up on my Trek Checkpoint SL-5 gravel bike when I received it from the shop last year (Lance was sponsored by Trek) – which is a long time after Lance so it shows how bad trends can continue on.
The Goals of a Good Neutral Lever Position
Let’s go over the basic steps of achieving a neutral lever position that should be a comfortable place to start for most cyclists. It also ensures that the hands can reach the levers for braking and shifting when gripping the hoods and drops. And it provides comfort, control, and easy access to braking and shifting when a rider is standing for climbing or sprinting – whether they choose to do this gripping the hoods or drops.
The most important thing is to not put the hands or wrists at risk of injury by forcing them to grip at an unnatural angle. When the handlebars and levers are all set up, they should feel like they are an extension of your arms and be easy to hold onto and to brake and shift with too.
An Important Note for Carbon Handlebars
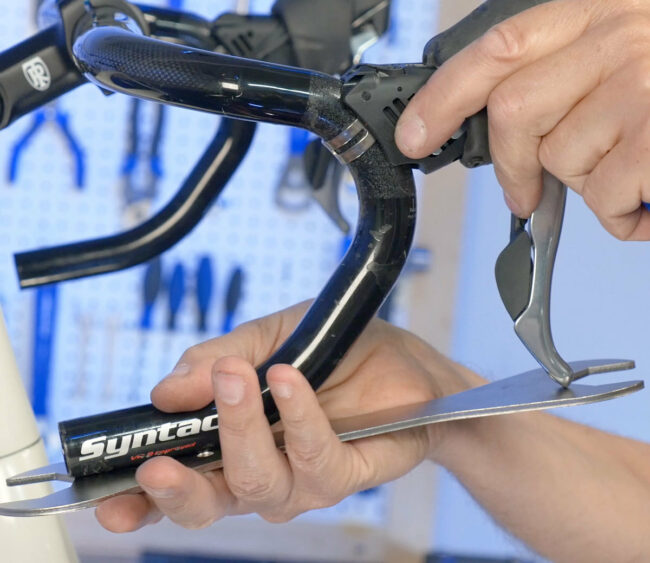
If you have carbon handlebars, while you make adjustments to the handlebars and levers only do it by loosening the clamp bolts rather than by forcing the handlebar or levers to move by pushing and pulling on them. If you force the bars or levers to move, you can scratch and damage your carbon handlebars and that’s a costly mistake. Some bars are reinforced at the gripping areas but it’s still best to go easy when making adjustments like this. Also, always follow any torque specifications when fully tightening the stem and lever bolts. Torque specs are usually found on component maker’s websites. You might see them printed on the components too but not always.
About Handlebar Tape/Wrap
To make lever adjustments when the handlebars are already taped/wrapped, you usually need to unwrap the handlebars. This is because the cable housing is usually taped in place on the bar which makes it difficult to move the levers except a little bit. For handlebars with internal cable routing, you may be able to move the levers without unwrapping the tape since the cables may move inside the handlebar.
1. Check the handlebar angle first
If drop handlebars are at the wrong angle it can cause lever positioning mistakes. The “drops” of the handlebars (the flat, straight lowest gripping point on the bar) should be level with the ground or slightly angled down toward the ground, but only a few degrees. Some riders may want them angled upwards a few degrees. Handlebars come in many different shapes and styles and it’s often necessary to experiment to find the most comfortable position. But you shouldn’t need to be very far off level in most cases.
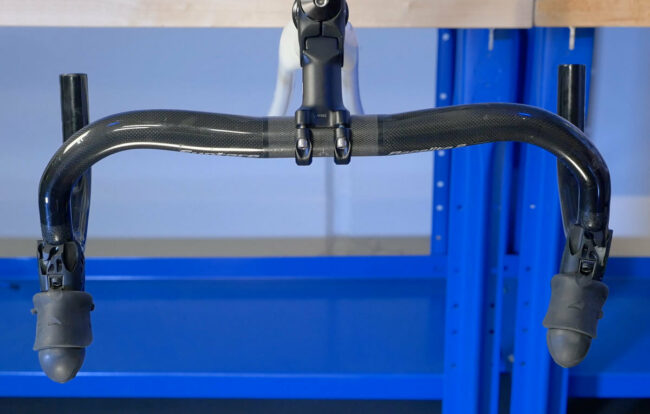
2. Lever height position
The photo here (courtesy of Park Tool) shows a great way to initially get the lever height close to perfect. Depending on the handlebar shape they might need to move a little, which I’ll explain in Step 4. I did not and do not agree with Lance’s high lever position. It forces the wrists to bend upward into an unnatural position that’s especially problematic for climbing while standing and holding onto the hoods. And unless you have extra large hands or long fingers it makes it more difficult to reach the levers from the drops.
3. Lever angle
While the UCI says it’s legal for pros to angle levers up to 10 degrees in toward each other, my recommendation is to keep them aligned with the sides of the drops as shown in this Park Tool photo. Compare the correctly aligned lever on the left to the lever on the right of the photo. The lever on the left of the photo is the one to copy. The reason NOT to angle levers inward is that just like with too-high levers, it put the wrists at an unnatural angle in relation to the handlebars and can cause pain or worse.
4. Fine tuning
Once you’ve got the handlebar angle set and the levers at the correct height and angle, it’s time to fine-tune the fit. The key thing to dial in is where the tops of the rubber hoods meet the handlebars. Depending on the shape of the handlebar there may be a round or nearly flat section here. With minor height adjustments of the lever you can achieve a nice platform that feels perfect to grip, hold on to and move your hand on to the hoods for braking, shifting or for standing. If it feels abrupt or like a change in angle, the lever’s probably too high, try lowering it a bit.
If it seems like it’s almost perfect and can’t be improved anymore by changing the levers on the bars, you can probably get it perfect by slightly changing the handlebar angle until the levers are perfect. Sometimes it takes a few tries moving the levers and bars to get it just right.
5. Outside the box setups
If you’ve never found a comfortable handlebar and lever setup, more than a few inventors have come out with unique and innovative handlebars that they believe are better than “standard” ones. For example, the Wave Coefficient handlebar Or for flat bar fans Jeff Jones’ H-Bar.
Your Turn
I’ve covered a few basic tips about dropped handlebar levers that I hope will help anyone with issues, especially pain or injury. But there are lots of different handlebars, levers and opinions on what’s best so please comment and weigh in with your helpful tips.
Jim Langley is RBR’s Technical Editor. A pro mechanic & cycling writer for more than 40 years, he’s the author of Your Home Bicycle Workshop in the RBR eBookstore. Tune in to Jim’s popular YouTube channel for wheel building & bike repair how-to’s. Jim’s also known for his cycling streak that ended in February 2022 with a total of 10,269 consecutive daily rides (28 years, 1 month and 11 days of never missing a ride). Click to read Jim’s full bio.
Despite the fact that I’m turning 72 in a month, I have found myself riding in the drops more than do the people I ride with. So, I’ve always used what your “Park Tools” photo shows. It eliminates “guess work”. ALSO, being a Campagnolo “fan” since about 2000, their documentation (for mechanical levers) show a rather narrow height range. This is to limit the amount of friction-inducing bend in the cables.
As indicated, bar/lever positioning has many variables. I am a “somewhat older” rider and often ride with “seniors.” Many times I have encountered riders with lower back pain (while riding). In many cases, this back pain can be almost instantly relieved by loosening the stem bolts and slightly rotating the bars upward.
Also, I have found that as riders age, lower back pain becomes more common and can be relieved by raising the bars on the steerer tube either by moving spacers to below the stem or, if that is not possible, by installing a steerer tube extension. Note: many bike shops will not install a steerer tube extension or will recommend against it. However, I have saved many riders from giving up riding due to back pain by installing a steerer tube extension. Sometimes, raising the bars by only 1/2 inch will solve lower back pain (sometimes, it requires more than 1/2″)..
Hi Jim,
Not directly related, so maybe this is the topic for another article, but another current trend is towards narrower handlebars, to reduce frontal area in any position but also to allow for an aerodynamic “TT-ish” position WITHOUT the need to tilt in the brake levers for the same effect.
It’s a compelling concept for those of us racing. However, just as the tilted-in brake levers can make for an uncomfortable wrist position, I’m concerned that a too-narrow handlebar can cause issues with shoulders, and maybe can compromise steering ability.
Any quick thoughts on this, or is it an involved topic that maybe could be the topic for a future article?
I normally use 44 cm bars, commensurate with my shoulder width. A while ago, on a new-to-me bike that had been built with 40 cm bars, I experienced shoulder pain on longer rides. Replaced the bars with my customary 44s and never experienced the pain again.
I used 44cm bars for 35 years but switched to 40cm a couple of years ago. I’m a big guy with wide shoulders, 183cm and 85kg but I actually find it more comfortable and it increased my average speed on 18km time trial by 0.5km/h. There is no cheaper or more effective aero improvement,
I have canted my levers inward for years for ergonomic reasons. I found by turning them inward my hands and wrists were in better alignment. If it was more aero, it was not major factor in my decision.
The shape of the grip has been an issue for me. I liked the old Campy style that was much less pronounced than Shimano’s. Now that the chunky style is in vogue, I find myself positioning the levers a bit lower to maintain the flat arm/wrist relationship I find comfortable.
I actually find that my wrist position is more neutral and my hands are more comfortable with the levers turned inward slightly. This is with older Campy 10-speed and Ultegra RS785 levers, so it’s possible that newer lever shapes and hood shapes may change that.
Thanks for this clear explanation!
A related question: I have a friend whose hands are small. She has trouble reaching the brake handles when riding on the hoods, and finds herself needing to go into the drops just to brake.
Any hope to make that easier — and safer?
Do her brake levers offer any reach adjustment? My girlfriend had the same issue and her levers didn’t offer any reach adjustment, so I ended up gluing a small spacer between the top of the brake lever and the lever body. That said, you need to make sure that she still has enough lever travel to actuate the brakes, which can be an issue with caliper brakes. Although it’s not an inexpensive solution, a bike with disc brake can be a game changer, as they generally have more adjustment and require less lever motion for braking.
That’s a common problem Ollie and there are lots of possible solutions depending on the situation.
One simple thing that sometimes works is loosening the brake adjustment. This works if the brakes are set too tight so that they grip when the levers are still close to the bars. If so, you can slightly loosen the brakes. That means the levers don’t grip until they’re closer to the bars which makes it easier to reach the levers for smaller hands.
BUT you never want to compromise braking power with this adjustment.
So if that’s an issue, maybe they’re lucky and their levers already have a reach adjustment built in. Some levers do and by making the adjustment the levers get closer to the bar and easier to reach.
Or if the levers don’t have reach adjustment, it might be worth it to upgrade to new levers with reach adjustment.
Lever positioning can be an issue for reach too but I’m assuming that’s not the issue… something to check if not. Different handlebar shapes can help with reach too.
Hope something here helps,
Jim
I also purchased a Trek Ckeckpoint about two years ago. My initial impression with the mounting position was “this is really high and different”, so I decided to try it for a while. Short rides are okay but a few hours in the saddle and the high position bothered my wrist.. so back a bit lower they went. I seem happiest with a relatively flat bar to hood transition., similar to the Park Tools photo.