
Jim’s Tech Talk
By Jim Langley
In several recent columns like this one. I’ve offered tool tips and ideas for a common and extremely frustrating issue with some tubeless tire and tubeless-ready rim combinations.
The issue is that, when the tires are installed, the tire beads become locked onto the rim. There are shelves on each side of the rim designed to lock and hold the tire beads in place. The problem is that they hold too well and when it comes time to remove a tubeless tire locked on like this, it can be monumentally difficult to remove.
If you carry a tubeless plug patch kit, such as the ones by Dynaplug (see my recent review) you may never have to remove a tubeless tire to fix a flat on a ride. But you’ll still run into the issue when it comes time to replace the tire, if you work on your own bike and have tubeless road tires and rims with locking beads.
Even if you have tire levers that work well on other tires, they usually won’t work for removing the locked on tubeless tires you can run into. The problem with standard tire levers is their tips are too thick to fit between the tire bead and the rim. You can try to jam it in-between but the mechanical advantage of the bead lock designed to not let go no matter what, prevents getting anything too thick between the rim and tire. There isn’t enough space, either.
If you’re lucky, instead of using a tire lever, you can push on the sides of the tire with your hands to try to shove the bead at one spot off the rim shelf there. If you try spots every few inches around both sides of the rim, you might find one spot that releases. And if so, that one free spot will create the slack needed to get the tire off all the way around on that one side. Then you just have to repeat the process on the other side to unlock that bead and remove the tire.
Dreaming of a Custom Tire Tool
As I wrote in previous Tech Talks about stubborn locked on tubeless tires, I’ve been trying to invent a tool that both fits in-between the tubeless bead and the rim and also has a pinching action to push the bead off the rim. I have not had much success – lots of ideas, but nothing I thought would work with all tires and rim types I would like to use it on (for road and mountain tubeless tires – MTB tires can be much worse than road).
Finally, the other day while fighting to remove a locked on tubeless tire, I had a eureka moment. This tire was even worse than a typical locked on tubeless because I had put a new tube in to fix a flat. The sealant in the tire stuck to the tube gluing it inside the tire and this made it even more difficult to push the tire beads off the rim.
Realizing I couldn’t force this tire off with my hands – or any of the regular bicycle tire tools in my shop – and I have about everything ever made, it dawned on me that I might have a much more basic tool to do the trick.

Use with Care
The tool that worked the magic was a good old fashioned putty knife. Here are some photos so you can see the type. With its oversize handle you have a great grip for forcing the tool in between the tire and rim. You have to work at it a bit with the goal of getting the entire width of the blade resting on the rim.
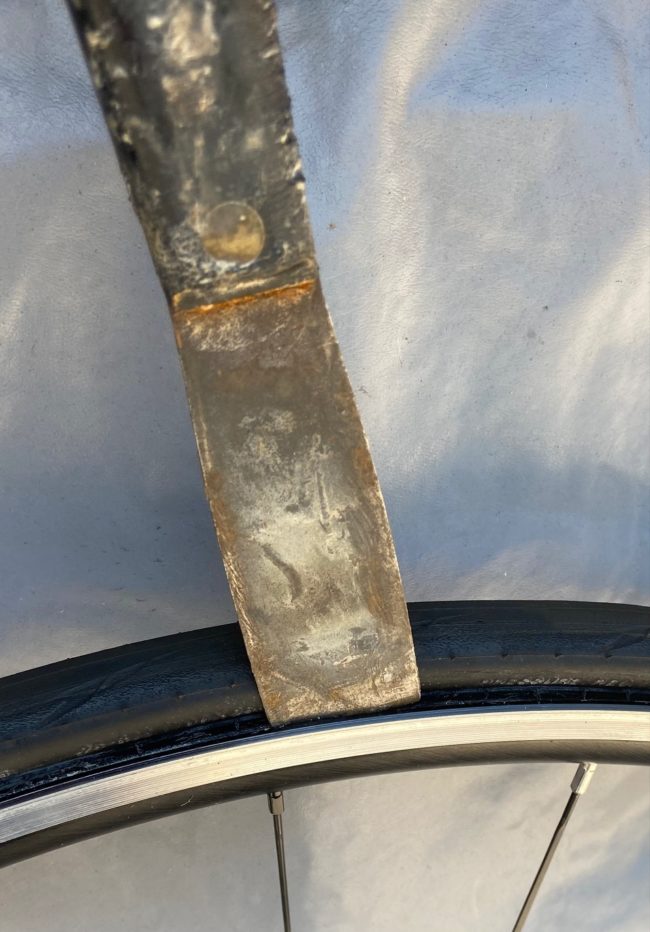
Once the tool’s blade is fully down in between the tire and rim, you can use the tool as a lever and also twist it to get its stiff wide blade to push the tire bead off the rim shelf. You use the tool carefully so as not to jab any sharp edges into the tire or rim. You’re just trying to get the tire bead to move toward the center of the rim.
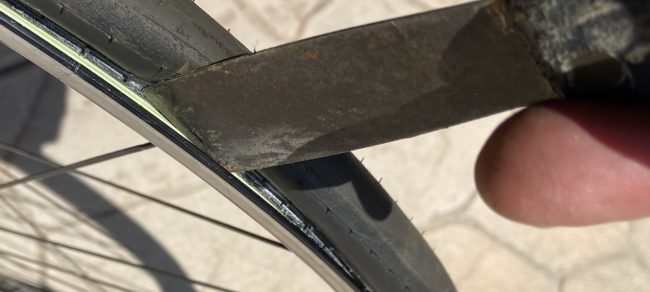
It took a few tries to free the tire, but the putty knife worked well. I had to be sure to keep it down against the rim and focus on moving the tire not in any way scratching or poking the rim or tire.
If you try this with a new putty knife, you want one that has a blade stiff enough not to bend. That way using it as a lever or twisting it to push the tire the blade will be strong enough to have the desired effect. If the new blade has any sharp edges, be sure to dull them with a file or piece of sandpaper, etc.
I hope this tool tip helps you with locked on tubeless tires. If you give it a try, please comment and let everyone know how it worked. And, please comment with your favorite tools for removing locked on tubeless tires.
Jim Langley is RBR’s Technical Editor. A pro mechanic & cycling writer for more than 40 years, he’s the author of Your Home Bicycle Workshop in the RBR eBookstore. Tune in to Jim’s popular YouTube channel for wheel building & bike repair how-to’s. Jim’s also known for his cycling streak that ended in February 2022 with a total of 10,269 consecutive daily rides (28 years, 1 month and 11 days of never missing a ride). Click to read Jim’s full bio.
I have over 40 years and 360,000 miles riding. During that time, I’ve had my share of flats. Not sure how many but not an excessive number. A few per year? I carry two tubes and a patch kit on all rides. Takes maybe 5-10 minutes to fix a flat. I have just one bike out of eight with tubeless tires. In two years I had three flats on that bike that wouldn’t seal. Inserting a tube on the road was extremely difficult. Break the bead seal. Deal with that sloppy sealer. Remove the stem (good luck). Ride back with a distinct hump in the tire as it’s almost impossible to get the tube and tire to mesh properly. I’m not a fan to say the least. I’ll stick with tubes.
In 12 tyers of tubeless riding I have not had one puncture to fix across 6 bikes on varying terrain and the new vegetalex sealant is not sticky
I would also say a[lthough i am more a Mountain bike rider these days than roadride, that changing a tyre in the middle of winter with your hands out of gloves is a nightmare scenario I am happy to avoid.
Granted its not all positives as tyres can be hard to remove [ though my road ones are pretty loose and not a problem ] but new hooked rims and tyres are very tight. That said when i got a new bike i struggled to unbead the tyres even though it had been set up with tubes so I am going to have that issue whether tubeless or not.
I don’t know if this will work or if it would require 8 hands to make it work. I was thinking that you might be able to use a length of insulated wire to wrap around the entire bead and then twist the wire ends with something like a screwdriver shaft. The military has tourniquets that work like this. As the wire gets tighter it will pull between the rim and tire bead and push the bead off the seat (hopefully).
If this works, adding a length of wire to a seat pack would not be too bulky or heavy.
That’s an ingenious idea, Eric – thank you. I will give that a try next time and see if it works. It just might.
Appreciate the idea!!
Jim
I’m with Peter W. on this – I’ve had many years of ‘tubed’ riding (and actually even more on tubulars), and can’t say that I see the point of tubeless.. So many issues that can be a nightmare on the road, as PW mentioned, and no disticnt advantages. You still need to carry a spare tube ‘just in case”. How many times has a colleague turned up to a ride start and white goo is ozzing out of his tire unexplicably, etc.. They work great until they don’t. It seems that some ‘improvements’ are created jsut to sell you some new stuff and stuff the wallets of manufacturers.
NK
The point is you dont get punctures. I am not sure why you dont see this as an advantage nor why you need this advanatge stating. I have never attended any ride where tubeless sealant was leaking – seems we both cannot get tyres off because they are stuck on and they are also somehow so loose the sealant leaks, I have stopped for others punctures more often they have stopped for my never had a puncture on the road tubeless set up . I have also stopped when they failed to remove the object from tyre and then waited as they patched both holed tubes and we hoped it did not leak again.
I am not sure why you state carrying a spare tube as a weakness as you are carrying one ” just in case” your system fails. Its the same reason we carry a chain tool but i dont think it means chains dont work.
I rode tubeless for six years on my fat tire and my gravel bikes. In those six years, I had seven tire “incidents” which required repair … one was able to be fixed with a plug, the remaining six required more attention as they were slits caused by either sharp gravel or glass. Of those six, I was fortunate to have riding buddies who helped “break the beads” on four of them so I could insert a tube … which, with a minimum of four ounces of sealant on my gravel bikes (even though some leaked out of the slits), was a mess and the tube ended up sticking to the tire casing. I ended up calling for rides home on the two that couldn’t be repaired on the road. So, like a couple of others that commented, I will stick with tubes. I carry at least one spare and a patch kit. I can singularly break any bead and repair a tire in less than 10 minutes and be back on the road.
This is my 48th year of adult riding, so you might guess that the guy has changed a tire or two. I had 4 experiences of trying to remove a tubed tire from a tubeless rim. In one case I had 3 very experienced riders help me & we still couldn’t get it off. The rims were DT Swiss & the tires were conti GP 5000s. I had to call to get rides home. I finally came up with a solution. I took my wheels to my LBS & had them re-laced with Velocity rims, which are not tubeless ready. Yes, it cost some $$, but I’m now trouble free. If I get a flat at the corner of Tarantula Blvd. & Rattlesnake Road I know I can fix it without problem. IMO, it was worth the money for the peace of mind.
Every time I read an article about how to deal with one road tubeless issue or another, I just wonder what the attraction is. This “innovation” has been around for well over a decade and it still has not captured the market. If it really was an improvement, we would all be on tubeless by now. It really seems like this is being pushed by manufacturers and the bicycling press rather than embraced by riders.
I’d say for gravel and mountain biking, it’s definitely helpful. But with low air volume and high air pressure road tires, especially when they have those new tube technologies like Tubolito and that new Schwalbe tube that is lighter and more puncture resistant, I’m also not sure that tubeless is that great when a flat can leave you stranded on the side of the road because it’s so hard to get the tire off or back on. It’s also a disgusting mess if you try and put a tube in after you’ve had some problem that the sealant wouldn’t fix and get a flat anyway. At high pressures, the sealant sprays out on everyone around you and all over your bike, but it isn’t always that effective at actually sealing up the puncture.
Not to mention what it’s like if you have some kind of problem where the tire explodes off the rim when you are setting it up and you get sealant everywhere and scare yourself half to death.
Granted some folks don’t like tubeless. I have four bikes that I ride road, gravel, trails, two tubeless, two tubed. Finding a good tire/rim compatability helps in both installation and removal. Here are my removal tips:
On the road if thumbs and palms don’t suffice try placing the heel of one shoe on the tire near the rim (wheel near horizontal and opposite side tire well supported).
In my shop I use the tail vice of my woodworking bench, the tire is placed into the face of the vice with minimal gap to the rim.
I’m with the “tubes only” gang on this one. In my shop I’ve done lots of tubeless installations on mountain bike wheels with minimal problems. However, I’m working indoors, on a cleanish surface, and have my air compressor on hand to deliver the volume of air generally required to seat the tire bead.
On my own bikes (3 road, one mountain) I use Schwalbe XL/UL tubes in lightweight supple tires, and experience a few punctures each year. All are repaired quickly and cleanly on the road in minimum time and bother. Therefore, I”ll stick with tubes. I’m not enthralled by much of the newest technology. When things happen on the road, it’s great to be able to fix it quickly and get going again with minimum fuss.
The simplicity of the bicycle is a big part of the attraction. While I have electronic shifting on my time trial bike I have no interest in having it on my road bikes. Same with the disc brakes. My rim brakes are fine 99% of the time with the 1% being in the rain on a downhill. Dealing with the pads and fluid is more trouble than I think they are worth. I get their attraction in the mountain bike world. All of these ‘upgrades’ for the road bike segment just don’t seem worth the trouble. I know. I’ll be 60 next year and it’s showing! Grouchy old guy!
I used 2 F-Clamps and tightened them on the tyre with 10cm distance between them, then just bend these clamps over the rim side and then I could easily take the tyre off, no scratches.
I have pictures of it but do not know how to upload them here
Regards,
Ron
Use a C-Clamp. Tighten as far down on the tire towards the rim as possible. Worked for me
Thank you all for your solutions.
The one with the putty knife will most probably “work” in allcases, however, the probability of damaging the rim is very high, apart from the question of corrosion at the points where scratches will not be easy to avoid.
The answer which I think is very honest is that all solutions work till the don’t work. Stuck beads can be very troublesome and require more than just a bit of patience!.
I ran across this solution when desperately looking for a way to get my road bike tubeless tire off the wheel. A friend was able to get one side of the tube unseated last night but today when I went to replace the tube I realized I could not get the tire back on unless I unseated the other side so I could push the tire into the center rim channel I bought my bike last year and they set it up with tubes so the problem was getting the tire to unseat off the outer edge of the rim. I was about to give up when I found this article and had a putty knife I could use.
I didn’t realize until I was able to push the tire towards the center of the rim that there was no
“sticking” involved but rather a very tight fit that required enough leverage on the tire to move it. I had previously managed to open a small gap that then allowed the knife to fit down into and then it was just a matter of moving along a stretch of rim pushing towards the rim center. After a few minutes I was able to easily push the tire into the center channel.
Thanks for the solution!
Any metal tool is no go for carbon rims and not great for metal rims either. Be careful sure.
These newer hooked tubeless wheels and tires are horrific to deal with. I’ve been unable to fix a flat tube on my front wheel (DT Swiss GRC 1600 Spline) because I’ve been unable to remount the tire without destroying the tube a couple of times, and destroyed one plastic tire lever in the process. I’ll have to make a bike shop trip just to fix a flat tube now. If I get a flat out and about I’ll have to call a fucking helicopter.
Fucking horrific. I smacked the rim into my wood floor I was so mad, don’t think I dinged it, carbon cracks but doesn’t ding :). Fucking horrific, the worst piece of bike gear/maintenance I’ve ever had to deal with.
I’ve had a tubeless tyre less than a week and already have a flat that won’t fix… As soon as it gets in the shop those tyres are in the bin and going back to tubes…
I have a carbon rim will putty knife work
I have a carbon rim will putty knife work.
I have a carbon rim will the putty knife work.