
Jim’s Tech Talk
By Jim Langley
My neighbor Jessica brought her circa 2006 Trek Pilot 5.2 to me for a tune-up. She and her husband Kent are avid road riders. Her Shimano Ultegra Trek had the signs of a well-ridden machine.
Road grit covered the fork and frame, probably from our fog here; there was a black grimy build-up on the chain, cassette, derailleur pulleys and chainrings; the front brake was about to bind up; the seatpost collar was slightly loose and crooked; her dry derailleur pulleys cried for overhauling when I turned them; the Shimano MTB clipless pedals needed bearing grease and screw tightening; and she had a rear flat.
Her primary complaint was shifting hesitation. My chain checker showed that a new chain would be the likely solution. I asked her about the rear flat and whether she had a spare tube or if I should supply it and charge her for it.
She said that she had plenty of tubes because she had suffered a string of mysterious punctures recently and Kent had bought a supply. That made me take a closer look at her Bontrager low-spoke count wheels. Jessica said she had upgraded to them about three years ago.
Tubeless-ready Not Always Tube-ready
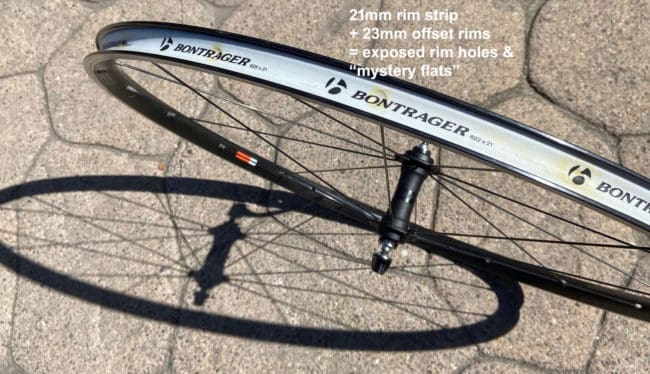
All it took was spotting two words on the rims and I was pretty sure I knew the source of her frequent and mysterious (to her) punctures. Those words were tubeless-ready (TR). I’ve seen the same TR issue with riders who use tubes in them several times now and I expect to see it more.
The problem is that someone, and it’s hard to know who – had installed rim strips that are too narrow to work properly with tubes. The rim strips’ job is to prevent the tubes from getting punctured from the holes inside the rim.
It could be that the maker of the wheels provided “temporary” rim strips that should work for a while. And since they think the owner will be setting the wheels up with tubeless tires soon (removing the rim strips and taping the rims in the process), it won’t be a problem.
Creeping Rim Strips

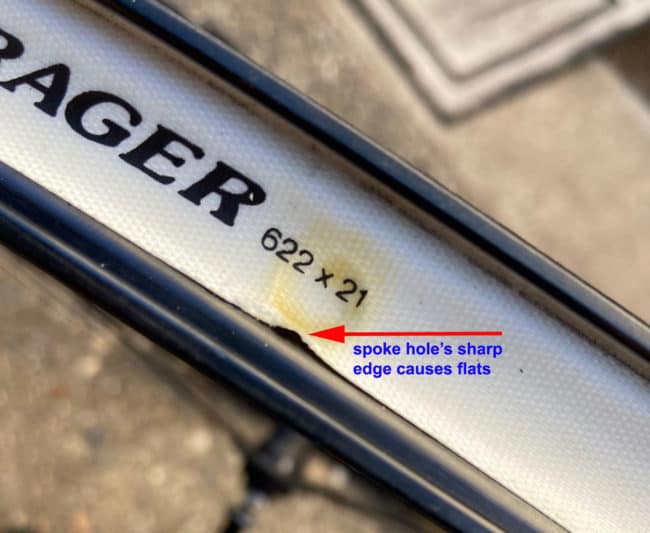
But, if you have too-narrow rim strips in any rim, the rim strips can move sideways. When that happens the rim holes can be exposed. These have sharp edges that quickly cut into the inflated tube, which expands down and into any part of the hole that the rim strip isn’t covering.
So if you run tubes in these tubeless-ready wheels, the next thing you know you have a flat. And, if you put a new tube in, you’ll just get another flat.
Even if you inspect the rim strip and make certain it’s covering the rim holes, it’s likely that it will creep out of position. This can happen during tire installation. The tire bead rests on the rim strip and even if you’re careful, it’s easy to move the strip while popping the tire onto the rim.
The other thing that causes it to move is the normal cycle of tires losing air and topping them off. As the tube shrinks and expands, it grips and can move the rim strip.
Rim Designs are Part of the Problem
Many tubeless-ready rims present another challenge when it comes to rim strips covering the holes. They have offset spoke holes that are closer to one side of the rim.
This means the rim strip only has to move a slight amount and the holes are exposed. Also, the holes can then be on the uphill side of the rim where the rim strip tries to slide down from. Offset spoke holes are great for wheel strength, but they make it even more important to carefully select rim strips.
Wall-to-wall Coverage
In the photos I hope you can see that the rim strip is narrower than the rim. The strip measures and is labeled 21mm wide and the rim is 23mm. That 2mm difference doesn’t seem like much, but because the rim strip is not touching both sides of the rim, the gap encourages the rim strip to move. And when it does it is more likely to get pushed down into the rim holes exposing the sharp edges.
Adhesive rim strips are better than Jessica’s that are only held in place by friction. But, most adhesives don’t last forever so even sticky strips need to be right-sized.
My Recommendation
If you have tubeless-ready wheels and you’re running them with tubes, plus you’re suffering frequent flats, I would take the tires off to inspect the rim strips and see if they’re properly sized for your rims.
If the rim strips are too narrow, you’ll probably see how some sharp spoke hole edges are exposed and have been in contact with the tube(s). You should remove those rim strips and install new rim strips or tape that fills the inside of the rim from rim wall to rim wall, no less, no more.
Depending on your inside rim width it might be difficult to find the right-width rim strips. If you can’t, it’s okay to use tape as long as it is strong enough not to get cut from the rim holes. Stan’s No Tubes makes rim tape in various widths designed for tubeless setups that will work with tubes, too. Be sure to read and follow the instructions.
Gorilla Tape (it’s like a heavier, thicker duct tape) will work, too. But, electrical tape usually doesn’t hold up very long (though you can double wrap it for longer life).
For Jessica, because I have it on hand, I used 23mm wide Gorilla Tape (I cut it to size from a wider roll – you can buy it in narrower widths, too). 23mm wide tape provides wall-to-wall coverage and will end her mystery flats hopefully forever.
Ride total: 9,730
Jim,
I’m not sure why these Bontrager rims are marked tubeless-ready. If they have spoke holes drilled through the rim that require rim strips to cover them, then they are not native tubeless-ready rims. True tubeless-ready rims like those do not have holes drilled through them for the spokes. There is no need then for rim strips when using either standard clincher tires.
You mixed up tubeless rims (UST) and tubeless-ready rims. The former do not have holes, but the latter do – if used as tubeless, holes to be covered with the special “tubeless” tape. The tubeless-ready differ from conventional ones on bead-locks design. Details may be seen here https://www.lightbicycle.com/newsletter/TUBELESS-READY-OR-TUBELESS-RIMS–WHAT-S-BEST-FOR-ME.html
My first new bike in a long time (and that was 1997) had a mystery flat when out by myself. Looking things over, as you said, I saw the plastic(!) rim strip and moved to expose the sharp edge…
All my wheels bar the Campy wheels (no spoke holes in the rim!) have Velox cloth strips. They do not move or stretch, and they are easy to install or remove if necessary.
Rode with a “new” friend (since then a very good friend) about 8-9 years ago and he flatted 8 times in about 50 miles. We were riding in a decent sized group and used up just about every spare tube everyone had. After about the 3rd flat we realized that the culprit was the plastic rim strip he had, that was too small and had no hope of staying in place. Since we didn’t have any other tape with us, we were scrambling to “patch” with dollar bills, gum wrappers, anything we could find. Since then I’ve kept a small roll of electrical tape in my kit bag, just for such emergencies …. and told everyone I talk with about it to immediately dump the plastic rim strip!
I’m not a fan of Bontrager-branded wheels. I was getting a flat every week! In addition to the rim tap issue, I had a set that developed cracks in the rim at the nipple junction. I dumped all Brontrager equipment for anything of better design and quality control.
Same issue with cracks around the nipples. First set of wheels was replaced on warranty. Second set, they refused to replace. Never again will I buy Bontrager wheels.
Had the exact same issue with a set of Velocity tubeless ready A23 rims built by a shop on a new bike I purchased. Started getting rim side flats after a few months so replaced the supplied plastic rim strips with Velox. That worked for a few more months until same thing started happening. Found out Velocity recommends two layers of tubeless rim tape even if using tubes . After doing that no more flats.
Velocity tape is very good! I’ve worked with the company and they recommend the first warp around be VERY tight, with the second firm but not quite as tight. Seems logical to me, so that the second wrap i less likely to slip.
I’d add, just not so loose as to make it slip as you install your tire.
In a pinch and if nothing else is available, I have found that (medical) adhesive tape will work.
Jim,
So we are all on the same page, please define (and the difference between) Tubeless and Tubeless-Ready. And while you are at it, Clincher and Tubular.
Thanks,
Tires: Tubeless- Tires have a butyl inner liner inside the tire so it does not leak air.
Tubeless-ready: Also a tubeless tire, but WITHOUT the butyl inner liner.
Clincher: Tire with a bead designed to take tubes.
Tubular: Tire with inner tube sewn into it, no beads. Must be glued onto a rim designed for tubular tires.
Rims: Tubeless-ready rim: No spoke holes in the rim, does not need rim tape. They can natively accept tubeless tires without a conversion kit.
Very informative. I have a used bike I purchased back in 2015 where the front tube is always flat, despite many changes: of tubes, of tires, of rim-tape. I’m off to the shed to investigate the situation again, this time with a magnifying glass!
Good luck, Paul. You might try stuffing a rag in the bare rim and running it around one way and then back the other way. If you’re lucky it’ll get snagged by some sharp that’s the source of your punctures. Don’t miss the valve hole. Sometimes that’s where the burr or edge is that’s slicing the tubes. Hope you find it!
Jim
Great suggestion on the rag Jim. When I inspect wheels when fixing a flat I am always hesitant to press my fingers too hard against the rim because I don’t want to “find” the burr with a cut finger. A small rag is a great way to find it without the risk.
Jim: Wow, 2 mm sure doesn’t seem like much, so thanks for giving the heads up on COMPLETE coverage of the inner rim surface. At a university campus bike shop we repair hundreds of punctures a week, and what I do is quickly inflate the failed tube to see if the failure is from a outside (tack, glass, etc) or from the inner surface, thus meaning a rim strip replacement which is only $1 for a rubber one; these are urban/campus bikes.
Jim, great article, as we so often get form you. I’ve built and rebuilt several bikes, and still find your advice very useful.
A question regarding Gorilla Tape: how did you cut it down to exactly 23mm, particularly since as you write, the tape or strip width must be exact ?
As you write, many size rims and tapes, likely to leave some gaps in what may be needed.
Jim,
I started using Veloplugs a few years ago instead of rim tape. It seems you then don’t have to worry about creep and it helped to make it easier to mount tires. Do you have an opinion about the use of Veloplugs?
Something not mentioned (unless I just missed it) is the issue of making sure the rim tape for tubeless setups is solidly adhered to the rim, with no creases or bad spots. My solution has been to clean the inside of the bare rim very well with alcohol, find the rim tape (I use Stan’s) that’s the full width of the inside of the rim, install it as smoothly as I can, and overlapping the ends by 30mm or so. Using a hot spoke, I carefully burn a smooth round hole for the valve stem. Now, install the tire with a tube, bring it up to full pressure…carefully….and let it sit for a while. Deflate the tube and remove it. You should find the rim tape smoothly and completely adhered inside the rim without creases or folds. Now install the tubeless valve stem and proceed with the tire and sealant. I was astonished how well this worked first time I tried it.