
By Stan Purdum
When I reviewed my new Specialized Turbo Creo SL Comp E5 Road Ebike in RBR recently, I said that the only thing I didn’t like about it was the location of the control unit, which is embedded in the top tube, near the head tube end, and that dislike was because when you want to change modes, you have to take your eyes off the road much more so than if the unit were somewhere on the handlebars. And operating the unit also requires you to take one hand off the handlebars.
But in the reader comment section following that review, several of you mentioned that Specialized has a kit with control buttons you can plant on the handlebars or anywhere you want them. One of you even supplied the part number. Thank you, all!
I ordered the kit — on sale for $51.99 — available both here and here.
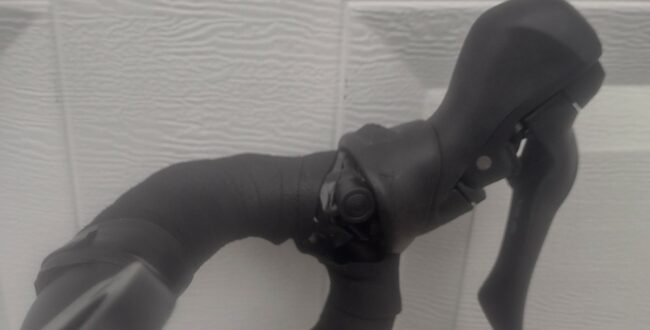
The kit came with clear installation directions, and it took me about an hour to do the install. Some of that time was deciding where I wanted to locate the buttons. I eventually settled on putting them under the brake hoods, near where my thumbs rest during normal pedaling. (The hoods are no impediment to operating the buttons, but neither is the handlebar tape, so you can wrap over the buttons if you wish.)
No matter where you put the buttons, however, planting them requires first removing the handlebar tape, and for me, the most time-consuming part of the whole project was rewrapping the bars afterward. I reused the same tape, which went back on without difficulty.
Although the instructions made the installation seem easy enough, I looked on the internet to see if there was a video of someone actually doing it. I found only one (see it here), but that video made the project seem harder than it proved to be.
The wires route internally through the frame, but the Creo the presenter was doing the install on must have been an earlier model than mine, because unlike mine, his didn’t have any cutout access on the side of the top tube (in bike jargon, the cutout is called an ICR port — Internal Cable Routing port) so he had route his wires through the ICR port on the down tube where the brake and shift wires also enter the frame, and then thread his wires through the joint where the top tube and down tube connect. He ended up turning the whole bike upside down to accomplish this.
The one useful point I picked up from the video, however, was the benefit of marking ahead of time which wire would serve to move up (+) the mode ladder: off→eco→sport→turbo, and which would serve to move down (-) the mode ladder: turbo→sport→eco→off.
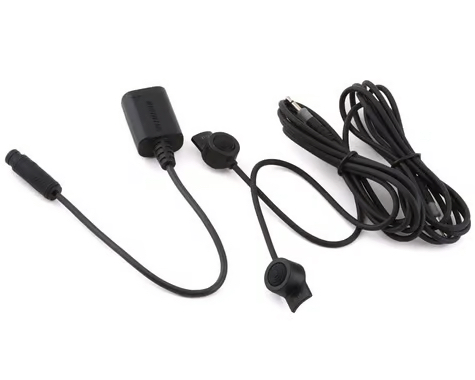
The kit comes with three parts: (1) a remote button connected by a wire to a male jack, which I marked “+” (2) a second identical remote button-wire-jack, which I marked “-” and (3) a junction block with two female receptacles, one marked “+” and one marked “-”; the block’s wires went to a connector that would plug into the existing control unit.
In short, to install the Turbo Road Remote:
- Unwrap the handlebar tape on each half of the handlebar to the point where you wish to plant the remote buttons.
- Attach the buttons. They have a sticky patch on the back that will hold them in place while you complete the attachment using electrical tape.
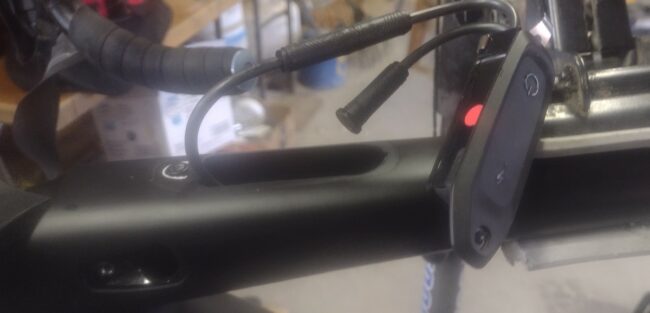
- Use a #10 torx driver to remove the existing control unit from the top tube.
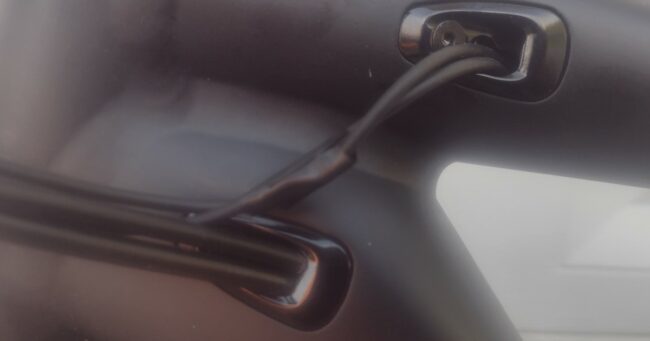
- Route the wires from the buttons to the IRC port on the side of the top tube, and using an Allen wrench, remove the port cover. If your port cover does not have a hole already in it through which the jacks will fit, check the kit that came with your Creo. It should have a cover with the appropriate hole. (In my case, the cover with the hole was already on the IRC port, and the non-hole cover was in the Creo kit.)
- Thread the button wires though IRC port cover then through the frame to the cutout where the control unit was. With the IRC port on the top tube on my bike, this was simple to do.
- Plug the two jacks into the junction block. I chose to plant the “up” button on the inside of the right shifter, so that jack went into the + junction. I planted the “down” button on the inside of the left shifter, so that jack went into the – junction.
- Plug the junction block connector into the corresponding connector on the control unit.
- Turn on the motor and check that the buttons are working as desired.
- Stuff the junction block and extra wire into the top tube and reinstall the control unit.
When on the road, turn the control unit on as usual. If you wish, changing modes can still be done from the control unit, as the new buttons do not override the unit; rather, they provide an alternative — and more instinctive and safer— way to change modes. The unit continues to display as usual, so you can always tell at a glance what mode you are in.
An additional benefit is that the Turbo Road Remote button allows you to move in either direction, up or down the mode ladder. The button on the control unit only moves up until it reaches the top, and then starts over. If, for example, you are in sport mode and want to drop back to eco mode, you have to click the unit button twice to move through the turbo mode to get to eco. With the remote buttons, you can click the down button once and move back to eco.
Though each button is present as a small bulge on the side of each brake hood, they are not at all in the way, and bulges let me know exactly where the buttons are, so I don’t have to feel around for them.
As mentioned above, the only thing I didn’t like about the Creo when I bought it was the location of the control unit. Now, with the addition of the remote buttons, the bike is darn near perfect!
Stan Purdum has ridden several long-distance bike trips, including an across-America ride recounted in his book Roll Around Heaven All Day, and a trek on U.S. 62, from Niagara Falls, New York, to El Paso, Texas, the subject of his book Playing in Traffic. Stan, a freelance writer and editor, lives in Ohio. See more at www.StanPurdum.com.
I’d consider it a “must-have upgrade”, along with the extended battery!
Our bikes came with them. Riding without them felt very dangerous to me. Husband put both on the right. I have one left and one right…down on the left. Must have for these bikes.
I read somewhere that someone had figured out how to convert the left shift lever so that it could be used to remotely change modes. Since My Evo Creo has a single chainring and I never use the left shift lever, this would be ideal! Does anyone have any thoughts on how this could be done?
My Creo has only a brake lever on the left hand side. No shift lever included, so that option would not work for me without replacing that lever with a combo one.