
Last week’s column on hanging bicycles on bike hooks – a versatile and easy way to safely store road bikes – elicited helpful comments, questions and suggestions. So I’m following up with your tips, more photos and ideas.
Hook Hanging Tip 1: ‘Fairing’ carbon wheels are too fragile to hang a bike by them
The most important tip is from Mark Beaver, who commented, “Jim, I must add a caveat to your hanging suggestions – if you have a wheelset that uses “carbon fairings,” don’t hang the bike by the wheels. Carbon wheels that are substantial, i.e. the spoke nipples are mounted to the inside circumference of the carbon rim, are fine, generally.
“But some carbon wheels, such as models from HED or Bontrager Aura, use an aluminum rim into which the nipples mount, and the carbon is a skin fairing; these are fragile and can be damaged by vigorous hanging, such as dropping the bike on the hook too hard. If your spokes enter the carbon through a visible hole, don’t hang ’em.”
Great tip, Mark. If you’re not sure whether you have the “fairing”-type carbon rims Mark is talking about, try gently squeezing the rims. A “fairing” type will flex without very much finger pressure. If your carbon rims flex like this, hang your bike another way, or switch out the wheel so you’re hanging it by a rim that can’t be damaged.
Bicycle Storage Hanging Tip 2: Hot engines might be hazardous to hanging bikes
John Perlman also made an interesting point. He wrote, “I keep my bikes in exactly the manner described, hanging from one wheel in the back of the garage. I realized after driving all over town one hot summer day that I was parking this hot engine right under the bikes. It takes hours to cool off and a lot of that heat is escaping through the radiator and grille, and also just radiating from the hood. So I’ve started trying to keep the car as far as possible from the bikes. All that heat can’t help the tires, brake fluid, etc.”
That makes a lot of sense, John. Thanks for the tip!
Tip 3: Use a pulley hoist/lift to hang bikes
Ed Downey shared this cool tip: “For under $9 each, I went to Harbor Freight and purchased four of their Bicycle Lifts. They work great in my garage, and with them hung on the ceiling I still have six feet of head clearance below the bikes.”
Ed’s bike lift solution hangs bikes right-side-up, by the seat and handlebars, not the wheels. I like the concept of being able to pull the bike with pulleys because it requires less muscle and coordination than picking a bike up. But, here in the earthquake-racked Bay Area, I would personally worry about all the pieces of this system that have to hold tight in order to keep bikes from dropping. Yet, for less than $10, it’s an ingenious alternative to consider.
Some Helpful Bike Hook Storage Photos to Show Hanging Solutions
Since last week, I was able to get a few more photos to show bikes hanging with hooks in various configurations. The description is below each photo.
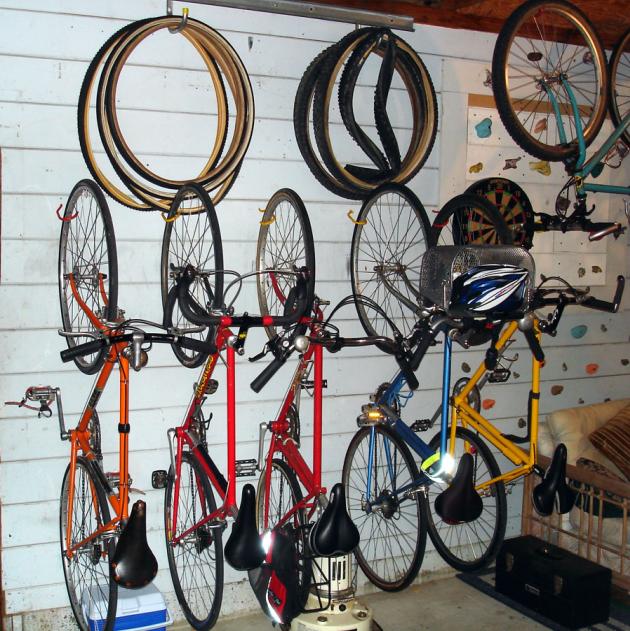
You can see in this one how bicycles hang nicely with hooks screwed into a wall. These hooks are in a wood wall. Notice that the hooks were either screwed in at an angle or they bent to that angle from the weight of the bikes pulling down on them over time. To the right you can see a green bike hanging overhead by its wheels on 2 hooks.
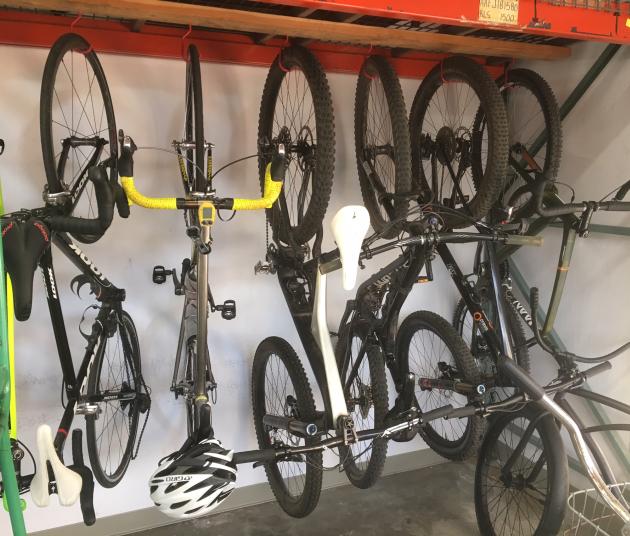
This photo shows how bikes hang from overhead hooks. Look closely and you’ll see that the bottom wheels are touching the wall. When bikes hang from overhead hooks like this, it’s possible to swing themleft and right to make it easier to fit bikes in-between and take bikes down. You can do this with wall-hung bikes, too, but the bikes aren’t free to pivot as much.
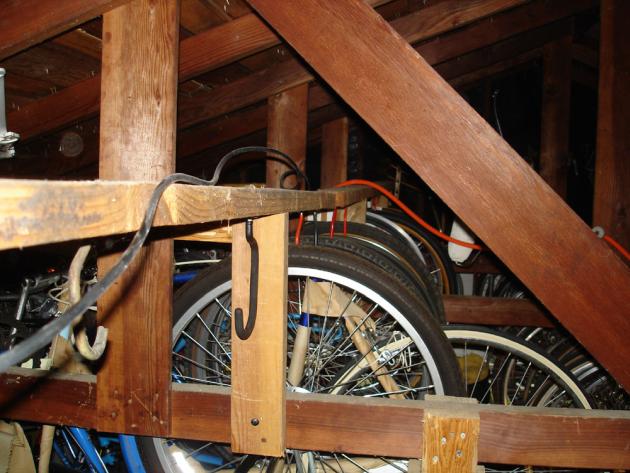
Finally, here’s a photo of the raised bike hooks in my garage. I mentioned how my rafters are so close to my car roofs that there wasn’t enough room to hang bikes overhead. To get around this, I tried hanging the bikes by both wheels so they wouldn’t hang as low as they do when hung by one wheel. But they were still too low.
The solution was getting a half dozen 2 x 4s and building elevated rows of hooks, one for the front wheel and one for the rear wheel. The photo shows only one of these rows. But you can clearly see how it’s been constructed to get the bikes high enough to clear the cars (above the bottom of the rafters).
The vertical piece of light-colored 2 x 4 just behind the black hook is the key to raising the bikes. I cut enough of these to support the cross members the hooks are screwed into. Then, the uprights were attached to the rafters and the cross pieces screwed atop the uprights. My rack can hold up to 30 bicycles hanging this way.
The one caution is that it can be difficult to lift heavy bikes up and onto high hooks like this (think beach cruisers). 30 years ago when I put this elevated rack in my garage, I had no trouble at all, but now I usually ask for help to get the portly bikes up and down. Nice road bikes are still no problem.
Thanks for all the great tips! And feel free to add more in the Comments below.
i have the pulley system hangers, you just have to be careful,. some of the new full carbon saddles, rails, etc can be a little on the fragile side…i loosened the rail attachment to the saddle on a fizik alliante R3….Fizik did step up and full warranty the seat but i no longer hang from the saddle, inverted on hooks now
Thanks, I’ve a carbon bike, but no carbon seat, I also have the pulley system with hooks. Was worried for a minute, because, after storing my carbon bike, suspended from seat and handlbars went for a ride and the seat dropped! It’s a new bike, and got a quickly fitting from the shop I purchased it from. All I can think of is they didn’t torque the seat post properly ??. I reset the seat post, used carbon paste and torqued it, hoping that solves the problem
Also for tight quarters alternate hanging the bike by front and rear wheel.
Thanks for this article! I’m in the process of switching from horizontal to vertical storage and this was really helpful.
Jim:
You mentioned the Bay Area & earthquakes and from a photo that’s not a big issue, One risk would be for to the wooden assembly given shear forces (I think) that cause the roof supports to domino down. I know that c. 2000 homes required shear walls to prevent this, but there are other ways like cable support from the top that might be easier with the goal of keeping the hook assembly up if the wood frame was losening.
But I also wanted to caution you about the orange and black lines in the photo: if these carry electricity at all they are a hazard. Romex (NM) needs to be properly fastened to the structure and any extension cord needs to be day-use-only then removed. Not only earthquake allowing them to slide into wood joints, havng them up there & lose invites friction and heat exposure and any water or minor interaction with hot or neutral to ground could easily start in the wood and that might net not trip a breaker. In addition, if you have any even minor contact between power/neutral and the hook you could become the shortest path to ground. Not a structural engineer or electrician but after ’89 I paid a lot more attention to quake risks. My comment (opinion) about electrical wires and cords is practical, so suggest ask a DYI (if in Calif) or licensed electrician.