Fixing Stiff Bicycle Chain Links (the other cause of skipping)
Drivetrain and shifting issues are always favorite topics here. So there was some excellent feedback to last issue’s Tech Talk on our Comments page, and via email. As you may recall, the subject was the myth that when a new chain is installed, a new cassette is required as well (not!).
Instead, what determines whether or not a cassette should be replaced is how worn it is. And I recommended testing cassettes by riding with the new chain and checking for skipping, which is a telltale sign of worn-out cassettes.
This triggered a question from Ken Meehan that is the perfect segue to another common cause of skipping. Ken wrote,
“I read your Tech Talk with the cassette test and have a question: An older Giant hybrid I have was skipping as you describe in the article, quite unexpected, dangerous and getting worse. This bike was a freebie fixer-upper, but I like the tall ride sometimes around Cape Cod’s beaches here. So, it’s definitely worth fixing to me. It has a 7X3 GripShift drivetrain.
“I replaced both the rear derailleur and the chain to try to address the skipping. I put on a Shimano derailleur, but a no-name chain. The pedaling and shifting became smooth. However, under pressure, it still skips on both the middle and large chainrings. It’s not as bad as before, but still isn’t good when you stand and try to get out of the way of a car quickly. I’m afraid to try and look down to observe what is happening when I test it.
“I should probably just get a Shimano chain and see what happens. What would you recommend?”
Here’s What I Replied
The fact that it skipped before and still skips with the new chain means that it might be a worn-out cassette, Ken. But, before spending the money for a replacement cassette, I would rule out chain installation issues first. The reason for this is that a very common skip-causer is a stiff link in the chain. And stiff links are usually the result of chain installation gone slightly awry.
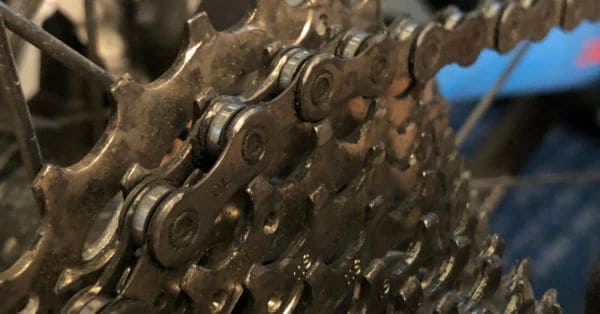
Note that while we refer to it as a stiff “link,” it actually looks like 2 links because the tightness occurs at the pin and it binds the outer and inner links on either side of the pin (the outer and inner link comprise a single full link).
Tip: To help tell whether skipping is caused by the chain or cassette, keep in mind that a chain glitch, like a stiff link, will usually cause a skip on all the cassette cogs, whereas a worn cassette will only skip on the few worn-out cogs.
Also, especially with no-name chains, you can do everything right putting the chain on and getting the pin pressed in just right, and you can still end up with a tight/stiff link in the chain where you joined it. That will cause an intermittent, somewhat mysterious skip on any gear at any time almost. It can be regular or inconsistent depending on the nature of the link hiccup.
Finding a stiff link
To find a stiff link, kneel next to your bike’s drivetrain and pedal backwards slowly by hand. As you pedal, watch the chain passing over and between the derailleur pulleys. A stiff link will show up as it goes around the pulleys.
You have to keep watching. You’re trying to see it when it’s stiff and tight, not when it’s working. Also, it can hide and then show itself. What you’re looking for is the pulleys to suddenly move when the stiff link tightens and goes through. You’ll see it if it happens and the offending link will be easy to find.
Fixing a stiff link using the chain tool
The thing that causes most stiff links is compressing the sideplates too tightly together, a natural result of using a chain tool that presses in the chain pin under great force to install the chain.
Tip: Stiff links is one of the reasons some chain companies, such as SRAM and Wipperman, provide master connecting links to join their chains. With a special link to join the chain, stiff links can be things of the past. In fact, I like to carry a Wipperman Connex linkin my seatbag just in case I break a chain or run into a stranded roadie who did.
The safe way to free a stiff link is to use a chain tool and push on both ends of the pin causing the stiff link. This will have the effect of moving the sideplates away from each other ending the tightness (some chain tools have a built-in link loosener feature (like Park Tool’s Mini Chain Brute Chain Tool, so look for this when shopping. Just be sure that you don’t push the pin off-center, because a protruding pin can cause skipping and even chain failure.
Fixing a stiff link when you don’t have a chain tool
If you don’t have a chain tool handy (maybe the stiff link didn’t show up until you hit the road), another way to fix it, is to grip the chain with one hand on either side of the offending link and gently flex the link sideways in both directions to bow and force the sideplates apart to create the clearance to fix the stiffness. Do this gently, a little at a time, testing the stiff link in your fingers to see if it’s free yet. Do not actually bend your chain!
Trick: Some riders have told me they’ve been able to free stiff links without stopping by shifting onto the most extreme gear, the largest chainring/largest cassette cog combination. They say the angle and tension on the chain frees the link. While I haven’t used this trick, it makes sense that it might work.
Other types of stiff links
Usually you can free stiff links with the aforementioned techniques. However, there are stiff links that aren’t so easy. Moisture can get in between the chain parts, causing rust that essentially locks the links together. Usually this doesn’t happen on regularly lubed chains. But, I’ve seen it happen a few days after a rainy ride when a bike was left to dry and no chain lube was applied.
Unfortunately, this resulted in several rusted-together stiff links. In this case, you can try lubricating the links to free them; however, the small clearances between chain components can make it difficult to get enough lube in to free the parts. Warming the chain with a hair dryer or heat gun, followed by liberal lubing, could also work. You could also try Finish Line’s rust-busting Chill Zone freezing penetrant.
But in a worst-case scenario you might have to remove and replace the bad links, being sure to use the same size (i.e. 9-, 10- or 11-speed) chain links, or replace the chain with a new one. And then be sure to keep it lubed.
Tip: I mentioned the master link I carry in my seat bag. I also bring along a Crank Brothers m17 all-in-one tool that includes a chain tool so that I can take apart a bent or even a broken chain if needed to fix it. I haven’t tried it, but Specialized has a Top Cap Chain Tool that hides inside your fork so that you’ll always have one on hand. Pretty cool idea.


I had the bike shop change my chain, because my chain tool was broken (Park is replacing it for free). But the tech put it on backwards. After I pointed that out, he fixed it, but he broke it at the same link.
Now, a month or so later, I have a new chain.
I encountered a grinding-feeling stiff link recently on my MTB that wasn’t fixed by any of the methods described. Ultimately I had to break the chain to diagnose the problem. It turned out there was a gouge in the side of the inner plate that had caused a slight protrusion which was scraping against the outer plate when the chain was assembled. I filed that down, cleaned and relubed the link, and reassembled the chain. At that point I was able to use the stiff link loosening cradle of my chain tool to free the link.
A loose chain can result in accidents from losing control of the bike. It can also cause damage to different parts of the drivetrain. How tight should a bike chain be?