
Jim’s Tech Talk
By Jim Langley
You might have noticed from the dates on some of the comments, that last week’s Tech Talk titled Preventing Slipping Seat Posts, was actually a rerun. That’s because I was off camping (close to some nice riding, too).
One of the comments to this “old” story was from reader Greg Titus, who asked – not long after the article appeared over a year ago,
“Why is this article entitled “Preventing Slipping Seat Posts” when it doesn’t discuss that issue at all, and is about determining proper seat height?”
Then, echoing, Greg, there was this new comment from Gary Keene:
“This article isn’t about seat post slipping, it’s 95 percent about finding/setting proper seat height. My concerns touch on multiple slipping issues. For example, on our bikes with metal frames/posts that we ride in wet conditions (road, touring and mountain bikes) I keep the posts lightly lubed and regularly cleaned and properly tightened, but still get some slipping, occasional twisting. On our carbon bikes, with carbon posts and metal posts, I use carbon paste on the latter, and still get slipping on the latter. Thanks for any help.”
A Waterproof Way to Mark Your Seatpost Position
Thanks for the heads-up, G men! I apologize for leaving you (and anyone else) hanging and will focus on seatpost slipping today. First I want to give props to Pete Royer. His comment was a tip for marking seat posts so that you can tell at a glance if they are slipping.
Pete says, “I use black silicone to mark seat posts as it is waterproof and IMHO looks better than electrical tape.”
Thanks, Pete!
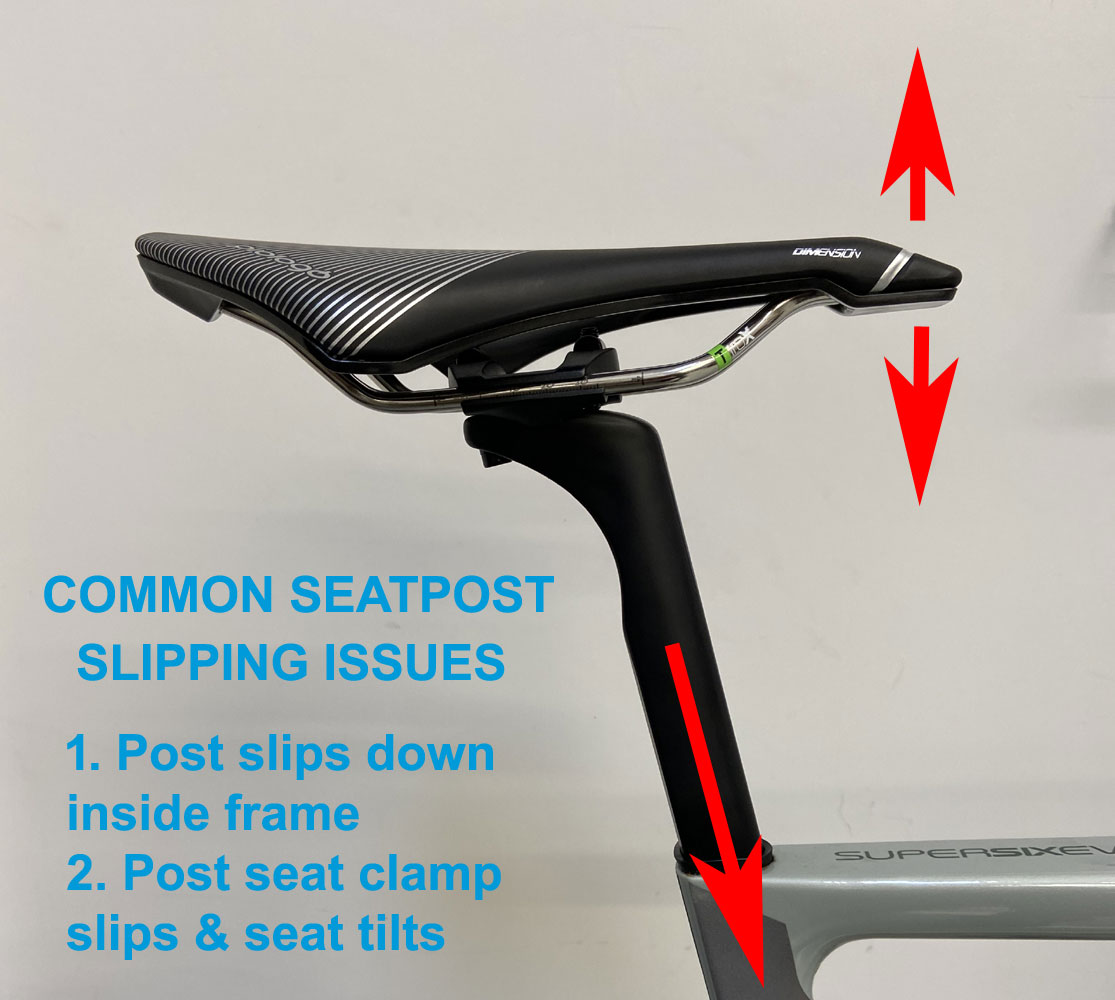
Types of Seatpost Slipping
There are two main ways seatposts slip as shown in the photo. They can slip down and into the frame. And the seat clamp can slip causing the seat to tilt up or down. Both are bad because they negatively affect your riding position. If you don’t notice and keep riding, you might develop a “mystery” injury until you realize what happened and fix it.
Round seat posts can also twist in the frame. That’s another kind of slipping (not shown in my photo). One of the advantages of bicycles with non-round seat posts (think aero posts in aero frames) is that they can’t twist. Also, they are self aligning unlike round posts that are tricky to center perfectly.
Fixing Posts that Slip Down
Check that the seat post is the correct size
First, if there’s any chance that the seat post in the bike was changed from original, it’s a good idea to make 100 percent certain that the seat post is the correct size for the frame. Because, seat posts come in many diameters varying only by fractions of a mm. It’s pretty common to see seat posts one size too small that will never tighten fully.
Check that the seat post tightening hardware on the frame is A-OK
If the seat post is the correct size and slipping down, next check that the tightening hardware on the frame or the collar are operating properly to tighten the post. The threads should be in perfect condition and it should be easy to tighten and torque the bolt to the recommended tightness for your frame and seatpost. (More on torqueing next.)
This hardware often gets used a lot so it’s common to see issues. Inspect parts carefully and replace anything damaged. Make sure threads are greased. Collars can get knocked out of position. They need to be fully seated on the frame and the slot for the bolt is usually aligned with the slot in the frame.
Know your seat post’s torque spec and use a torque wrench
Regarding tightening, the only way to know for sure something is tightened right is to know the part’s torque specifications and to use a torque wrench when tightening it. I find lots of loose parts especially on carbon bicycles because people are afraid to over tighten them and they don’t own a torque wrench. But, I’d rather see loose parts than broken parts from over tightening.
Here’s a nice video from Park Tool showing their torque wrench that I use (the TW-5.2) in action:
Proprietary Frame Hardware
On modern carbon frames – usually aero bikes with aero posts – there are all kinds of proprietary hardware for tightening posts in the frame. It’s not usually obvious how they are properly used. If you’re unsure, don’t guess because you can damage your frame or post. Instead, try looking it up on the bike manufacturer’s website or contact the shop where you bought the bike as they should know.
Increasing the Seat Post’s Grip
If the seat post is the correct size and the frame hardware is fine, too, the reason the seat post is slipping is probably that there isn’t enough friction between the post and frame to hold it in place.
Start by cleaning the frame
The problem might be that over the years the seat tube on the frame has been over lubed. A little lube is important to prevent the post getting stuck in the frame. But, if more and more lube is added, that can prevent the frame gripping the post enough to hold it.
To clean the frame make a plunger with a dowel and a rag zip-tied to one end. Wet the rag with solvent and use your giant one-ended Q-tip to clean the frame. (We used to make these out of plungers taken from old, cracked Silca Impero frame pumps – remember those?)
Cleaning an over lubed frame seat tube might fix the slipping problem.
Rough up that post
It’s unlikely you have one on your super bike, but just in case, with round chrome-plated seat posts, slipping is very common. The chrome is too polished/smooth/hard a surface for the frame to hold onto the post. The fix is simple. Remove the post from the frame and scratch up the chrome all around the post (only the part of the post hidden inside the frame). Then the post will stay put.
Aluminum seat posts
This trick works for getting aluminum posts to stop slipping, too. Aluminum is softer than steel so don’t scratch as hard as you have to with chrome. You can use a medium emery cloth, such as what comes in a tube repair patch kit.
If you don’t like the idea of scratching your seat post you can consider buying a different model with a better track record for not slipping. Not all seat posts are high quality. Sometimes on new bikes you get great ones, sometimes not so much.
Carbon seat posts
For carbon posts in carbon frames use carbon assembly paste to prevent slipping. But first, since I have seen grease applied to carbon posts and frames, check your seat post and frame to make sure there isn’t any grease. If there is, clean it off with a mild solvent such as isopropyl alcohol.
Then apply the assembly paste and reassemble. This paste has grit in it that bites into the carbon preventing posts from slipping. This works on round and non-round posts/frames. Here’s Finish Line’s paste https://amzn.to/3ndE3g1.
Dissimilar materials
About now you might be wondering about titanium frames and posts and aluminum posts in carbon and/or ti frames, maybe ti posts in carbon frames or carbon posts in titanium frames.
The bottom line is that the seatpost shouldn’t slip or twist in the frame if it’s the correct size and the frame hardware is properly functioning. If it is, make sure the frame and post are clean of old lube first and try assembling the parts. Sometimes, that will fix it. And a trace of old lube will remain preventing any seizing of the parts with any luck at all. (Dissimilar materials can react to each other under certain conditions and the post can seize in the frame.)
Fixing Slipping Seat Post Saddle Clamps
The saddle clamp is the piece on top of what are sometimes called “micro-adjust” seat posts that holds the saddle in place preventing it tipping up or down.
There are quality clamps and there are shoddy ones out there. If you somehow got a bad one, no matter what you do, you may not be able to get it to permanently hold the saddle in place. In that case, the best solution is to buy a higher quality seat post with a clamp that works.
It might just have loosened
If you know you have a quality post and it’s slipping, carefully examine it to see if you can identify the problem. If you’re lucky it’ll just need tightening. They do come loose, especially if they weren’t fully tightened in the first place.
It might be assembled incorrectly
Other possible issues are improper assembly of the clamp parts (some designs are quite complicated and if the saddle was changed it’s possible the clamp was misassembled). For this, try to find the documentation for the post from your local bike shop or the maker’s website so that you know how to reassemble it correctly.
It might be dry (not lubed)
If you know the clamp is assembled correctly, but it doesn’t stay tight, it might be that it was put together without lube. Dry threads are difficult to tighten sufficiently and dry clamp pieces may not seat against each other when you try to tighten the clamp. If it looks dry, loosen the clamp enough to get some lube in between the pieces and try tightening it again. It should stay tight then.
Ball-and-socket type clamps
There’s another type of seat post saddle clamp that’s sort of a ball-and-socket design. As the bolt is tightened, the clamp (the ball) gets drawn deeper into the socket (the top of the post) tightening the saddle in place. I have two Cervelos with this design and find it requires help to keep saddles in place.
By help, I mean that the ball-and-socket design needs more friction to hold saddles in place. For that I use carbon assembly paste. The posts are aluminum and the clamping parts are aluminum and the grit in the paste is just the thing to keep things in place.
I hope this overview of seat post slipping problems and solutions helps keep your saddle where it belongs for good. A tip of the helmet to Greg and Gary for letting me know this story was needed. Thanks guys!
Ride total: 9,814
Jim Langley is RBR’s Technical Editor. A pro mechanic & cycling writer for more than 40 years, he’s the author of Your Home Bicycle Workshop in the RBR eBookstore. Tune in to Jim’s popular YouTube channel for wheel building & bike repair how-to’s. Jim’s also known for his cycling streak that ended in February 2022 with a total of 10,269 consecutive daily rides (28 years, 1 month and 11 days of never missing a ride). Click to read Jim’s full bio.
Thanks Jim.
You’re welcome, George! Thanks for reading and commenting!
Jim
FYI, to be clear Silicone tape. I use black for seat post, but it comes in colors and clear!
Thanks, Pete!
btw, Silicone tape works great for handle bar tape. Seals up the ends and it seals upon it self so it never comes undone!
Thanks, Pete! I’ve been using it that way, just never though to use it on seatposts. Great tips. Appreciate it.
If you have a round seatpost, another solution would be to add a second collar/clamp right above the one on the frame. Just make sure to get the correct diameter.
Steve C
I solved the slipping seat post on my bike with a two pronged approach:
– Replace the factory seat post clamp with a Salsa Lip-Lock. This was reputed to be a real heavy duty clamp, seems to work. The clamp bolt is an M6 with a 5mm hex key head. Takes 8 N.m of toque which “feels” like a lot. NOTE there is no carbon involved here, aluminum seat post in a titanium frame.
– Apply Finish Line’s “Fiber Grip” (like you mention in the article) to the sleeve. Feel it between your fingers, it’s pretty gritty. Although it says it’s for “eliminating the need to over tighten clamps” on carbon, it seems to do the job on my titanium / aluminum.
Thanks– that is TOTALLY about seats/posts/clamps/slipping, and I don’t see anything missing!!!
Hey, for a totally different but still related problem, I would pass along that quality seat-posts make a REAL difference = in our early years of tandeming and experimenting with a mis-match of stoker seat-tube and seat-post diameters and multiple bikes (including singles), my lovely bride snapped the fixing bolts/head/clamp assemblies off of THREE different posts by virtue of her powerful pedaling. We’re now fans of Thompson posts– worth the price!
Thanks for the info. I have an aluminium frame with a carbon seatpost. Despite cleaning the inside of the frame and removing and cleaning the internal clamp mechanism to get rid of any lube, the seatpost – which is the correct size, still slips. So have ordered some Finish Line Fiber Grip Carbon Fiber Bicycle Assembly Gel as suggested – which will hopefully resolve the issue.
Thanks again.
Thanks for this discussion, but I have a new (for me) problem I do not see discussed often: saddles slipping along their rails. On my otherwise lovely Orbea Terra gravel bike, I cannot seem to keep my saddle from sliding backwards to the end of the rails. The seatpost is an OC Performance XP10 Carbon, 27.2mm, and the saddle is a Prologo model of some sort, the original that came with the bike. I have tried various forms of roughing up the rails, applying two different types of tape to them before clamping them in the seatpost, but nothing is working.
Any suggestions out for for a remedy?