Fixing my Cracked Carbon Bike

Jim’s Tech Talk
By Jim Langley
Back in May, I wrote about my Cervelo S5 falling over and landing on a rock. The impact cracked the top tube. I said I might have the bike repaired by a professional carbon shop, such as Calfee Design since they’re just down the street from me and have been carbon gurus since the beginning (Greg LeMond raced on a Calfee!). In the comments to the article, several of you recommended Broken Carbon in Boulder, Colorado.
Here’s the story from May if you missed it and want to catch up: Do As I Say Not As I Did.
Thanks Eric!
What jumped out at me in the comments, though, was one from reader Eric Brandt who said that he had learned how to fix carbon frames and that it was “fairly easy.” That got me Googling carbon repair and up came a link to Predator Cycling’s carbon repair kit, everything needed for just $99.95.
Before I bought it, I gave them a call to discuss my frame’s issue, the crack running more than halfway around my top tube. They assured me it was just the kind of problem I could fix myself with their kit. So, I purchased it.
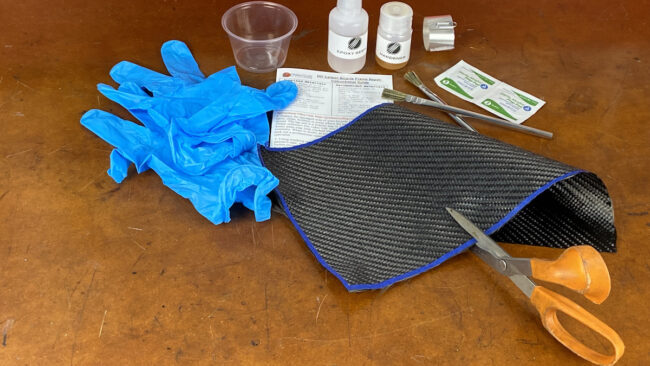
Everything Needed
The box arrived in just a couple of days and as promised, the carbon patch fabric, epoxy, brushes, alcohol cleaning pads, sandpaper, compression tape (heat shrink tape) and even rubber gloves were provided. Predator has 3 videos showing the full procedure, too.
Steps
The process for repairing my cracked top tube turned out to be just like Eric said, fairly simple.
Here are the steps:
- Mask and cover the frame to protect it.
- Wet sand the frame in the area of the crack to get all the paint and primer off and get down to the carbon. Make sure the crack/damage is smooth, no jagged edges.
- Cut 2 patches. I small one to go over the crack. I larger one to cover the small one and the full area around the patch.
- Mix the epoxy and hardener together.
- Clean the patch area with the alcohol wipes.
- Apply epoxy to the patch area on the frame.
- Apply epoxy to the patches being sure to saturate them.
- Apply the small patch over the crack and the larger patch on top of that.
- Wrap the repaired area with the compression tape.
- Using a hair dryer or heat gun, heat the compression tape to get it to shrink and compress the entire repair area.
- Wait 24 hours for the epoxy to cure.
- Remove the compression tape and all masking.
- Final sand and repaint the frame if desired.
This probably looks like a lot of steps and work, but it only took about 2 hours plus the 24 waiting for it to dry.
Results
When you crash a carbon frame and can see damage, the “coin test,” is a good way to tell if it’s just a surface issue, such as a paint scuff or chip or real damage. To do it, you go down the carbon tube tapping on it with the edge of a coin. Undamaged carbon will be solid and you’ll hear the loud sound the coin strikes make. For a cracked frame, however, when you hit that bad spot with the coin, it will make a dead sound.
That’s what my Cervelo did when I tapped with the coin on the crack on the top tube. So I knew it was a failure, not just superficial paint damage. When I tested the frame after repairing it, the coin made the same loud sound all the way down the top tube and all around the formerly cracked area, too.
I also tested the bike on a couple of hilly rides, standing more than usual and feeling for any change. I’m happy to report that my bike rides as well as it ever did and I’m delighted that with only $100 and a couple of hours of labor, I could fix it myself.
The Video
In case you’ve got a carbon frame in need of repair, I made a video while I did the repair to help:
Follow-up on Tom’s Speed Wobble
I’m pleased to be able to report that my friend Tom with the speed wobble, who I wrote about a couple of weeks ago https://www.roadbikerider.com/avoiding-bicycle-speed-wobble/ is now wobble-free!
Thanks to a kind reader named Melissa who commented that she had experienced a wobble from her Roval wheels, Tom got the bike shop to give him a new front wheel. And voila, the wobble is now gone! Thanks Melissa!
Jim Langley is RBR’s Technical Editor. A pro mechanic & cycling writer for more than 40 years, he’s the author of Your Home Bicycle Workshop in the RBR eBookstore. Tune in to Jim’s popular YouTube channel for wheel building & bike repair how-to’s. Jim’s also known for his cycling streak that ended in February 2022 with a total of 10,269 consecutive daily rides (28 years, 1 month and 11 days of never missing a ride). Click to read Jim’s full bio.


Jim,
Many thanks to Eric Brandt and yourself for highlighting a solution to a cracked carbon frame. I would have never known about this kit.
You’re welcome, Karl!
Jim
Spoke to a friend that knows a thing or two about designing carbon frames, building the molds, and building the frames, as well as carbon repair, and all of those in the carbon repair industry know him. He mentioned that for that type of crack, you will want to repair it from both the inside and the outside. Repairing from only the outside is half a repair and could lead to failure again. Just want you to be safe.
Thanks, Rick. I sent photos to Predator Cycling before buying their kit. They confirmed that the type of damage to my frame was something their kit was designed to repair. Predator Cycling makes carbon frames not just repair kits.
Jim
I’d love to see the finished result in a photo. Did you repaint?
Sorry to disappoint you, Don, but I don’t plan to repaint the frame. As I explained and showed in my video, I’m going to use strips of electrical tape in the right colors (if I can find them and if not in colors as close as I can get) to hide the repair. You’ll still see the texture through the tape because I don’t plan to sand down the patched area.
Jim
Hi again, Don,
Here’s a YouTube channel from a guy that repaints carbon so you can see a lot of ideas:
https://www.youtube.com/c/ETOE/videos
Jim
I’m not comfortable with that repair. I have some experience with carbon fiber and would want the inside of the tube repaired in the process.
Thanks for the feedback, David. Without seeing inside the frame or X-raying the frame, you can’t know if the frame has any damage inside. It might not. As I mentioned in an earlier reply, I sent photos of my damage to Predator Cycling and they said their kit was made to fix damage such as mine. They’re a carbon bike manufacturer not just sellers of repair kits.
Jim
Thanks for info and video. Few questions. Did you cut cloth to butt up to to each end and did you offset the second layer over the first layer? Also, just curiosity, how could you make a patch on the inside?
When you watch the video you’ll have answers to your questions, David 😉 Patching the inside of the tube wasn’t part of the repair. I don’t know if the inside of the tube suffered any damage. I would have to get the frame X-rayed or try to get an endoscope inside the tube maybe. But the Predator Cycling kit is for patching from the outside only. There’s epoxy on the patches that should travel into any carbon crack and cure.
Thanks,
Jim
My friend recently had her seatstay repaired by Spyder Composites in Scott’s Valley CA. Excellent! A trifecta of high quality and color-matched, quick turnaround, and very reasonable price.
https://www.spydercomposites.com/
Thanks for the recommendation. I’ve had friends who used them with great results, too.
Jim
I’
ve been using carbon fibre for a number of years now. one thing that is nvery important is to ensure that all excess resin extracted from the carbon fibre. Onl;y enough resin to hold the fibre together is the strongest.
Yes, you might remember quite a while ago now when Trek came out with their OCLV tagline for their carbon bikes. OCLV stands for Optimum Compaction Low Void, which is exactly what you’re describing. In the carbon repair shown, the compression tape and heating and curing with heat provide both the compaction and the low void.
Thanks,
Jim
I used Predator carbon repair on the seat tube of a 2016 Stumpjumper 6Fattie. I bought the frameset NOS from Specialized’s eBay store in 2021. I initially thought there may be a flaw in the layup at a spot in the rearward side of the seat tube. I chose to build up the bike, ride and watch that spot closely. Within a month the clearcoat began to crack over the spot I thought didn’t look right.
I had photos and an initial email to Specialized about my concerns. Specialized sent me an S-works 6Fattie frameset as replacement and let me keep the damaged one. Internet research led me to Predator Cycling. The all-in-one kit and the quality of their YouTube presentations encouraged my purchase.
As I got into the repair, what appeared to be a horizontal crack involving 2/3 of seat tube’s circumference, turned into a void in the carbon fiber that the factory “fixed” with putty and sent it on it’s way. Using 4 successively larger carbon layers with three spanning around the full circumference of the seat tube, the repair has held fast through 2 months of moderately aggressive singletrack including 3 foot drops a couple dirt naps. The Predator kit is high quality, the directions and videos are clear and complete, and they are quick to answer any questions. Very high quality all around.
Thanks for the great write up!