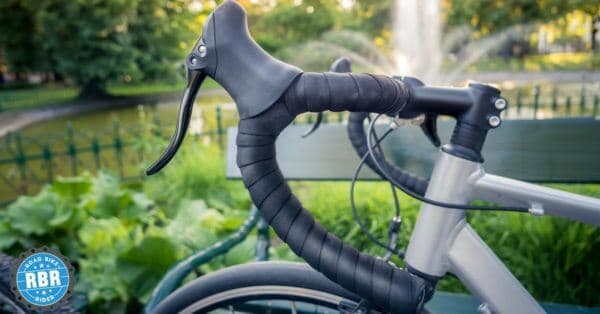
One of the most common things to go out of adjustment on many modern road bicycles is the headset, which is the component that connects the fork to the frame so that you can turn to steer and balance your bike. On most bikes today we have headsets known as “threadless” because the parts that adjust the headset are a slip fit over the fork steerer, which is smooth, not threaded (you can’t see the steerer because it’s the topmost part of the fork and hidden inside the head tube of the frame).
The wonderful thing about threadless forks and headsets is that they can be adjusted with allen wrenches, the most basic of tools and ones you probably already have if you own a multi-tool. You’ll need the right sizes to fit the bolt in the center of the top cap on your stem. And you’ll also need the correct size to fit the bolt(s) on the side of your stem (usually 5mm and 4mm size, respectively).
Tip: If you’re working with a carbon stem and/or fork, get a torque wrench or torque key (these have preset torque settings – see Park Tool’s here https://www.youtube.com/watch?v=613mPyos0Xo). They’re the only way to get things tight enough and not break anything. Many quality stems have torque specification printed right on them to make it easy, too.
Disclaimers
The bicycle industry has gone crazy and there are way too many different types of threadless headsets (and bottom bracket types). This means that if a bicycle was built from scratch or improperly maintained or repaired, it’s possible to run into headset maladjustment that can only be repaired by replacing parts or the entire headset.
The good news is that, as long as your headset is all there and looks and feels to be in good condition, it’s likely that you can fix it if it comes out of adjustment. Modern threadless headsets are remarkably durable, too.
Tip: Should you run into more serious issues, a good resource is Cane Creek’s Standardized Headset Identification System http://www.canecreek.com/tech-center/headsets/shis/overview
Diagnosing a loose headset
The easiest way to find a loose headset is to pay attention when you’re moving your bike around, like rolling it up over a lip in the pavement or curb to park at a coffee shop, etc. If you hear or feel a knock or rattle or clunk, stop and try to re-create it. See if youcan tell if it’s coming from the front of the bicycle. To be sure, raise the front wheel off the ground about 4 inches/10 cm and drop it and see if that re-creates the clunk or rattle.
Another test is to hold on the front brake and rock the bike forward and back to see if you can get the front end to knock or clunk. You can also kneel down next to the front wheel, firmly grip the fork with your dominant hand, hold the bike by the down tube in your other hand and then push and pull. If the headset is loose, you’ll feel the play when you do this.
Headsets usually become loose because one of the headset pieces changed positions, or as a result of the stem and top nut loosening. To fix this requires tightening and locking the adjustment so it stays in place.
Basic adjustment
Most of the time, to remove play in a threadless headset, you perform these 4 steps in this order:
1. Using the right size allen wrench, loosen the bolts tightening the stem in place – typically, on the back or side of the stem. Make them so loose that you can turn them by hand, but don’t let them fall out or you could lose them. The stem needs to be free to move. To be sure it is, hold the front wheel between your legs and see if the handlebars turn slightly to the side when you nudge them. They should.
2. When you’re sure the stem is free, align it with the front wheel again. Then, using the right size allen wrench, turn the top cap bolt clockwise to tighten the headset and remove any play. Check that the play is gone using the same methods you used to find the play.
3. Once you’re sure there’s no play, check that the headset turns freely because binding can be worse than having play. To do this, reach into the front wheel and hold the fork in one hand, gripping both fork blades at once (you can remove the front wheel to make this easier). Holding the fork like this, lift the front wheel off the ground and turn the fork slowly side to side feeling for tightness. It should turn easily and smoothly. If it’s binding, loosen the top bolt (turn counterclockwise) slightly until it does turn easily and smoothly.
4. To finish and lock the adjustment, check to ensure the stem is aligned and tighten its bolts to the right torque. Then make sure the top bolt is tight and you’re ready to ride.
Tip: The top bolt is only there for adjusting the headset. It’s not holding the headset in adjustment. The stem is what does that. So, the top bolt only needs to be tight enough not to vibrate loose. You don’t have to worry about a specific torque, either.
When the basic adjustment doesn’t work
If you’re unlucky, you’ll follow the 4 steps and you won’t be able to remove the play by simply loosening the stem and tightening the top nut. When this happens it’s because something has created excess play between the headset components and the top cap.
In order to remove the play, the top cap bolt, which is holding onto a fixed “nut” hidden inside the fork steerer, needs to be able to pull the fork up far enough to remove all the space between the headset components. If you tighten the bolt and that doesn’t happen, you have to determine what’s causing the problem.
Often – especially on new bicycles – one of the headset parts shifted during the first rides and created the play. But the tolerance of the headset parts is such that you can’t remove the play by only tightening the bolt. The fix is usually adding one more headset spacers beneath the stem to take up the space. Shops will take care of this for you for free on new bikes.
Tip: On some bikes you’ll find extra-thin spacers on top of the stem (right below the top cap). If you have these, you can move one of the spacers from on top of the stem to below it to remove the play.
Another possibility is that the nut inside the fork steerer has moved. When this happens,tightening the top bolt cannot remove the play in the headset parts because it’s not actually lifting the fork, it’s only lifting the nut inside. You can look inside the fork to check the height of the nut and see if it’s moving. There are different designs of these internal nuts and it’s a matter of figuring out how to tighten it so that it can’t move. You then move it back where it used to be and lock it in place. Then you can remove the play and adjust your headset properly.
I need to remove headset bolt (quill) completely any suggestions. It’s threadless,Cannondale catalyst mtn bike
As am amateur mechanic and avid daily rider, this is a GREAT step by step guide for diagnosing and (hopefully) removing headset play. Thanks to the author.
My headset has play. Because I am tall and the bike frame is slightly smaller than I wish to use, I added an extender on the fork post above the headset. The handlebars on held by a piece that goes forward and is angled up. (I do not see that this angle piece should have any bearing on the situation.) I use a longer bolt inside the extender to reach the threaded part of the fork post. I am surprised at the difficulty I face in tightening that bolt. But I have a Allen wrench fitting on the end of a long socket set. This is a suspicious situation because there is no resistance when I screw that same bolt into the post without the extender. There is no other indication that the extender piece is causing any problem. But the play in the front assembly does not disappear with tightening the “inside” bolt or when trying to fasten the extender to the post in a snug position. Any suggestions about what would solve this problem of play in the headset??
Maybe replace the threaded enter grasp ring that the bolt tightens to
I got a new Mongoose Dolomite and I put a longer adjustable stem to raise the bars to ride more comfortable. I realized that the stock stem was thicker and kept the headset tight. The new one was about 1/8 inch shorter so when I tightened the top head screw I still had slack in the tree. So I took one of the top plastic spacers out and then it tightened with no problem. I hope this helps out. Carl
My bike is having a loose handlebar problem. They made me lose my balance and upset the ride, so I figured out How to Fix Loose Handlebars on a Bike. For threaded stems, first, screw the top cap onto the handlebar body. This is followed by loosening the clamp bolts by pulling the stem up and out of the guide tube. After separating the two, a thin layer of lubricant or bicycle grease should be applied, and then the guide tube should be replaced. Also, I think it’s a good idea to check the removable headphones if you hear any knocking, clacking, or clacking in the front of the bike, as it’s very likely that the headphones are also loose.
Loose handlebars can potentially cause accidents if they remain unfixed. That is why you should be aware to fix loose handlebars on your bike.