
Jim’s Tech Talk
By Jim Langley
Today is Stage 6 of the Tour de France. I hope you’re enjoying the race so far. To prep for this year I watched the Netflix 8-part documentary “Tour de France Unchained” on last year’s race and enjoyed it a lot. Here’s a link if you haven’t seen it and you subscribe to the service: https://www.netflix.com/title/81153133.
Since I imagine you’re glued to the race on TV today I want to share a quick tip from regular contributor “Fixieguy” and then ask for your help answering a question that came in from “Chuck.” He rode the TransAm Express tour across the country in 2021. As he prepares for more epic rides he’s looking for input on choosing between the different inner tube types available today.
Fixieguy’s Tip
NOTE: As is appropriate for a roadie who goes by “Fixieguy,” this tip is about setting up a one-speed drivetrain. But keep reading because the tip could come in helpful on any chain to prevent a stiff link or possible annoying squeak.
Fixieguy says, “Jim, you wrote a piece a while ago on stiff chain links installed using a chain tool rather than a “power-link” (AKA “quick link”). I think I may have a tip of limited utility. However, I’ve only used it once so it may be more correlation than causation.
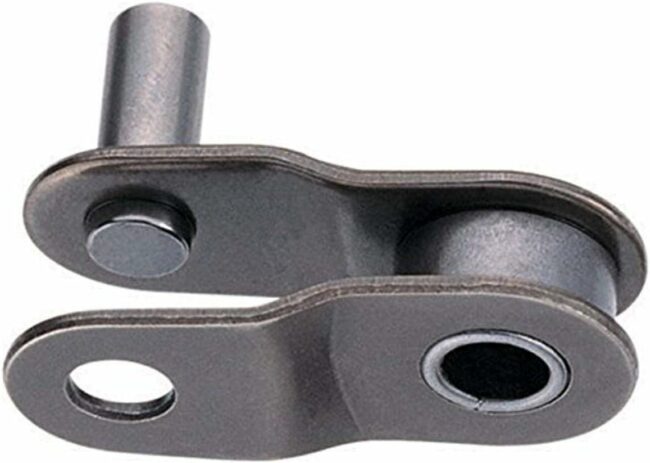
On fixed gear bikes, it is often necessary to install a half-link (photo) to use a gear choice (chainring plus cog) that does not fit the dropouts because a full chain link takes up ½” of chain distance in the dropouts and a particular gear choice may leave the axle too far back in the dropouts but if a link is removed, the axle could be too far forward. A half-link takes up only ¼”.
Given that a tooth takes up 1/8”, using a half-link in the chain will make even the shorter horizontal dropouts of the 80’s and 90’s work. Alas, half-links must be installed using a chain tool. In your article about stiff links, you had suggested that just pushing the pin in or out a little should loosen the link. On half-links, my experience is, that does not work quite well enough. And having a stiff link makes setting the chain tension more difficult.
I was installing a new half-link today and it was stiff and would not loosen enough no matter how much I tried to move the pin. I took the half-link out, intending to try it at a different spot on the chain. I noted that there was no lube on the half-link (which is always the case with new half-links, but I’d never thought about it). I decided to put chain lube on the half-link, being certain both to drip some into the hole in the narrow portion of the link and onto the pin at the wide portion. I installed it and, to my surprise, it worked satisfactorily after just one minor adjustment with the chain tool.
As I said, even assuming it is causation and not mere correlation, its limited utility would be only to fixed gear and perhaps single speed riders. However, it might be useful for persons still attaching chains with chain tools to squirt some chain lube on the two pins that will engage the chain. I can’t see how it would hurt.”
Thanks Fixieguy! I’d like to add that I recommend always lubricating quick links the way you are before installation too. That’s applicable to most modern bikes these days now that most groups use them.
Chuck’s Question That I Hope You Can Help With
He writes: “The topic I’m interested in is butyl vs latex vs TPU inner tubes. I would be interested in all the usual issues as well as if TPU tubes can accept sealant without issue.”
In response I told Chuck that sealant is supposed to be problematic with TPU tubes according to Schwalbe. Also, that mostly sealant is used in tubeless tires not inside inner tubes because it adds weight and most riders choose lightweight tubes to have light tubes i.e. less not more weight.
I have a review of Schwalbe’s Aerothan TPU tubes here:
Your Turn
Chuck’s already heard from me. He would appreciate what you choose in the way of tubes for your road riding and why you choose them. If you use tubes with sealant, please share your setup. Thanks!
Jim Langley is RBR’s Technical Editor. A pro mechanic & cycling writer for more than 40 years, he’s the author of Your Home Bicycle Workshop in the RBR eBookstore. Tune in to Jim’s popular YouTube channel for wheel building & bike repair how-to’s. Jim’s also known for his cycling streak that ended in February 2022 with a total of 10,269 consecutive daily rides (28 years, 1 month and 11 days of never missing a ride). Click to read Jim’s full bio.
Muc-Off now makes an inner tube sealant: https://us.muc-off.com/products/inner-tube-sealant. I didn’t see any information about using with TPU tubes.
Have tried the TPU tubes, latex, butyl and tubeless. TPU tubes were very susceptible to punctures. Weight savings and ride quality were good but too many punctures. Currently with latex and Vittoria on my road bike. Tubeless on gravel bike, afraid to go tubeless on road bike as I am still on rim brakes.
Please explain why rim brakes affect your decision to go tubeless. I’m tubeless with rim brakes and love it.
Can you patch these – either with a latex or butyl patch..?? That would be the deal-breaker for me. A $30 tube that cannot be repaired is just not worth the lump in my pocket if so..
Yes, you can repair TPU tubes with Park Tool’s pre-glued patches Bigborb: https://amzn.to/3D1CrQb
Thanks for asking,
Jim
I have been riding on Tuboitos-brand TPU tubes for at least two years. Contrary to other comments I find them to be more puncture resistant (or maybe I’m just lucky). One of the reasons I buy Tubolitos is that they can be patched.
Overall, TPU tubes sacrifice a small amount of ride quality, but the weight savings are noticeable.
I have tandem bikes with rim brakes, my wife is the stoker. My priorities are safety and comfort. The Aerothan claims of heat resistance, supple ride and puncture resistance all caught my eye, so I installed them on our favorite tandem 2 years ago. I also bought a spare, which I’ve never had to use. And I can’t comment on repair ability because we’ve never experienced a flat since these tubes were installed. They hold air as well as butyl tubes. I agree with the subjective assessment of a more supple ride, in part also because I’ve been able to lower air pressure a bit due to the lower risk of pinch flats. And for an older team in hilly terrain, the lighter weight doesn’t hurt either. All in all, I’ve become a fan and don’t regret the initial price outlay.
I cannot comment on the TPU tubes, but I’ve done a significant amount of testing over the years on butyl vs latex; specifically Continental “Race 700” butyl and Michelin “Air Comp” latex. I run Continental Grand Prix 4000s II tires (Haven’t “graduated” to the 5000’s because I have a good stash of the 4000’s!) I generally get about 2000 miles out of a rear tire before I send it to recycle and swap it with the front. Then I put a new tire on the front.
The Michelins have a greater resistance to puncture and will deform around a pointed object for some time before rupturing. Whereas the Conti’s will rupture almost immediately on contact with the entering point (be it glass or metal, it doesn’t matter).
The ride quality of the Michelins IS definitely superior to the Conti’s. I liberally talc all my tubes before use so I’m assuming the ride quality issue is due to the better flexibility of the latex. Although I ride with latex, I keep a butyl in my seat-bag for the unusual instance that I do puncture the latex. When I get going after a flat repair with the butyl spare installed, it ride feels “Harder” (or stiffer) than with the latex. Then when I get home and repair and replace the latex, my ride quality returns to “Normal.” And speaking of repairs, a REMA patch works on both butyl and latex although the latex cannot be buffed so I just use some IPA to clean the surface before applying the glue. It works for me and I’ve never had it fail. I usually stop after three patches just because the tube will then be about six years old!
Latex does leak down MUCH more rapidly than butyl. However, I don’t find that to be a problem because I check and pump my tires before EVERY ride to the pressures given by the Berto equations. And I’ve NEVER had a pinch flat with latex whereas, when I got lazy with butyl, I’ve had a few.
I realize this treatise is limited and totally subjective, but I wanted to share my experience from over the last 12 years as suggested by Jim.
Jim – What are the Berto equations?
Keith
Hi Keith,
In this article I wrote a while back is a link to an online “Frank Berto based” tire pressure calculator:
https://www.roadbikerider.com/inflation-for-road-bike-tires/
You can also search google for “Frank Berto + Tire Pressure” and you will find a whole bunch of cycling related websites that use Frank’s chart first published in Bicycling Magazine to explain how to determine your pressure.
Hope this helps,
Jim
I’ve used sealant in clinchers with tubes since ~2010 and prior to that, in tubulars for a decade or so. I’ve had zero issues with either one and the only real caveat is that you need tubes (or tubulars) with removable valve cores (there’s actually a way to use sealant in tubes and tires without removable valve cores, but it’s way more hassle than most people will want to deal with).
I’ve primarily used Stan’s regular sealant and it works so well that I’ve never had any reason to change.
I’m interested in giving latex tubes a try. I know that they lose air much faster than butyl tubes, and I’m generally religious about checking inflation before every ride. That said, I’m wondering if anyone has ever inflated their latex tubed tires with nitrogen. The last 2 cars I bought came from the dealer with nitrogen filled tires, and I was amazed that I didn’t have to top them up for more than 3 months. From a cost/benefit perspective, probably not the practical. Just asking out of curiosity.
I have been using Tubilito tubes for quite a while and have not had any noticeable increase in the number of flats; perhaps one flat every 5,000 miles. Running 650×48 Rene Herse tires at 40 psi on the road and 30 on the trail I can go for several weeks with needing to add air. They are light and compact for carrying a spare.