
|
HOT!
|
NOT!
|
Tested: Aeroclam P1; Aeroclam P2 |
Minimalist Underseat Storage Overcomes Saddle Bag Issues
Cyckit came into being with the goal of creating a well-functioning, minimalist saddle bag without using cloth (or other pliant material), Velcro and zippers. To me, that’s a laudable goal, as just about every saddle bag I’ve ever used has eventually had problems with one or the other of those. The cloth and Velcro can wear out, causing the bag to either hang down or fall off completely, and zippers can easily get stuck when they get dirty, preventing you from getting to your tube, C02 and tools when needed.
Cyckit’s founder, New Zealander Pat Reardon, looked at the problems with current saddle bags and decided that there had to be a better way. After interviewing 125 road cyclists, he had a well-defined idea of what roadies wanted in a minimalist saddle bag. Topping the list of suggestions was that the bag had to be completely secured under the saddle, with seamless integration to the saddle (practically becoming a part of the saddle), provide easy access to the contents, must fit most saddles and not touch or rub the cyclist while riding. And, of course, have no cloth, no Velcro, and no zippers. From these requirements and Pat’s ideas, the Aeroclam P1 and P2 were developed.
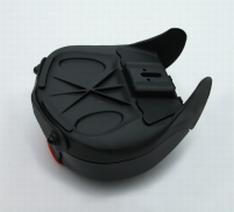
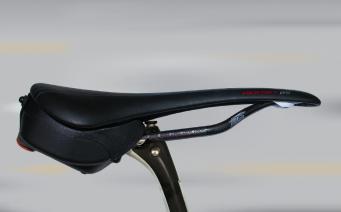
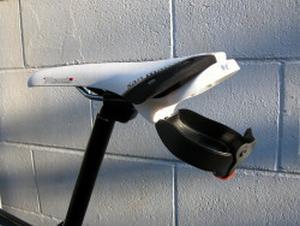 One look tells you the Aeroclam (Cyckit calls it “cool, minimalist under-seat bike storage,” and who’s to argue?) is not your typical saddle bag. In fact, it’s not a bag at all. True to its name, it’s reminiscent of a hard plastic clamshell in both looks and operation. With the hinge tucked under the saddle near the seat post, and the top section of the Aeroclam affixed to the saddle, the bottom section opens to provide access to your tube-change and –repair kit (see photo).
Injection-Molded, Tough Yet Light Plastic
The Aeroclam is 1.5mm (0.06”) thick and made from a high-impact nylon-based thermoplastic, which is injection molded to ensure that it will easily withstand the elements and daily use on the road. The P1 weighs just 13.57g, including mounting hardware.
While designing the rubber latch (rubber snubber), waterproofing, dust proofing and sand proofing were critical requirements, according to Reardon. Rear wheels throw water, sand, gravel and everything else up and onto the rear of the bicycle, including the underside of the saddle. With a typical saddle bag, water, sand, grit, dirt, and mud get into the zipper, sometimes even corroding it or seizing it up.
The Aeroclam mitigates the possibility by utilizing a rubber latch that is strong, durable, UV resistant, easy-to-open/close, won’t pop open and, most importantly, keeps water/dirt/debris from getting inside. (If any water does manage to get in, drain holes in the bottom of the Aeroclam get rid of it.) By opening and closing the Aeroclam over 500 times, Reardon personally tested the durability of the rubber’s hinging ability, as well as any deformation of the rubber eyelets.
And to test the UV resistance of the rubber used on the latch, he mounted a complete Aeroclam outside his office for a year, and he says it is still working perfectly even after being exposed to all of the sun, rain, heat and humidity that New Zealand has to offer. There has been no rubber rot nor cracking of the rubber after a year of sitting outside. And just in case it ever happens, the latch is replaceable – unlike the zipper on a typical bag.
Model Differences, Easy Installation
The differences in the two versions of the Aeroclam are in the contour on the top edge of the upper section. The P1 will fit more saddle brands, while the P2 will fit larger brand saddles.
On the other hand, there are several saddles that the Aeroclams will not fit, mainly due to saddle protrusions into the area that the Aeroclam needs to occupy (such as the tag on the rear of the Selle SMP) as well as greatly different contours of the saddle such as the Fizik Arione.
The company offers a money-back guarantee if neither model fits your existing saddle. Cyckit keeps an updated tally on which saddle brands and models do and don’t fit the Aeroclam, based on customer feedback – and keeps this information updated on a special page on its website.
After unpacking all of the parts, I laid them out on the workbench and opened the sheet of instructions. Not only was the installation of the Aeroclam very intuitive, if you did have a question, the instructions were very easy to read, understand and follow. The only thing left up to the customer is to figure out what you want to carry (see below).
The top piece of the Aeroclam is secured to the seat rails by a glass-filled injection-molded nylon clamp. A single stainless steel 5mm allen bolt holds these two pieces together. Rubber pads on the clamp help keep it from slipping. Installed correctly, the seat rails are sandwiched between the clamp and the top piece of the Aeroclam, making for a very secure fit.
How Does it Work on the Road?
I chose OPTION 1 (see the illustration) when it came time to decide what to carry in the Aeroclam. It held everything Cyckit claimed it would. When opening and closing the rubber latch around the plastic snap fasteners, it was initially very tight and difficult to open and close, especially if you had cold fingers. However, this is actually a good thing since rubber and plastic pieces will “relax” after some usage and become more pliable, and I would rather have this latch tighter than looser when attached to the plastic buttons.
On my initial ride, I torture tested the Aeroclam on the horrible roads of San Diego. For those who haven’t ridden here, full-suspension road bikes are required – the roads here are that bad! I did experience quite a bit of rattling on that maiden voyage. The solution is quite easy – and in fact is suggested on the Cyckit website.
I took an old MTB inner tube and cut it into small pieces, making small rubber sleeves to encase each item (CO2 cartridge, multi-tool and CO2 pump head). On my next ride, and ever since, everything have been very quiet.
Minimalist Approach Means Minimal Storage
While Cyckit was performing their market research, four mandatory requirements kept surfacing. These included (1) a strong product, (2) a minimalist and aerodynamic design, (3) no zippers, cloth or Velcro and (4) sleek integration that fits most saddles and looks like it’s supposed to be part of the bike.
While they achieved these goals, the minimalist approach means minimal storage. This is the only drawback to the Aeroclam (or is it? Keep reading). Any way you pack it, you will either need to carry (a) only 1 tube, 1 CO2 cartridge and 1 pump head, with the 2 levers provided with your Clam, and a slimline multi-tool, or (b) if you want to carry 2 tubes and 2 CO2 cartridges, you will need to carry 1 tube and 1 cartridge in your jersey pocket.
I said the minimalist storage is a drawback – for some riders, that is. Some roadies actually prefer a very minimal “changing kit,” even less than what fits in the Aeroclam. And some prefer to tote those items in their jersey, forgoing a saddle bag entirely. So, for the minimalist, the Aeroclam may be a nearly perfect solution. But if you like to carry 2 tubes, 2 CO2 cartridges, 2 levers, a multitool, and maybe even more, then you’re going to have to figure out how you bring it all along. You may decide that the integrated aero profile and “totally out of the way” functionality of the Aeroclam is worth toting some stuff in a pocket. If you want a bigger ’Clam, one may be on the way.
I have spoken to Pat and recommended that he manufacture a second bottom piece that is deep enough to carry 2 of each. He said he is working on some ideas and that a bigger Aeroclam may be forthcoming.
The Last Word
This unique product achieves all of its goals, works quite well and is affordable. The Aeroclam is light and strong, well-engineered and -manufactured. The only drawback for me (and, again, I recognize it’s not a drawback for every roadie) is the limited storage capacity. But that may well be a non-issue if the company decides to produce a larger size.
February 2015
Coach Rick Schultz is an avid cyclist who trains, races and coaches in Southern California. Rick is an engineer by trade, and in addition to being a coach, he’s a bike fitter and prolific product reviewer. He’s the author of Stretching & Core Strengthening for the Cyclist and Bike Fit 101: Your Toolset for a Great Bike Fit in the RBR eBookstore. Check his product reviews website, www.biketestreviews.com, and his coaching site, www.bikefitnesscoaching.com. Click to read Rick’s full bio.
ytyr