
As we age resistance training becomes more important. I call it resistance training exercise because strength training has the connotation of going to the gym and lifting free weights or using machines. You can do these exercises at home with no special equipment.
Resistance training is important for three fundamental reasons:
- Muscle capacity, to prevent the atrophy of muscles as you age.
- Bone strength, to prevent the loss of bone mass as you age.
- Weight management, as your muscles atrophy from less use, they are replaced by fat and connective tissue.
Most of the can be reversed with resistance training! Here are four essential exercises with variations to include in your training throughout your training year.
American College of Sports Medicine Strength Training Recommendations
- Frequency: Two or three days per week using a variety of exercises and equipment.
- Intensity: Rate of Perceived Exertion (RPE) between moderate (5 to 6) and vigorous (7 to 8) intensity on a scale of 0 to 10. These RPEs are determined by how hard the resistance is and apply onlywhen you are actually doing an exercise. An RPE of 5 to 6 is at the top of your aerobic range — you’re breathing deeply but not gasping for air. At RPE of 7 to 8 you are breathing very hard.
- Type: Progressive weight training program or weight-bearing calisthenics of 8 to 10 exercises involving the major muscle groups as well as stair climbing, and other strengthening activities that use the major muscle groups.
- Recovery: Wait at least 48 hours between resistance training sessions.
The ACSM recommends 8 to 10 exercises two or three times a week. This takes at least half an hour per session. Here is a 15-minute program of four fundamental exercises to do at least twice a week. You’re better off doing these exercises year-round than skipping resistance training because it takes too much time. If you have more time, my eBook Anti-Aging 12 Ways You Can Slow the Aging Process has a chapter that describes in detail how to create and follow a resistance training program. The chapter includes 28 exercises illustrated with photos.
For each exercise do one set of 10 to 15 reps of each exercise each workout. Start with no weights. When you can easily do 15 reps then increase the resistance.
1. Lower Body
Your legs get a good workout riding your bike. Why do more? Even riding hard doesn’t give your legs a full workout. A friend coaches pros who race the grand tours. After a grand tour he sends a racer to the gym because he’s lost leg strength over three weeks!
Here are four progressively more challenging exercises. Start with number one and if it’s too easy progress to number two, etc. You don’t have to do the same exercise every workout as long as you’re using good form and not struggling. Variety is good!
1. Wall squats: If you have any knee problems, only do the partial wall squat. If your knees are pain-free, do the full wall squat.
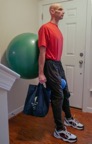
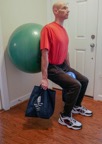
Coach Dan Kehlenbach is using an exercise ball. You could use a basketball or soccer ball. For weights he’s holding a couple of cloth bags filled with cans of food.
- Full: Start without any weights. If you can do 15 reps then hold a weight in each hand. Stand with your exercise ball between your butt and the wall. Put a folded small towel between your knees and squeeze your knees together enough to keep the towel there. You can also put a mini-band around your hips to keep them in alignment. Move your feet out so that when you squat down, your hip and knee joints form right angles like sitting in a chair. Bend your knees and, using the ball as a roller, squat down like you’re sitting in a chair, and then stand back up.
- Partial: Start without any weights. If you can do 15 reps then hold a weight in each hand. The exercise is the same as the full wall squat but only go down as far as you can without any knee pain.
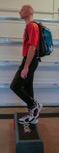
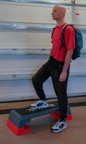
2. Step-ups: These are complementary. Each session do one and/or the other.
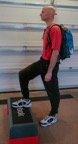
- Front: Start without any weights. If you can do 15 reps then wear a backpack or hold a weight in each hand. Stand facing a box or step approximately 8-16 inches (20-40 cm) high. With your right leg, step up onto the box. Step up with your right leg; don’t push off with your left leg. Step back down. Do a set of reps with one leg, then a set with the other leg.

- Lateral: Start without any weights. If you can do 15 reps then wear a backpack or hold a weight in each hand. Stand with your right side along the same box. Step up sideways with your right leg; don’t push off with your left leg. Step back down. Do a set of reps with one leg, then a set with the other leg.
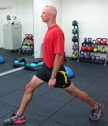
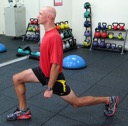
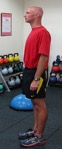
3. Split squats: Start without any weights like the first photo. If you can do 15 reps then wear a backpack or hold a weight in each hand. Step forward about 18-24 inches (45-60 cm) with your right foot. Lower your left knee toward the floor until your right thigh is parallel to the floor. Keep your right knee over your ankle, not in front of your foot. Come back up like the first photo —that’s one rep. Go up and down (photos #1 and #2) for one set. Then switch legs. If either of your knees hurts, don’t go down as far.
4. Lunge: If you have any knee problems, only do either the partial lunge or the reverse lunge. If your knees are pain-free, do the full lunge.
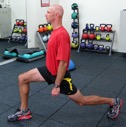
- Full: Step forward about 18-24 inches (45-60 cm) with your right foot and lower your left knee toward the floor. Only go down until your right thigh is almost parallel to the floor. Keep your right knee over your ankle, not in front of your foot. Stand back up like the first photo. Step forward with your left foot, the same as the second photo but opposite leg. Go down and stand back up like the first photo. Alternate right and left legs for each set.
- Partial: The exercise is the same as the full lunge but only go down as far as you can without any knee pain.
- Reverse: Step backward about 18-24 inches (45-60 cm) with your right foot and lower your right knee toward the floor. Only go down until your right thigh is almost parallel to the floor. Keep your right knee over your ankle, not in front of your foot. Return to standing and repeat with left leg. Alternate right and left legs for each set.
2. Upper Body
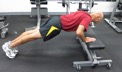
1. Push-ups, modified: Start with your hands 3-4 inches (8-10 cm) wider than your shoulders and your hands resting on a bench about 12-15 inches (30-40 cm) high. Tighten your core and keep your back straight through the full range of motion. Lower your chest until your elbows form right angles and then push back up. Do 10 to 15 reps. When you can do 15 reps, progress to regular push-ups.
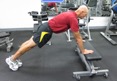
2. Push-ups: Start with your hands 3-4 inches (8-10 cm) wider than your shoulders. Tighten your core and keep your back straight through the full range of motion. Lower until your chest is just touching the floor and then push back up.

3. Upper Back
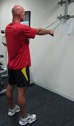
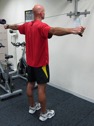
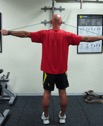
Rhomboids: This exercise strengthens your upper back muscles that help to hold your head up while you’re riding. You can do this exercise with an inner tube. If the tube provides too much or too little resistance, then order exercise tubing from Amazon. Loop the tube over an anchor so that the band is somewhere between even with your shoulders and parallel to the floor to higher than your head and angled down 45 degrees.
Stand with straight arms extended in front of you grasping the band or tubing ends. Using the muscles that connect your upper back to your lower neck, spread your arms wide until they are out to your sides, squeeze your shoulder blades together, and return. If you can’t get through the full range of motion, then get lighter tubing. One set of 10 to 15 reps. When you can do 15 reps then get a heavier inner tube or harder exercise tubing.
4. Core Exercises
Core strength is important on the bike for three reasons:
- Your legs are levers and your pelvis is the fulcrum on the bike. If you have a strong core, the pelvis is stable and you get maximum power out of your legs. If you don’t have a strong core, with each pedal stroke your pelvis moves a bit and you are wasting energy.
- Your lower back is held in neutral alignment by a strong core. If your back is rounded, you’re pulling on your back muscles; and during a ride, especially climbing, the back muscles will get tired and start to hurt.
- Your hands rest lightly on the handlebar when your upper body is supported by a strong core. This prevents sore/numb hands.
The surface muscles you use for crunches run up and down your abdomen; similarly, the surface muscles you use for arching your back run up and down your back. Below these surface muscles are the core muscles, which run around your body.
Core exercises are designed to teach you to activate the core muscles, the transversus abdominus and the multifidus, the muscles, which form a girdle around your core.
You can’t feel the core muscles working — their action is subtle. Here are several ways to visualize engaging them:
- Imagine that a clock is resting on your belly with the 12 toward your chin. Imagine that you are pulling the three and the nine down toward the floor.
- Imagine that you are pulling your belly button down to your anus.
- Imagine that you are trying to make yourself thinner to slip sideways among people in a crowded room.
- Imagine that you are pulling on a tight pair of jeans.
These are progressive.
Bird dogs #1: Start with your hands and knees on the floor. Tighten your core so your pelvis is in neutral and doesn’t move. Slowly raise your left leg until almost parallel with the floor. Slowly lift your right hand off the floor, touch your left chest and hold for 3-5 counts. Put your right hand back on the floor and lower your left leg. Repeat with your left arm and right leg. That’s one rep. Your back should not move — just like a table. One set is 10 to 20 reps. When you can do one set of 20 reps with good form, then move on to #2.
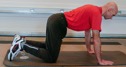
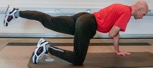
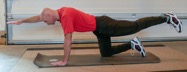
Bird dogs #2: Start with your hands and knees on the floor. Tighten your core so your pelvis is in neutral and doesn’t move. Slowly raise your right arm pointing in front of you and slowly raise your left leg until almost parallel with the floor, hold 3-5 counts and lower. Repeat with your left arm and right leg. That’s one rep. Your back should not move — just like a table. One set is 15 to 20 reps. Then move on to the plank.
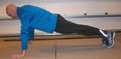
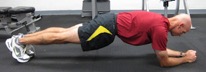
Plank: Lie prone on your front on the floor with your toes bent and resting on the floor. Your elbows are bent resting on the floor under your shoulders with your forearms extended along the floor to form a V with your hands together under your head. Tighten your core muscles to raise all of your body off the floor except for your toes, elbows, arms and hands. Your body should be in a straight line from your head to your feet. Hold — use your core muscles, not your surface abdominal muscles. Time yourself doing one rep. Try to increase your time by five seconds each day or two you do the core.
Resources
My e-Book Anti-Aging 12 Ways You Can Slow the Aging Process explains the physiology of aging and how to assess your current fitness. It includes exercise programs for cardiovascular health and endurance, training with intensity, resistance training, getting more flexible, improving your balance and slowing bone loss. It includes a dozen stories about their personal experiences by riders aged 54 to 82. The 107-page Anti-Aging 12 Ways You Can Slow the Aging Process is $14.99.
Coach John Hughes earned coaching certifications from USA Cycling and the National Strength and Conditioning Association. John’s cycling career includes course records in the Boston-Montreal-Boston 1200-km randonnée and the Furnace Creek 508, a Race Across AMerica (RAAM) qualifier. He has ridden solo RAAM twice and is a 5-time finisher of the 1200-km Paris-Brest-Paris. He has written over 40 eBooks and eArticles on cycling training and nutrition, available in RBR’s eBookstore at Coach John Hughes. Click to read John’s full bio.