
By Brandon Bilyeu

Cost:
HideMyBell: €30-€60 (~$33-$66)
HideMyMirror: €25 (~$27)
CoverMyBack: €22 (~$22)
*Shipping outside Europe is €18 (~$20), free shipping over €100 (~$110)
How obtained: review sample from company
Available: online, retail
Colors:
HideMyBell: Black, White, Red
HideMyMirror: Black
CoverMyBack: Black
Website: closethegap.cc
RBR Sponsor: no
Tested: 30+ hours
CloseTheGap
Based in the Netherlands, CloseTheGap was founded in 2015 by lifelong cyclist Mathijs Wagenaar. With the goal of making cycling safer and fun, Mathijs’ first product was the aptly named HideMyBell that integrated a bell into an out-front computer mount. Now it has been sold all around the world and even multiple Tour de France champion Chris Froome has been spotted using a HideMyBell mount.
All design and engineering is done in the Netherlands with 3D printing playing a big part in prototype production. This means new product ideas can be made quickly and tested in the real world before the expensive investment in injection molds. In the ensuing years CloseTheGap has released several more products including a rear-view mirror, rear fender, MTB bar grips, and even an on-bike waste container to store used nutrition wrappers.
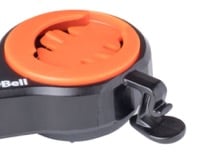
HideMyBell
![]()

Hot!
- Bell located in out-front computer mount declutters handlebar tops
- Comes with GoPro style adapter that attaches underneath the mount
- Supports many different computer brands
- Many styles available to fit different cockpits
- Packaging is plastic free, fully recyclable
Not!
- Forward bell location requires taking hand off the handlebar
My standard cockpit layout consists of an out-front computer mount, handlebar mounted bell to the right of my stem, and light on the left. This setup has worked well for me, but it limits space on the bar tops for my hands, my computer tends to block a portion of the light beam leaving a dark spot on the road at night, and it makes for a cluttered cockpit on what is otherwise a sleek looking go-fast machine.
The HideMyBell solves all the above issues in one sleek unit. What looks like a standard out-front mount actually has an integrated bell and comes with a GoPro style adapter that can be mounted to the underside. For mounting a light that is not GoPro adapter compatible you can buy an accessory adapter from CloseTheGap that allows a standard handlebar mounting strap to be used.

I tested the HideMyBell Regular version which is long enough to fit most larger computers and comes with adapters to mount computers from Garmin, Sigma, Bryton, Wahoo, Polar, Lezyne, and Mio. If you use only a Garmin, Wahoo, or Sigma you can get the slightly cheaper model HideMyBell GWS that does not come with all the extra adapters. Other options include a mini version for smaller computers, an off-road version that mounts next to the stem, multiple options for fitting fancy integrated handlebar/stem systems, and race versions that allow easy removal of the bell and are made of carbon fiber instead of plastic to save a little weight on race day.
The HideMyBell is designed to fit standard 31.8mm diameter handlebars and mounts to the left of the stem. The hinged clamp makes installation easy and once tightened in place the whole mount feels rock solid. Changing computer adapters is quick and easy, simply remove the bell (one screw) and then swap the adapter (two screws). The computer adapters are designed with several millimeters of offset so depending on the installation orientation you can adjust the fore/aft position slightly.
The bell trigger is located on the right side and actuation is done by pulling up on the trigger and then releasing. This actuation takes a bit of getting used to as other bells typically use a downward trigger and the HideMyBell trigger requires a very quick and clean release, but after a couple uses it is second nature. The trigger is well forward of the handlebar tops so for most people this means when ringing the bell your right hand is no longer on the handlebar. I spent a lot of time just ringing the bell trying to break the plastic trigger, but was unable to break or wear it out. If the trigger does eventually break a replacement bracket is available for €10 (~$11).
And now for the most important part of the review, how does the bell sound?!?! I’m not going to lie, this bell does not sound as beautiful as some of the $50 options out there with high-end brass bells blessed by the Pope and sound profiles meticulously tuned to imitate the call of a Humpback whale. It is less musical tone and more kitchen timer ding, but is by no means grating on the ears. Rated for 85 dB at 5 meters (16 feet) it had no problems getting the attention of the intended target.

Bottom Line
A great option for decluttering your bike cockpit. Perfect if you want/need a bike bell but are too cool to be seen with a bell on your bike.
HideMyMirror


Hot!
- Low profile and inconspicuous rear-view mirror
- Can be closed when not in use and looks like a standard bar-end plug
- Screw-in expansion plug ensures a solid lock on handlebars
- Ball joint pivot and full 360 degree rotation around bar end
Not!
- Mirror could be a little bigger
There are lots of options out there for rear-view bike mirrors. The most common varieties either mount to your helmet/glasses or to the end of your handlebars. I’ll admit that I have never used a rear-view mirror before because I don’t have any problems looking back over my shoulder and I’m too cool to ride with a mirror (personal opinion, it’s very likely I’m not cool at all).
For those like me who need a gateway drug to get started in the dark underworld of bike mirrors, CloseTheGap has the answer. The HideMyMirror is a compactly designed mirror that is all but unnoticeable when in the closed position but performs great with almost infinite adjustability. After lots of testing I am not a full-time mirror convert yet, but it’s great to know that the mirror is always there hidden in plain sight if I want to use it.
The HideMyMirror replaces one of the bar-end plugs and locks in place with a screw-in expansion plug so it will not fall out (fits bars with 19-23mm inside diameter). The mirror itself is mounted via ball joint so it can be pivoted to the best angle for viewing. The pivot is easy enough to adjust, but also stiff enough to be stable on rough roads. The whole outer frame also rotates 360 degrees so the mirror can be located straight down, sticking out to the side, or any other location around the bar-end.


In the closed position the HideMyMirror is only slightly bigger than a normal bar-end plug. It opens with a simple flick of a finger and adjustment is quick, though must be done in the riding position to get the angle right. It is safest to do the adjustment when stationary leaning against something but can also be done while riding. Mirror clarity is very good with cars and other road uses clearly visible. For the HideMyMirror to be unobtrusive on the bike the mirror size had to be small and does seem to be a little smaller than competitors. In my use I found the mirror size sufficient, but certainly a little bigger would be better.
Bottom Line
Quality rear-view mirror that stows in place when not needed (or when your buddies are around and you don’t want to be caught with a mirror), has excellent adjustability, and very secure mounting.
CoverMyBack

Hot!
- Excellent back coverage, protects rear light from spray
- Solid connection to saddle
- Quick and easy installation/removal
Not!
- Will interfere with some saddle bags
A little protection from rear wheel spray on wet rides can make a huge difference in comfort. For several years I have used Ass Savers’ folding plastic fenders on my summer bike when it threatens to rain and they work great. But I have also had to replace several after they were ejected from my saddle by rough roads or wind, not noticing they were gone until miles later down the road.
The CoverMyBack fender provides the same rear coverage but with a much sturdier connection to the saddle and heavier material used throughout. The base of the CoverMyBack system is a bracket that mounts to the saddle rails with clamps that tighten with screws (fits 7-9mm diameter rails, round or square, max 66mm between rails). This bracket is meant to be permanently installed so it is always ready to accept the fender. The fender then snaps onto the bracket in one second and is removed by simply pressing a tab and sliding the fender off.
Included with the fender is a light adapter that can mount to either the bracket or the top of the fender. Personally, I would recommend keeping the light adapter on top of the fender. With no fender installed you can mount the light on the seat post, mounting the light on the bracket means you cannot use a saddle bag. With the fender installed a light on the seat post or bracket will potentially be blocked by the fender and will receive nasty road spray. The light on top of the fender will guarantee the light is visible from the rear and keep it free from road spray. Larger rear lights may not mount properly to the short adapter.

Bottom Line
Good coverage for a minimalist rear fender and easy to install/remove at a moment’s notice. Solid plastic construction and connection to the saddle should last a long time. Options for light placement a nice bonus.
Leave a Reply