By John Marsh, Editor & Publisher
Magnificent desolation. That’s my best two-word description of Wyoming.
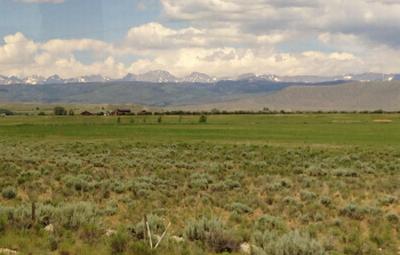
I had never been to the Cowboy State before, and I knew it would be beautiful, but I was not prepared for the ways it would present its stunning landscape. From pancake-flat plains to semi-arid slow-rolling hills to red rock canyons to the majestic peaks of the Tetons – almost all of it wide-open country – it was truly magnificent.
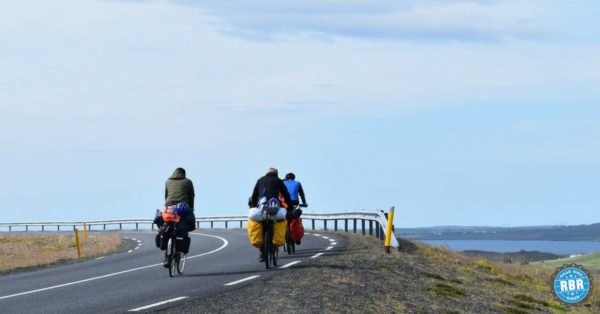
With views of up to 40 miles in all directions on some days, and the Wind River Mountains often framing one sideof your vision, the 18th annual Tour de Wyoming (which features a different course each year) was dubbed “Circle the Winds Tour” for the general route around (and to a degree, over) the Wind River Mountain range.
 The towns from start to finish were Riverton, Dubois, Jackson, Pinedale, Farson, Lander and back to Riverton. With elevations from 4,900 to over 9,500 feet (1,490 – 2,900m) when crossing the Continental Divide at Togwotee Pass, the ride was about 410 miles over six days, with a touch under 25,000 feet (7,600m) of climbing.
In addition to the indelible scenery and challenging terrain, it was the only ride I’ve ever done where the pre-ride briefing included a warning to beware of grizzly bears! Thankfully, no one on the ride reported running across one. However, there were moose, antelope and other various wildlife to be seen, in addition to a little history here and there.
Included in that were ruts from the Oregon Trail, and the Parting of the Ways, where the Mormon Trail and Oregon Trail branched off. Hailing from Independence, Missouri, the starting point of the Oregon, Sante Fe and California Trails, seeing the wagon ruts in the vastness of Wyoming was pretty cool.
I got there, along with 350 other riders from 32 states, Canada and Norway!, at the suggestion of RBR Premium Member Tom Dorigatti, who happens to be a Wyoming native. I was looking for a ride to celebrate turning 50 this year, and Tom suggested the TdW. Couple more rider facts: the oldest rider on the tour was 76 (three 76-year-olds, actually), and the youngest was 8.
In our poll of a couple weeks ago, 55% of RBR readers said you’ve done several multi-day bike tours, and another 13% said you’ve done a couple. Moreover, all but 7% of the rest of readers said you’d sure like to try one.
So, instead of writing a “travelogue” piece about the Tour de Wyoming, in the spirit of providing some tips that may be useful to both experienced and novice tour riders, I thought I’d share my Top 10 take-aways gleaned from this tour (not necessarily in order).
You’ll probably note some overlap in the various tips, because many organically blend into others. And while some might seem obvious, you’ll read why I mentioned them, anyway. Hopefully, you’ll find something beneficial.
1. Ride Safely
No matter where you’re riding – whether it’s on a tour like the Tour de Wyoming, where the cars are relatively few and far between, or on a cross-state tour with thousands of other riders – don’t lose sight of your basic safety responsibilities to yourself and your fellow riders. Signal your turns. Point out or call out road debris, potholes or other obstacles. Don’t overlap wheels, and protect your own front wheel. Keep riders in your small groups abreast of traffic behind you (“car back!”). Wear or use a mirror if you’re comfortable doing so. Follow the rules set forth by the ride. And so on.
In short, just because it’s a fun-filled tour on which you may be chatting it up with fellow riders or enjoying the scenery much more than on a normal, everyday ride, DO NOT let your guard down. Terrible accidents, and even deaths, can happen on cycling vacations, just the same as on our everyday rides.
In fact, I’m saddened to report that one rider on the Wyoming tour was severely injured when hit by a truck pulling a camper. The accident happened on a long, straight road with not much traffic. By all accounts, it seemed to be the rider’s fault. Witnesses said she signaled a left turn across both lanes of the 2-lane highway to enter a rest stop. Somehow, she missed seeing the truck and pulled out right in front of it. Despite the horrific accident – I won’t list her many injuries – she will survive andis expected to walk again in several weeks.
2. Ride Courteously
Tours and big organized rides often include a range of cyclists of different riding abilities. No matter where you fit on the spectrum, riding courteously is part of your overall responsibilities on the ride.
For example, if you are a faster rider (or are in a faster group) who passes other riders on occasion, always give a hale and hardy “on your left” before you make your pass. And if you know you’re slower than some other riders, and are likely to be passed, ride as far to the right as you can to increase your safety, and that of any passers.
Courtesy extends, too, to your riding in small groups on tours and bigger rides. Grouping up and riding in pacelines once in a while allows you to conserve a bit of energy – which can be quite helpful on long, consecutive days in the saddle. But in addition to riding safely, it’s common courtesy to “share the work” by taking pulls on the front, as you’re able. Just do what you can; if you’re only up for a 30-second pull, that’s fine. And if you’re riding alone and sidle up behind another rider, let them know you’re there by asking if they don’t mind if you suck some wheel for a while.
3. Stop and Smell the Roses
Part of the enjoyment of rides like the Wyoming Tour is just the overall sensory experience of pedaling through some of the most breathtaking (in the good sense of the word!) scenery imaginable. 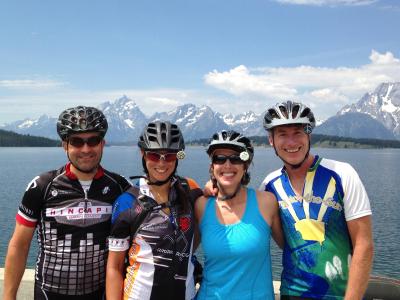
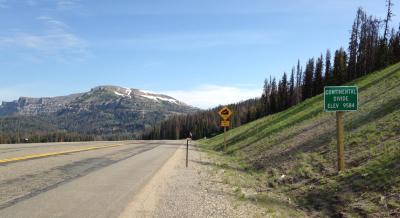 Every day offered something different, but my highlight was the 88-mile Queen Stage, featuring a 10-mile climb up Togwotee Pass and over the Continental Divide, then a long descent into Grand Teton National Park, with the majestic Tetons getting ever closer as we cycled through the Park. Stunning.
After all, it’s a tour – not a race. So stop, take pictures, inhale deeply, and listen to the quietude you’ll probably never experience at home.
In fact, a couple of the remarkable sensory experiences in the Park were the beautiful fragrance and – when I stopped to take a photo – the ability to clearly hear every word of the conversation of other riders who were at least 250 meters in the distance. It was that quiet!
And, finally – here’s some overlap with the courtesy point – if you’re riding in a group with someone who wants to stop, for whatever reason, for heaven’s sake, stop with them. I was riding one day with a couple of other riders who, not once but twice, left me behind as I stopped to take photos.
4. Understand the Conditions, Ride Rules
Leading up to the Wyoming ride, in both the ride instructions and safety video prepared for the ride, I noticed an incessant drumbeat re: “riding right.” Meaning, ride to the right of the white line separating the roadway from the shoulder. I also read about the “rumbles” or “rumble strip” separating the shoulder from the road, which in some cases was said to run for miles on end, with no gap.
It only took a few miles on day one to realize how different riding in the vast open spaces of Wyoming was from my normal frame of reference, and why the ride director focused so much attention on 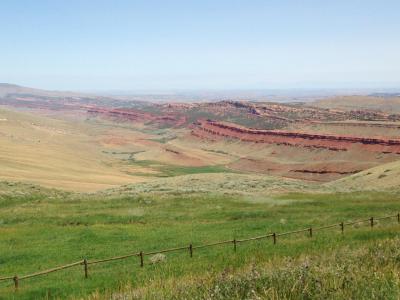 hammering home the ride-right rule. Basically every two-lane road between towns in Wyoming is a highway, with cars driving at highway speeds. The roads, which – no exaggeration– can run for tens of miles in thin, arrow-straight ribbons into the vanishing point on the horizon, can also feature fairly clean shoulders up to five or six feet (almost 2m) wide.
And, because these roads can run for 70 or more miles through open, desolate country between towns, those rumble strips are cut into the roadside to signal to a wayward driver to snap out of it and get back in the lane. Going off the road literally in the middle of nowhere can end badly. But those rumbles can shake a bike like a 9.0 earthquake, so they’re best avoided.
The point is, understand the conditions specific to your ride, how they might affect your riding, and follow the ride rules as set forth by the tour or ride director. They’ve put much thought into rider safety in establishing the ground rules, and they surely know the local territory better than you do.
5. Consider Leaving the Computer at Home
Before you go on a cycling trip, make a list, check it twice – and fully expect to forget at least one thing. I’m pretty good at packing for rides, but on this trip, I forgot my cycling computer.
I had plugged it in to recharge in an outlet near the floor in my home office. Out of sight, out of mind. (And I obviously did not check my list twice.) When I realized upon arrival in Wyoming that I did not have the Garmin, I knew exactly where I had left it! Gah!
But I also knew that I still had my iPhone app, with which I track every ride anyway. (I keep the phone in my pocket while riding.) I instantly decided – so what?! I don’t need the computer anyway. I’m just going to ride without knowing my speed, cadence, heart rate, elevation, grade, etc., during the ride. And I think I was better off for it!
In fact, I’d suggest you try riding a few times without your computer on board, and see how attenuated you become to your perceived exertion, your innate ability to track time and distance. And see how much more you focus on enjoying your surroundings – the sights, sounds, smells, flora and fauna – than when your attention is sucked away by the need to know how fast, how far, how high, etc. Try it. You make like it. I did.
6. Maintain Your Flexibility
No. This point is not about stretching! Stretching is good, of course. But I’m talking about “rolling with it” when things might not go quite as expected. For example, my buddy Tom (whom I mentioned last week is the one who suggested I join him on the Wyoming tour) was stricken with severe adductor cramps only 30-odd miles in on Day One. He sagged in that day and was forced to abandon the ride.
Tom made the most of it, though, by picking up his van (he was already vacationing in Wyoming) and driving along to some of the tour towns to meet up with old school mates, do a little easy riding  when possible, and (I’m most appreciative for this) serving as a post-riding-day tour guide to show me even more of the beautiful sights the state has to offer (like Fremont Lake at dusk, see photo at left. And someone asked me what the Oregon Trail ruts I mentioned last week looked like. That photo is below.)
For my part, without Tom to ride with, I simply organically grouped up with some folks I met along the way, rode together some, ate together some, and made some new friends. (Shout-outs to Rich, Michelle and Jenn from Chicago, and Nancy and Eric from San Francisco.)
So, like life and Forrest Gump’s proverbial box of chocolates, you never know what you’re going to get. So just roll with it.
7. Getting Your Bike There
Before a previous tour, I asked for RBR reader input on bike shipping options and provided a rundown of your feedback in Issue No. 494 (available to Premium Members in the Newsletter archives). For that ride, I chose to ship my bike via FedEx using an Air Caddy, which worked out fine. This time, I chose to go with a regular bike box from my local bike shop, shipped by FedEx.
As was the case last time I checked on pricing, shipping by FedEx seemed to be a bit cheaper than UPS. And it proved to be fairly fast and efficient, even using their Ground service. Most LBSs charge $35-$45 to disassemble, wrap and tie, and box a bike for shipping. Usually a similar charge for unpacking and assembly on the receiving end.
As most airlines these days charge a pretty penny to fly with your bike – and do not offer additional insurance on it – you’d be well-served to explore all your shipping options ahead of any trip.
8. Get to Know the Tour Techs, Thank the Volunteers
On this tour, the good folks from Pedal House in Laramie were along for the ride. As with most all techs on tours and at organized rides, this crew was great. They happily knocked out repairs big (a new rear derailleur installed for one of my new friends) and small (any number of flats fixed, and a few new tires installed) every afternoon and well into the night, with a joke or story to tell – no extra charge.
And they were on hand every morning, like the crew of an old-school full-service gas station (remember those?), to top off the air in your tires, and ask you how you’re bike is riding, as you rolled out for the day. Oh yeah, they always kept a cooler of “beverages” in the back of their trailer, too, which was handy local knowledge in a pinch.
While I didn’t need anything big from them, they did make a quick adjustment for me. And they certainly helped out any number of riders on the tour. So get to know your bike techs on a tour, whether 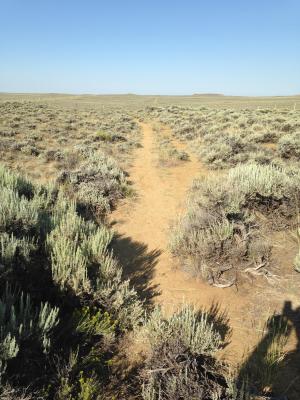 you end up needing their services or not. They may end up helping a friend stay on the road, and they’re usually a fun group to hang around.
Thanks to Dewey, Jessica and the crew from Pedal House for their help on this tour. Thanks, too, to every single volunteer who cooked and served food, set up and worked at the daily rest stops, etc. Tours like this one don’t happen without them. So make it a point to say thanks at every possible opportunity!
9. Toting, and Wearing, Your Kits and Gear
I packed each day’s complete kit in large plastic zip-lock bags, so all I had to do was grab one each morning and get dressed. No frantic searching for lost socks, headband, or gloves. And zip-lock bags allow you to roll up and squeeze all the air out before sealing, which takes up less space in your gear bag. I also kept all my on-the-road gear – chamois crème, a bit of extra food, regular glasses for extended stops, a rag, etc. – in a small cycling backpack that I could just grab and go each day.
Don’t forget to take a few “extras” based on the local weather and conditions. For Wyoming, that meant leg and arm warmers, a pair of fingered gloves, a pair of light wool socks, and extra sunscreen. With most rides at 6-7,000+ feet (1,829-2,134m) of elevation, the sun can crisp you faster than at lower elevations. And mornings tend to be much cooler, too. All but a couple days started in the upper 40s (8-9C).
And this may sound beat-you-over-the-head reasonable, but if you bring it, wear it. I can’t tell you how many riders I saw each morning with no leg or arm coverings at all. Now, I realize they may have been hardy natives for whom those temps are a toasty summer morning. But I still adhere to the 60-degree rule (for many riders, it’s 65; that’s 15-18C) for covering my knees. If it’s below that, I cover up. You’ll have plenty of rest stops for peeling off the layers, so if you got it, use it.
10. Eat, Drink and Be Merry
I never trust my iPhone app I use when it comes to calculating the calories I’ve burned on a given ride. It’s just an algorithm, after all, based on the various inputs, and surely not terribly accurate. Still, it’s fun to see a number in the 4,000s after a particularly hard day in the saddle. And no matter what the number, rest assured that your body’s metabolism kicks into high gear during consecutive days of hard riding. And it needs the fuel to power you through each day.
So, eat, drink and be merry. Stop and munch at every rest stop. (I live in the Peach State, but the fresh peaches at every rest stop throughout the week in Wyoming were the tasty equal of anything I could get at home. And the Salted Nut Rolls were better than any candy bar I think I’ve ever had! I loved those things!).
Stop for lunch along the route, if options are available. And eat a big dinner every night. Treat yourself to a beer or two while you’re enjoying talking to new, and old, friends about the day’s ride, and what to expect tomorrow.
Heck, not worrying for a second about what you’re eating is one of the joys of a multiday tour. And meeting, riding and hanging out with friends is another.