
By Rick Schultz
You just received your new Peloton bike and have gone through Peloton’s master fitter extensive bike fitting process by adjusting the saddle to your hip and placing your elbow at the tip of the saddle and fingertips on the handlebars. Perfect, what could go wrong? After several rides you notice that your knees are starting to hurt, maybe even swelling a little, and your hips hurt some as well. You raise the saddle, you lower the saddle, you move the saddle forward you move it back, nothing seems to help the pain in your knees.
The #1 and #2 problems with the Peloton are discussed below and these can easily be fixed by a competent bike fitter. We, at Bike Fitness Coaching have completed well over 250 Peloton fits, mainly helping mitigate knee and hip pain. So, what are the main causes?
Problem #1
The crank arms are too long for most Peloton riders. This goes for actual bicycling as well. Too long of crank arms can cause the knees to have too much flexion during the pedal stroke which can cause excessive sheer and compressive forces on the patellofemoral head, excessive sheer and compressive forces on the meniscus, and the abrading away of the articular cartilage. All of these are bad for the knees.
So, let’s just raise the saddle?
This old wives’ tale I hear all of the time. My answer is always, “We will need to raise it higher than the point where you cannot reach the pedals anymore. Now what?”
So, let’s just change the crank arms to shorter ones?
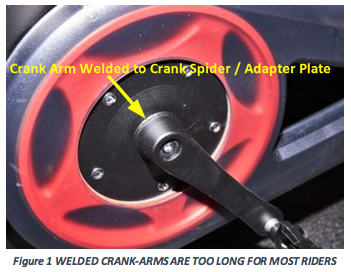
The main problem with this is that the drive-side (right-side) crank arm is welded to the black adapter plate which is bolted to the red pulley wheel [Figure 1]. Shy of using an angle grinder, there is no way to separate the crank arm from the adapter plate. Even if you could, Peloton only offers one-size of crank arm for all of their bikes.
What is the solution?
Our comprehensive solution includes a consultation, and complete Peloton bike fit including cleat placement, crank arm fix and saddle and handlebar adjustments.
Problem #2
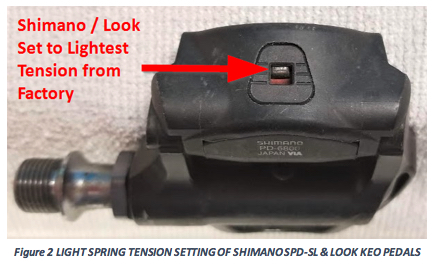
Currently, Peloton uses a LOOK DELTA-style pedal and cleat system. The problem is that the spring tension on these pedals is set way-too high from Peloton, whereas comparable ‘road’ pedals from Shimano (SPD-SL) and Look (KEO) are set to the lightest setting from the manufacturer (Figure 2).
As a bike fitter for the past 12+ years, I have seen thousands of pedals, in all different kinds of conditions, from new to worn out and everything in between. Most of the pedals I see at my studio are Shimano SPD-SL, Look Keo, Speedplay Zero, and Assioma Favero (power meter pedals) and 99.99% of them (except Speedplay, now Wahoo, i.e., no adjustment) come in still set to the lightest setting. Why is Peloton different?
What do all current road pedals have in common?
As stated above, you open a box of brand-new pedals from Shimano (SPD-SL) or Look (KEO) and every one of these has their spring tension set to low. When pedals are designed correctly, the cleats go in easy and extract with light to medium effort. Just enough force to hold onto the cleat while keeping the cleat from disengaging. This setup ensures that the cyclist experiences minimal twisting of the knee when extracting their shoe out of the pedal.
Removing shoes/cleats from Peloton’s Delta pedals requires such a high force that many of my smaller and lighter clients cannot even get their cleats extracted, so they just leave the shoes stuck in the pedals. For those that can extract their shoes/cleats, they must exert such an extremely high force to twist their feet that they end up twisting/torquing their knees, adding to their chronic knee pain.
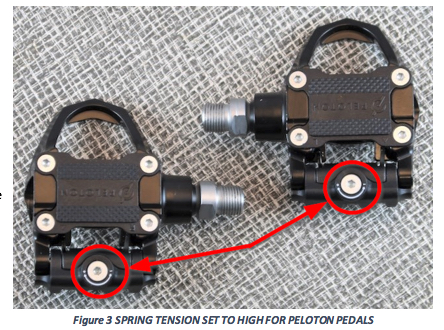
One solution is to loosen the spring tension (figure 3). Using the supplied 4mm Allen wrench, try turning each pedals’ spring tension screw counterclockwise 2 complete turns. If the shoes still feel hard to disengage, try one more turn. Any more than 3 turns and the pedals have a chance of falling apart. This happened with one client who wanted to loosen them as far as she could and the whole spring tension assembly, including the spring fell out of the back of the pedal, so be careful when loosening over 3 turns.
Another solution is to upgrade to a Shimano or Look pedal system. For 2021, here are some options.
Top of the line, world tour pro level pedals are not really required and similar pedals in the same product line can be obtained for less than half the price and no reduction in quality or usability. Sorted by price,
- SHIMANO ULTEGRA PD-R8000 ($200) –maybe a little overkill?
- SHIMANO 105 PD-R7000 ($150)
- LOOK KEO 2 MAX CARBON ($135)
- LOOK KEO 2 MAX ($110)
- SHIMANO PD-R550 ($100)
- LOOK KEO CLASSIC 3 PLUS ($80)
Of course, new cleats will come as part of the pedal system, and we at Bike Fitness Coaching can help you get all the above installed onto your Peloton (or other) shoes, which brings us the last point.
What Shoes Do We Recommend?
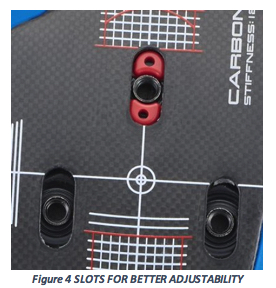
The short answer is any shoe you are comfortable with. This can be an MTB-style shoe using SPD-type cleats or you can use a road shoe AS LONG AS THE ROAD SHOES USE CLEAT SLOTS INSTEAD OF HOLES (figure 4), and, of course, the shoes need to be comfortable, be wide enough and long enough.
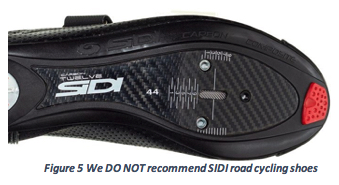
What Shoes do we NOT Recommend?
Sidi road and ‘Sidi copies’ by other manufacturers.
Why? Two reasons,
- Holes, no slots. In other words, we only have the cleat itself to adjust foot placement. For shoes with slots, we can also use the shoe to help position the cleat correctly.
- On many of Sidi’s shoes, the 3 cleat holes are positioned further forward compared to other manufacturers shoes making it impossible to position the cleat for correct foot placement. In fact, I have NEVER been able to get any clients’ cleats positioned correctly with Sidi Road shoes.
For those interested, examples of well-designed shoes are Shimano, Lake Cycling, Fizik Vento or Aria r3, etc., but you need to look carefully since not an entire product line from a manufacturer will include slots.
Hopefully this will help with understanding what is causing your knee pain and we ask that you contact us with any questions you might have or fittings you wish to schedule.
Coach Rick Schultz is an avid cyclist who has trained, raced, and coached in Southern California and now resides in Bend, Oregon where he works as a bike fitter and bike fit educator. Rick is an engineer by trade and a prolific cycling product reviewer. He’s the author of Stretching & Core Strengthening for the Cyclist in the RBR eBookstore. Check his coaching site, www.bikefitnesscoaching.com. Click to read Rick’s full bio.