More on Matte Carbon Care and Avoiding the No. 1 Bike Touring Mistake

In last week’s column about cleaning and polishing carbon bicycles with matte finishes, we asked you for recommendations for bicycle-specific products (since the only ones I provided came from the automobile industry).
Kudos to Michael Metzger from Burke, Virginia, who was the first to tell me about White Lightning’s Matte Finisher. Mike’s comment was followed by an email from Daniel Rowe from Finish Line USA, which also owns White Lightning bicycle care products.
Dan says, “We recently came out with a new White Lightning product called Matte Finisher that is uniquely marketed for such applications. To the best of my knowledge, it’s the only product in the bicycle 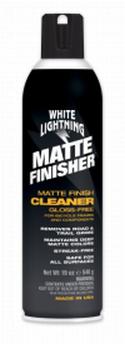 industry that addresses this growing application. We had it tested/approved by Trek, Fuji and Giant. It works wonderfully by providing a flat (not shiny) finish.
“Matte Finisher works on any matte surface including carbon, aluminum and titanium. It works on glossy surfaces, too. There’s no water rinsing required, either. Just spray it on and then wipe with a clean rag.” About $10 for 19-ounce spray can. We’re hoping to try some soon.
We also heard from a reader named Gerard with another interesting tip you might want tolook into. He says that 3M makes a matte film that’s used to protect signs that works perfectly on flat matte bike finishes. Says Gerard, “I get mine on Amazon in rolls that are cut to different widths. Additionally I use the Chemical Guys wax and cleaning/protectant you mentioned last week and it works well. It shields the finish from water marks when washing the bike, too.”
Thanks a lot Michael, Dan and Gerard!
Perhaps the biggest mistake tourists can make
Even though I’ve turned into a road racer, my roots in pavement pounding come from touring. Attracted to it for the adventure, I started as a teenager and made every mistake, such as hardly ever shifting gears, not carrying a pump, tube or patchkit and riding without a shirt – under the blazing hot August sun. That dumb mistake led to sunstroke that nearly hospitalized me.
Later I put my school-of-hard-knocks bike touring education to great use commuting to work 25 miles each way for 6 months, carrying my change of clothes, lunch and repair kit in rear panniers and equipping my Richard Sachs custom tourer with fenders, lights and lower gearing so my tired legs could climb easily after long days at the bike shop.
All that commuting was great preparation for my longest ride, which covered 5,000 miles across the USA, leaving New England in October and reaching the Bay Area of California in January. The smart way to do the crossing is in the spring or summer, and west to east, to take advantage of the prevailing winds. But, since I wanted to ride to the Golden State, that was my only option.
Today, touring is still in my blood and I look for fully loaded pedalers when I’m riding or driving remembering what it’s like to be out their self-supported in a far-flung location. I wave or stop If they look like they need help. This summer I was doing that during our RV trip up and down the Oregon coast, which is where the Oregon Coast Bike Route is. It follow highway 101 with its spectacular views and picturesque lighthouses.
Tip: Here’s an informative pamphlet about the Oregon Coast Bike Route.
During our Oregon trip, I bet I spotted over 50 tourists, and I was surprised to see that about 75% of them were wearing backpacks full of gear (not hydration packs). And, these were seriously equipped tourists with racks and bags on nice modern road bikes (with a few hybrids) — not someone running errands.
Don’t be the mule
It made me think of interviewing the late Sir Alex Moulton in London. Moulton was a genius engineer who invented the famous Mini automobile’s suspension and later designed the Moulton road bike. Among other groundbreaking innovations, like a one-size-fits-all frame and front and rear suspension, the Moulton bike accepts integral racks and bags. When another journalist asked Sir Alex why his road bike accommodates sizable front and rear bags that ride on dedicated racks, he laughed and asked him back, whether he thought that he made a better mule than his bicycle?!
So, seeing all those tourists suffering from the weight and heat and constricting straps motivated me to write this brief tip telling anyone about to hit the road by bicycle to leave the backpack home! Well, feel free to tuck a small daypack in your cycling bag for use hiking off the bike if you wish. But, don’t burden yourself with a backpack while riding.
Instead, simply get larger bags for your bicycle or add bags to carry any extra gear that you think requires a backpack. Today, with traditional road touring, gravel grinding and off-road bike packing, there are seemingly endless ways to hang gear on your 2-wheel beast of burden. For example, you can add a front rack and front panniers (if you’re only using rears). Or add a handlebar or frame bag. There’s never a good reason for being the mule. You won’t get tired as fast and you’ll enjoy the ride a lot more, too.
Tip: A few other reasons it’s best not to tour wearing a backpack include: if you choose bright cycling jerseys to improve visibility/safety a backpack will block the jersey from view; backpacks make it harder to access rear jersey pockets; even the best backpack straps restrict freedom of movement to some degree; carrying weight on your back adds to the pressure on the seat and saddle sores are among the most common issues of touring; and it’s easier to lose a backpack since it doesn’t have a dedicated spot it attaches on the bike, which could be a disaster if your valuables are in it.
In alpha order, here are links to just a few highly regarded touring companies with many options for loading up your mule rather than yourself:
