Fixing Sloppy Rear Mechanical Shifting
Usually, it’s relatively easy and quick to fine-tune rear mechanical shifting issues and fix them. And, if the quick fix doesn’t work, it’s only a bit more work to investigate, find and solve the problem. Instructions for both approaches follow.
Disclaimer: These tips are for non-crashed or -abused road bicycles with cable-operated mechanical rear derailleurs and what’s known as “index shifting.” You have this type of shifting if your right shift lever clicks into gear when you operate it. And, while some of these instructions can relate to front shifting, too, the tips are mainly for the rear shifting because that’s used the most and what goes out of adjustment most often.
Easy adjustment
The most common rear shifting issue is the chain hesitating to go into the next easier gear (next larger cog). You click the lever, but instead of the derailleur crisply shifting the chain into gear, it makes a clattering noise and you have to overshift the lever to make the shift (or it might not make the shift no matter what).
The most common reason this happens is because the shift cable stretched. That creates slack in the cable. This slack changes how far the derailleur moves with each click of the shift lever. And, when the cable can’t move the derailleur far enough, the derailleur won’t be able to shift the chain onto the next cog.
Using the barrel adjuster
Fortunately, most bicycles have a built-in barrel adjuster (illustration) for taking up any cable slack and fine-tuning your shifting. Look for it on the back of the rear derailleur. You’ll 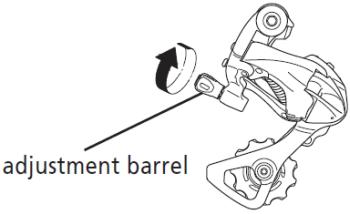 see the adjuster if you follow the cable path to where it enters the derailleur. The adjuster is knurled for turning by hand, no tools needed.
To fix the shifting hesitation, turn the adjuster counterclockwise in 1/2-turn increments, check the shifting after each 1/2 turn, and repeat until each click of the shift lever hits the next gear smoothly. Usually, it’ll only require a handful of half turns at the most.
Troubleshooting and repairing when the easy adjustment isn’t enough
When the derailleur adjusting barrel doesn’t solve your shifting issue, taking a more systematic approach is the best way to figure out and fix what else might be wrong. What I describe here may seem like a lot of work. But with luck, you will just be checking these things and not doing too much work on the parts.
The reason to take this approach is to check everything in the rear shifting system so that you know everything’s working the way it should. What can happen is the adjustment can get messed up if too many changes are made over time, such as cable tensioning, derailleur limit screw changes and even swapping cassettes or rear wheels.
This systematic 7-step approach resets everything back to square one, so it works optimally again. Even if you choose not to do it, if you read it, you’ll know the procedure a pro mechanic will use and can ask for it at the shop.
Step 1. Start by removing the rear wheel and trying to turn the nuts on the axle ends with your fingers. Occasionally these parts come loose and they can then move in and out, changing the axle spacing and shifting. Cassette cogs can loosen, too. Hold and try to wiggle them to check. There shouldn’t be any play between the cogs. If the nuts or cogs are loose, fix these issues.
Step 2. Before reinstalling the rear wheel, look at how the rear derailleur connects to the frame. Depending on your frame type, you will probably see some small screws holding the plate the derailleur is screwed into onto the frame. These need to be tight. Check with the right tool (usually a tiny allen wrench). Now that these things are checked, reinstall the rear wheel.
Step 3. Next, loosen the rear shift cable from the rear derailleur by loosening the cable anchor bolt. Once the cable is loose, hold the end of the cable between your fingers and pull on it. Hold on tight and operate the shift lever. Feel for if the cable moves nice and smoothly and if the lever moves into all its positions without any issues. If the lever doesn’t work right, that could be the cause of the shifting problem, and a lever repair or replacement might be needed. Usually they don’t fail, though. A more common thing is to find something dragging in the cable, either rust or a frayed cable inside the housing, or a bent or cracked or crushed piece of housing (replace bad cables/housing). If the cable feels nice and smooth and the lever works perfectly, that’s great.
Step 4. With the cable still NOT tightened in the derailleur anchor bolt, you can check the derailleur limit screw adjustments with no cable influencing how it shifts. To do this, suspend the bike and pedal with your right hand while gently pushing the derailleur in with your left hand and releasing it. The derailleur will walk the chain up and down the cogs as you do this, and you can watch it for problems. It should shift up onto the biggest cog nice and smooth and run nice and quiet up there. And it should drop onto the smallest cog quickly and accurately, too. If it doesn’t shift onto the smallest or largest cogs, fine-tune the high and low limit screws in 1/2-turn increments with a screwdriver until it does. Keep checking, shifting with your hand and pedaling with your other hand and make sure the limit screw adjustments are spot on.
Most component makers provide limit screw instructions online in their tech docs, or similar. That’s the best place to find the latest instructions for adjusting the limit screws on your specific derailleur. Here are generic instructions to get you going: Find the high and low limit screws on the rear of the derailleur, usually marked H for High gear and L for Low gear adjustment. To use them, understand that even 1/2 turns make a big difference in the adjustment. So turn one at a time and test the adjustment before fine tuning more. Also, remember what you did so you don’t get confused and can easily go back if you got it wrong or went too far.
You use clockwise turns of the screws to reduce how far the derailleur can move toward the spokes (the L screw), and toward the frame (H screw). To increase the derailleur’s range, you turn them counterclockwise. Once these limits are perfectly set for shifting to the smallest and largest cogs, note that there is no adjustment with the screws for fine tuning shifts to any of the other cogs. Instead, you fine-tune that adjustment by changing the cable tension with the barrel adjuster.
Tip: It’s worth taking your time and getting the limit screws set perfectly, because they’ll stay put and you may never need to touch them again for the life of the derailleur – as long as you don’t crash and bend the derailleur.
Step 5. To review: the rear wheel’s axle nuts and cassette cogs are good, the rear derailleur is tightly attached to the frame, the cable and the shifter are good, and the derailleur limit screws are perfectly adjusted. The final step is to remove slack in the cable and tighten it to the derailleur. First, check to make sure the rear derailleur is as far to the right (the bike’s drive side) as it will go, and holding the chain on the smallest cog. Also make sure the shift lever is in its starting position. In other words, where it is before you’ve made any shifts.
Step 6. Now, remove any slack in the cable by pulling on its end with pliers, and then tighten the shift cable to the derailleur with its cable anchor bolt. Do this carefully because there’s a fine line between too tight and just right. You’re just taking out the slack. You are not trying to make the cable really tight. If you pull too tight you can actually move the derailleur and change how it shifts.
Tip: A top tip that can save you if you get the cable too taut is to use the adjusting barrel on your derailleur as a cheat. Before tightening the cable, turn the barrel out about 3 or 4 turns and then remove the cable slack and tighten it to what feels right. You can tell on the first test shift if the cable is too tight because it will jump too far up the cogs and it won’t drop back down on the small cog. If that happens, now that the adjustment barrel was adjusted out (the tip), you can just screw it in to loosen the cable rather than having to loosen the anchor bolt and try again.
Step 7. The final step is fine-tuning the cable tension with the adjustment barrel so that each click of the shift lever results in a perfect shift.
A lot more things can go wrong with rear derailleurs and shifting, yet these basic procedures will go a long ways toward keeping your shifting — and you — happy.
Next week: replacing rear shift cables.